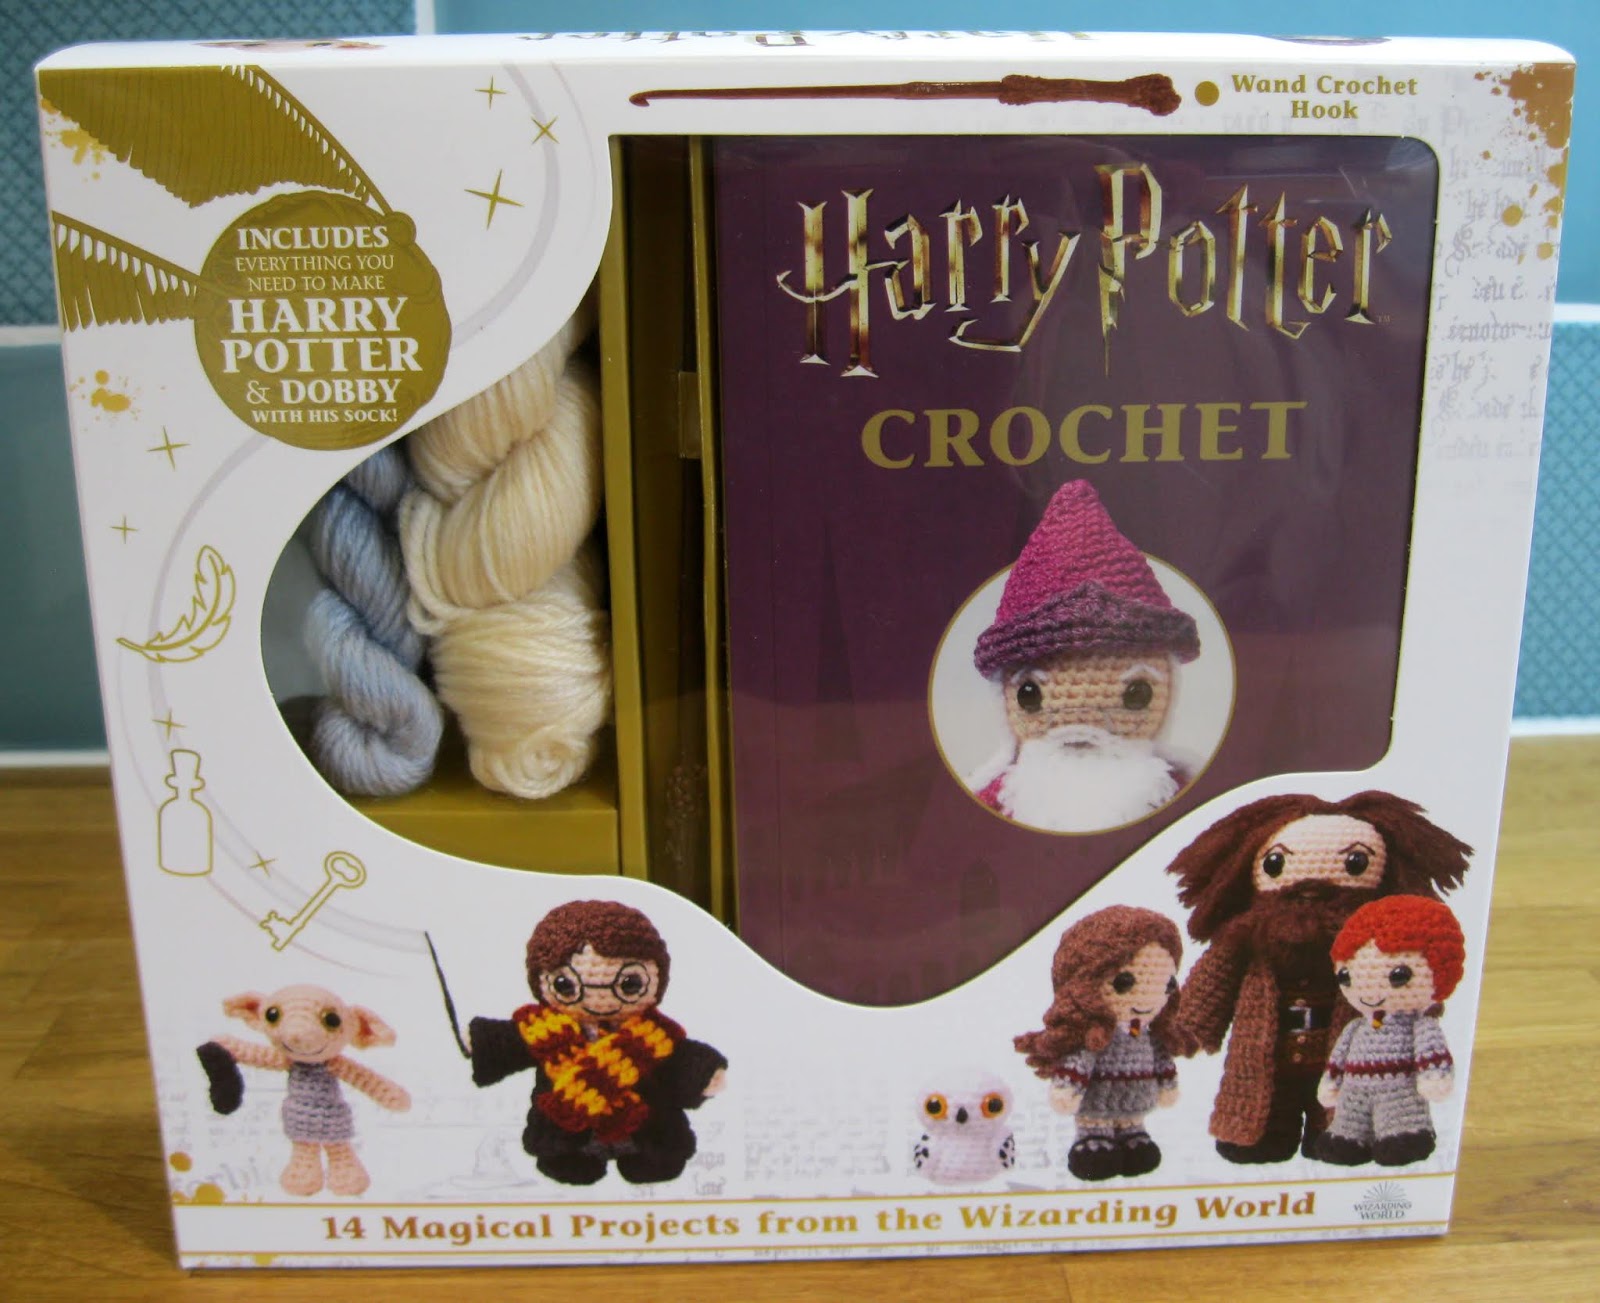
Friday 29 November 2019

Baby Yoda

So, who's watching the new Star Wars series, The Mandalorian? Not me unfortunately, because it's not available in the UK, but without even looking for spoilers I can't help but see images of the adorable baby Yoda that features in the show. It's not actually Yoda as a baby, but a member of his species, which doesn't have a name. The first thing I noticed when I looked at pictures of the cute little baby was that it looked a lot like my mini amigurumi of Yoda which appears in the Star Wars Crochet Kit and which is a small and very simplified version of Yoda.


So, I decided to try adapting that pattern a little to make it more like the baby in the show. If you have the Star Wars Crochet Kit then you can use these variations and make yourself your own tiny Baby Yoda. (Please note, I'm using US stitch names).

Follow the instructions to make the Head and Body as they are in the book, but use 9mm safety eyes for that big-eyed baby look.
After making the head change to dark beige yarn for the body on round 11.
When you get to round 20 don't change to green yarn and don't make the feet, just work 27 sc around.

Baby Yoda's ears are proportionally larger, so make them as follows:
Rnd 1: ch 2, work 6 sc into first ch - 6 st.
Rnd 2: 2 sc in each st around - 12 st.
Rnd 3: 2 sc in each of next 2 st, (hdc, dc) in next st, ch 1, (dc, hdc) in next st, ss in next st - end round here and FO.
Follow the rest of the instructions in the book to shape and attach the ears.


Start making the arms as described in the book, then after round 2 change to light beige yarn and work 6 x 2dc bobbles around. Change to dark beige yarn and work rounds 3 - 6 as in the book, miss round 7 and work round 8 as described.

To make the cowl neck collar using light beige yarn:
Ch 26.
Row 1: miss ch next to hook, sc in next 25 ch, ch 1, turn.
Row 2: sc in next 25 st, ch 1, turn.
Row 3: sc in next 25 st, FO.
Pin around the neck and top of the arms with the starting chain at the top. Overlap at the front as shown then sew in place. Fold over and secure the front with a couple of stitches.


I hope you enjoy making your own little Baby Yoda!

Wednesday 30 October 2019

Little Monster Finger Puppets - free crochet pattern


Here's a little treat for Halloween that's quick and simple to crochet.


You will need:
Small amount of yarn for the body, any colour you like (I think green or purple looks good).
Small amount of red yarn for the mouth and eyes.
Small amount of black yarn for eyes.
Tapestry needle.
3.5mm crochet hook (US E hook).

Finished size: approximately 4 cm/1.5” tall.

Abbreviations:
ch = chain
st = stitch or stitches
ss = slipstitch
sc = single crochet (US), double crochet (UK)
dc = double crochet (US), treble crochet (UK)
hdc = half double crochet (US), half treble crochet (UK)
BLO = back loop only
FLO = front loop only
tog = together
sc2tog = decrease by working two sc together
bob = bobble (see special stitch instructions)
FO = fasten off

General instructions:
This pattern is written using US crochet terms. For the UK equivalents, see abbreviations list.

Work in rounds unless otherwise stated and do not join rounds unless told to. Use a stitch marker to mark the start of a round - a small piece of different coloured yarn placed under the stitch at the start of the round will do. To start a round, you can use the magic ring method, but I prefer (ch2, work 6 sc into 1st ch). If you work the 6 sc over the tail of yarn as well you can use that to pull the hole tight. You can find a detailed tutorial on how to do this here on my blog.

Work through both loops of stitches unless otherwise indicated.

Special stitch instructions:
3 dc bob: bobble stitch for nose. YOH (yarn over hook), insert hook into next stitch, YOH and pull through loop, YOH, pull through 2 loops, *YOH, insert hook into same stitch, YOH and pull through loop, YOH, pull through 2 loops, repeat once from*, YOH, pull through all 4 loops on hook.


Start with yarn for body.
Round 1: ch 2, work 6 sc into 1st ch - 6 st.
Round 2: 2 sc in each st around - 12 st.
Round 3: [2 sc in next st, sc in next 3 st] 3 times – 15 st.
Round 4: sc in each st around - 15 st.
Round 5: sc in next 6 st, 3 dc bob in next st, sc in next 8 st – 15 st.
Round 6: sc in next 4 st, [FLO: sc in next st, 2 hdc in next st, hdc in next 2 st, 2 hdc in next st, sc in next st], sc in next 5 st – 17 st.
Round 7: sc in next 4 st, change to red yarn, [work in back loops remaining from working in front loops in previous round: hdc in next 6 st], change to body yarn, sc in next 5 st – 15 st.
Cut red yarn, leaving a length to sew the eyes. Sew 4-5 lines vertically over rounds 3 and 4 on either side of the nose. Use black yarn to sew a dot in the centre of each eye. Secure ends of yarn.
Round 8: sc in next 5 st, [FLO: sc in next st, 2 hdc in next st, hdc in next st, 2 hdc in next st, sc in next st], sc in next 5 st – 17 st.
Round 9: sc in next 5 st, [work in back loops remaining from working in front loops in previous round: hdc in next 5 st], sc in next 5 st – 15 st.
Round 10: sc in next 3 st, [arm: ss into next st, ch 7, turn, ss into next 2 ch, (ch 3, turn, ss in next 2 ch) 2 times, ss into next 4 ch, ss back into original st on round], sc in next 7 st, [arm], sc in next 3 st - 15 st.
Round 11: sc in each st around (work into the first ss used to make each arm, not the final ss) - 15 st.
Round 12: sc in each st around - 15 st.
Ss in next st, FO and weave in end of yarn.

Stick it on your finger and have some monstrous fun!


Thursday 10 October 2019

Harry Potter Crochet - yarn used


My latest book of patterns, Harry Potter Crochet, has just been released in the US! It comes as part of a kit which includes the yarn to make Harry and Dobby, and a crochet hook shaped like Harry's wand. If you want to watch me opening up the kit, check out this video on YouTube.


To help in finding the right colours of yarn to make the characters, I've made a list of all the yarns I used, and the approximate amounts needed for each figure. I live in the UK, so that's where I get all my yarn from. I use double knitting (DK) weight yarn, equivalent to 3:light weight in the US, and 8 ply in Australia/NZ - there's a yarn thickness guide on Ravelry which is very helpful. (By the way, the yarn I used is not the same as the yarn in the kit. That isn't a particular brand, and was sourced by the publisher separately.)

If you can't get hold of the yarns listed below, you can at least look at them in an online store such as Wool Warehouse or LoveCrochet, which might help you find equivalents closer to home.

I used mostly Hayfield Bonus DK (HBDK) and Stylecraft Special DK (SSDK). Hayfield is a great yarn for making amigurumi (toys worked in the round) as it's quite sturdy and doesn't get squashed by working tightly, which you have to do when you're crocheting like this. Stylecraft is a little lighter and works better for clothes (when you're not working so tightly) as it gives a little bit more drape at this very small scale. I also used it for some hair, but not Hagrid's, as it wasn't very easy to brush out.

Harry Potter
5g pale peach yarn - HBDK Flesh Tone (963).
5g mid grey yarn - HBDK Silver Grey (838).
5g dark grey yarn - HBDK Dark Grey Mix (790).
5g black yarn - HBDK Black (965).
5g dark brown yarn - SSDK Dark Brown (1004).
Small amount of white yarn - HBDK White (961).
Small amount of maroon yarn - HBDK Claret (841).
Small amount of yellow yarn - HBDK Sunflower (978).

Hermione Granger
10g pale peach yarn - HBDK Flesh Tone (963).
5g mid grey yarn - HBDK Silver Grey (838).
5g dark grey yarn - HBDK Dark Grey Mix (790).
5g black yarn - HBDK Black (965).
10g  light brown yarn - yarn used now unavailable, try HBDK Walnut (927) or Stylecraft Life DK Bark (2448).
Small amount of white yarn - HBDK White (961).
Small amount of maroon yarn - HBDK Claret (841).
Small amount of yellow yarn - HBDK Sunflower (978).

Ron Weasley
All the same as Harry, apart from yarn for hair:
5g russet yarn - SSDK Copper (1029).

Student robe and Scarf Pattern
10g black yarn - SSDK Black (1002).
5g maroon yarn - HBDK Claret (841).
5g yellow yarn - HBDK Sunflower (978).

Dobby
15g pale peach yarn - HBDK Flesh Tone (963).
10g mid grey yarn - HBDK Silver Grey (838).
Small amount of black yarn - HBDK Black (965).

Rubeus Hagrid
15g pale peach yarn - HBDK Flesh Tone (963).
10g medium brown yarn - HBDK Chocolate (947).
10g maroon yarn - HBDK Claret (841).
10g black yarn - HBDK Black (965).
25g dark brown yarn - Robin DK Brown (51).
25g light brown yarn - yarn used now unavailable, try HBDK Walnut (927) or Stylecraft Life DK Bark (2448).
Small amount of silver grey yarn (for belt buckle) - HBDK Silver Grey (838).
Small amount of beige yarn (for buttons) - HBDK Walnut (927).

Norbert The Dragon
25g green yarn - HBDK Orchard (904).

Albus Dumbledore
10g pale peach yarn - HBDK Flesh Tone (963).
20g purple yarn - HBDK Velvet Plum (906).
20g magenta yarn - SSDK Plum (1061).
5g black yarn - SSDK Black (1002).
10g white yarn - HBDK White (961).

Minerva McGonagall
10g pale peach yarn - HBDK Flesh Tone (963).
30g black yarn - HBDK Black (965).
15g dark green yarn - SSDK Bottle (1009).
10g beige yarn - HBDK Walnut (927).

Sorting Hat
15g medium brown yarn - HBDK Chocolate (947).
Small amount of black yarn - HBDK Black (965).

Voldemort
10g pale peach yarn - HBDK Flesh Tone (963).
35g black yarn - HBDK Black (965) for body (optional 15g SSDK Black (1002) for the robe only).

Severus Snape
10g pale peach yarn - HBDK Flesh Tone (963).
20g dark blue yarn - HBDK Navy (971).
10g black yarn - HBDK Black (965).
Small amount of white yarn- HBDK White (961).

Ginny Weasley
5g pale peach yarn - HBDK Flesh Tone (963).
5g red yarn - HBDK Classic Red (833).
5g medium brown yarn - HBDK Chocolate (947).
5g black yarn - HBDK Black (965).
10g russet yarn - SSDK Copper (1029).
Small amount of yellow yarn - HBDK Sunflower (978).

Broomstick
2g light brown yarn - yarn used now unavailable, try Robin Mink (0143) or Stylecraft Life DK Bark (2448).
Small amount of beige yarn - HBDK Walnut (927).
Small amount of grey yarn - HBDK Silver Grey (838).

Hedwig
10g white yarn - HBDK White (961).
Small amount of black yarn - HBDK Black (965).

*Edited to add errata:
Unfortunately the instructions for a 2 dc bob and a 3 dc bob (bobble stitches) were missed out of the book. Here they are:
2 dc bob: YOH (yarn over hook), insert hook into next stitch, YOH and pull through loop, YOH, pull through 2 loops, YOH, insert hook into same stitch, YOH and pull through loop, YOH, pull through 2 loops, YOH, pull through all 3 loops on hook.

3 dc bob: YOH (yarn over hook), insert hook into next stitch, YOH and pull through loop, YOH, pull through 2 loops, *YOH, insert hook into same stitch, YOH and pull through loop, YOH, pull through 2 loops, repeat once from*, YOH, pull through all 4 loops on hook.

Rubeus Hagrid pattern, p38. Just before instructions to make the left leg it should read "First, to split the body in half, find the front middle of your figure between two stitches on round 40", not round 35.
To make a foot, p39, it should say 'find the stitch in round 52 that is in the front middle.', not round 47.

Harry's hair, p21, Row 12 should read 'sc in next 16 st, ch 1, turn - 16 st.'

Minerva McGonagall:
Arms, p54, Rnd 2 should read '[2 sc in next st, sc in next st] 3 times - 9 st.'
Robe, p55, Rows 12 - 14 should read '(3 rows) sc in next 26 st, ch 1, turn - 26 st.'

Voldemort, robe, p63, Rows 12 - 14 should read '(3 rows) sc in next 26 st, ch 1, turn - 26 st.'


Thursday 12 September 2019

Fizzgig Amigurumi


When I started watching The Dark Crystal: Age of Resistance, and knowing that I was going to the Into Thra exhibition in a few days, I just knew I had to crochet something to take along. The obvious choice was to make Fizzgig - I loved him in the original film, and members of his species (which is actually Fizzgig) obviously appeared in the new show, as I kept seeing them in promotional meterial. The only problem was that I had limited time to make him, and I was binge-watching the show in the same time. You'd think that I could make him while I was watching, wouldn't you? I mean, I normally crochet while watching TV, in fact my fingers start getting twitchy if I don't have a project on the go. However, Age of Resistance is such a visual treat that I couldn't risk missing any of it, so I had to crochet in the time I had between the episodes.


The basic technique I used to make Fizzgig was to use loop stitch which I then cut, and fluffed up the yarn using a wire pet brush. I wasn't sure when I started what direction to work in, because I didn't know which direction the fluff would go once it was brushed. I also had the problem that I only had one ball of the yarn I used, and loop stitch uses up a lot of yarn! I didn't bother to make him fluffy at the bottom to save on yarn, and I was really worried that I'd run out as I was making the tail and the feet. Luckily I had just enough, although annoyingly it seems that this colour of yarn is not being produced any more.


I've used the technique of making something furry/hairy by using loop stitch before, but only on much smaller pieces, like the beards for my dwarves, so it was hard to know how well it would work. I was also unsure of how to make the face, but it turned out that just inserting the eyes and sewing on the nose and mouth flattened the fur in that area so the face can be seen. I did think about making a version with an open mouth, or even a puppet version where I'd be able to operate the mouth, like the monster I made a while ago, but I figured that would take longer to get right, so I stuck with a Fizzgig with a closed mouth.


Strictly speaking Fizzgig have four feet, each with four toes, but being limited for time (I was sewing the feet on at 11.00pm the night before I went to the exhibition) mine only has two feet with three toes. Size-wise he ended up larger than I'd planned, nearly lifesize, when I had intended him to be much smaller (maybe large grapefruit size) so he'd be easier to fit in my bag, but that's what happens you make something so fluffy!

A few small issues aside, I'm really pleased with him, and I'm so happy with the way the texture of his fur looks. He's very tactile, and I love stroking and cuddling him. His slightly grumpy face also reminds me of my dog!


Tuesday 10 September 2019

The Dark Crystal

I first saw The Dark Crystal on the big screen when it came out in 1982. I was 12, and I was instantly enchanted. I loved the characters and the story, but what particularly caught my attention was the world-building, and all the different creatures that inhabited the world of Thra. I really wanted to make my own strange and wonderful creatures, but I wasn't sure how I would achieve that. It wasn't until I realised that crochet could be used to make things in three dimensions that I started to work on my own creations, and I was very much inspired by Brian Froud, the artist who designed the world of the Dark Crystal.


 Various creatures I've made that have had a bit of inspiration from Brian Froud's creativity.

So, you can imagine how excited I was when I heard that Netflix were making a prequel series to the film - The Dark Crystal: Age of Resistance. A few weeks ago I saw that the magazine SFX was offering readers the chance to go to a talk with Brian Froud at the 'Into Thra' exhibition in London (for free!) and, being lucky enough to live fairly close, I booked it immediately.

Once the show was released I binged it in a few days, so that I would have finished before going to the exhibition. As I started watching I knew that I had to crochet something to take with me, and the obvious choice was Fizzgig, the fuzzy little friend of Kira in the film. His species appears in the prequel, including one with an eyepatch called Baffi. I will write a separate blog post with more details about making him, but suffice to say that I just finished him in time, and so he made the trip up to London with me. My rucksack was rather full, but luckily he's mostly fluff, so he didn't weigh too much!


I had a fun day up in London, visiting the British Library and the National Gallery, and in the early evening I headed to the BFI Southbank. When I arrived I was greeted by sight of the Emperor on his throne, Aughra in a glass case, and staff who were all wearing 'Order of Lesser Service' t-shirts (which I would very much like to have). We all went into a screening room to watch The Crystal Calls, the 'making-of' documentary which is also available on Netflix. I'd already seen it, but it was good to watch it on the big screen. Then Brian Froud came on stage (to loud applause) and was interviewed. He was just as lovely as I'd hoped he'd be, full of lots of interesting information about his work on the film and the show. He joked that after seeing his younger self on the documentary, he was turning into one of his creations!

He talked a little bit about how great it is to create something entirely with puppets, because of the reality they bring. He's not against CGI (and he thought that Jim Henson would have embraced it, as he loved new technology), and said what a useful tool it was on the show, to remove puppeteers in green screen and add more details to the puppets' expressions. However, he did say that CGI characters often lack weight, and that animators would do well to create puppets of their characters to see how they move in the real world.

Lore, an unusally shaped puppet (no spoilers, but if you've seen the show you'll know which character this is) was performed using the Japanese Bunraku style of puppetry, where you can see the puppeteers, but they were removed to give a character with a really unusual way of moving. An interesting mix of an ancient art and modern technology. Brian said that Lore was insprired by the stone tors on Dartmoor, where he lives, and the head was based to some degree on a hamburger!

Brian talked about the fact that Thra has a very different sensibility to our world. Everything is alive - rocks, plant, maybe even clothes. You'll see on the documentary that the people who made the costumes tried to neaten up his designs, not realising that the clothes are supposed to be asymmetrical and organic to a degree. Many of the costumes were made from expensive fabrics, and some of the designers were horrified by the amount of 'aging' he and his wife Wendy were subjecting them to to make them look more like they fit in the world. Luckily the director, Louis Leterrier, was fully behind what they were trying to create or, in this case, destroy.

Brian and Wendy wanted to spend time at the beginning of preparation for the series to make lots of background creatures, which is something they did when they started work on the original film. Unfortunately there wasn't time in the schedule for this and they had to get straight on with the main characters. So they came in at weekends (I think along with their son Toby who also worked on the series) and made little creatures, often out of scraps in the bins, to go in the background of the scenes. However, when Louis saw them he liked some of them enough to put in the foreground!

One fact Brian shared was that when he started designing the Mystics for the original film, Jim Henson suggested he base them on trolls that he drew. The only trouble with this was that any designs he made for the film became the property of the Henson Company, and he didn't want to lose the copyright on creatures he'd already designed, so he gave the Mystics and extra pair of arms, thus making them different enough. The Skeksis also have four arms, but on most of the the second pair has atrophied and is hidden in their clothes, although there's a new Skeksis character in the series that uses all four of his arms.

A question was asked about whether it was his decision for the Gelfling to have a matriarchal society He said that was down to the writers, but that they'd been inspired by the 'Wall of Destiny' he designed for the film which teaches Jen and Kira about the prophecy they are part of. It features a queen figure, which became the All-Maudra in the show. It also inspired the pink Sanctuary Tree which Brian was a bit confused by, until he realised that the image they thought was a tree was actually supposed to be a castle!

All in all Brian talked for about an hour, and he was fascinating to listen to. He mentioned that when people met him, so many said that they had been inspired to do something creative or work in a creative job after watching The Dark Crystal or Labyrinth, and I saw many heads nodding in the theatre. I know it's true for me, and the person I chatted to next to me was working on a stop-motion film, so I think that's very much the case.


Various otherworldly beings - over 70 different species were created for the series.

 Brea's journal, paints and paintbrushes.

Brea's journal and another book from the library.

After this, we were able to go and look at the exhibition, which was just crammed with interesting items and puppets from the show. There were displays of various small creatures, props, photos, scale models, and a Podling bottom! Round a corner was the Crystal itself, glowing purple, and then a table set with Skeksis delicacies and with the Chamberlain enjoying them. Round another corner were various tableaux, filled with the plants and animals of Thra, as well as several Podlings, and the  Gelfling stars of the show. It was all a treat for the eyes, and I managed to get a photo of Fizzgig in his natural environment.

 Fizzgig and I enjoying a meal with the Chamberlain. The Gelfling ears were part of the experience!


 Deet

 Brea
 
 Rian


Podlings, and a Podling bottom!

Fizzgig, feeling right at home.


Afterwards I picked up a free poster, and a can of Stone-in-the-Wood pale ale! I had a great time that evening, although sadly the exhibition is now over. If you're a fan, and it appears anywhere near you, make sure you go along! In the meantime, I hope you enjoy all the photos, and I'll post more about making Fizzgig in my next post.


Monday 5 August 2019

Mooncake Amigurumi


Earlier this year I asked my brother for ideas for a birthday present for my nephew (he's in his 20s) and he suggested that I could crochet him something. He sent me a photo of Mooncake, a cute little green alien which appears in the animated series Final Space, which I'd never seen. So, of course, I had to check it out (series one is on Netflix) and really enjoyed it. I fell in love with the little alien that flies around in space making funny noises, and who turns out to be much more powerful than his appearance would suggest.


I thought it would be an easy pattern to design, but in fact it took a lot of tweaking to get the shape and proportions right. As with any amigurumi made up mostly of a large shape, it takes a lot of stuffing, much more than you think. You just have to keep adding the stuffing, a bit at a time, until the it really hold its shape.


If you would like to buy the pattern, it's available on Etsy and Ravelry.