Friday, 30 October 2020

Super Quick Snake - Free Crochet Pattern


These little snakes are quick and easy to crochet, they don't need stuffing and there's hardly any sewing to finish them off. They naturally curl around your fingers and are great for anyone who loves snakes. They would also make cool and creepy decorations for Halloween.


You will need:

Small amounts of 2 different colours of DK weight yarn to work together - green and black, or green and yellow make nice snake colours mixed together (thinner or thicker yarn is fine, just use a thinner or thicker hook).

Small amount of red yarn for the mouth and eyes.

Tapestry needle.

4.5mm crochet hook.

Finished size: approximately 18 cm/7” long.


Abbreviations:

ch = chain

st = stitch or stitches

ss = slipstitch

dc = double crochet (US), treble crochet (UK)

hdc = half double crochet (US), half treble crochet (UK)

tog = together

dc2tog = decrease by working two dc together (see special stitch instructions)

FO = fasten off


General instructions:

This pattern is written using US crochet terms. For the UK equivalents, see abbreviations list.

The head is worked in rounds and is not joined. To start a round, you can use the magic ring method, but I prefer to work into the  1st chain stitch, working over the tail of yarn and using that to pull the hole tight.

Special stitch instructions:

Dc2tog: YOH (yarn over hook), insert hook into next stitch, YOH and pull through loop, YOH, pull through 2 loops, YOH, insert hook into next stitch, YOH and pull through loop, YOH, pull through 2 loops, YOH, pull through all 3 loops on hook.


Starting at the head, holding both strands of yarn together:

Round 1: ch 3, work 8 dc into 1st ch - 8 st.

Round 2: dc2tog 4 times - 4 st.

Ch 21, sc into 2nd ch from hook, sc into next ch, 2 hdc into next 18 ch.

Ss into next st on head, FO leaving some yarn.

Using the red yarn sew one eye with three short lines. Take the yarn out of the small hole where you started the head and make a tiny stitch to secure it. Make a loop for the tongue and secure it with another tiny stitch, then sew the other eye and secure the end of the yarn. Cut the loop of yarn to look like a forked tongue (if it frays put a tiny bit of glue on the strands). Use the ends of yarn from the snake’s body to sew up the back of its head and weave in any ends.


Friday, 2 October 2020

Tree Folk and Fungus Folk Amigurumi Pattern

I love my walk every day through local fields and woods, getting to see beautiful trees and spot toadstools popping up through the earth at this time of year. These two patterns celebrate, in cute amigurumi form, my fondness for these elements of nature. 


These two types of creature are not in scale with each other - true Tree Folk are much more mighty than these little fellows, whereas Fungus Folk are small and unexpected, brightening the woods with their colourful caps.

If you need a little friendly Tree Folk or Fungus Folk in your life, this pattern has all the details you need to make them, with lots of photos to illustrate the more complicated elements. Depending on the yarn you use (I used DK weight, but slightly thinner or thicker yarn will work just fine) the Tree Folk will end up about 12cm/5" tall, and the Fungus Folk will be 10cm/4" tall.

For the Tree Folk you can use a range of yarn colours: different greens for the crown (variegated colours look good) or russet if you want an autumnal tree, and various browns and grey for the trunk. For the Fungu Folk the instantly recognisable red with white spots of the Amanita muscaria or fly agaric is a great choice, but you can make it in any colour, or to look like any mushroom you like.

Find the pattern in my Etsy shop, or on Ravelry.


Sunday, 16 August 2020

Fuzzy Troll Amigurumi

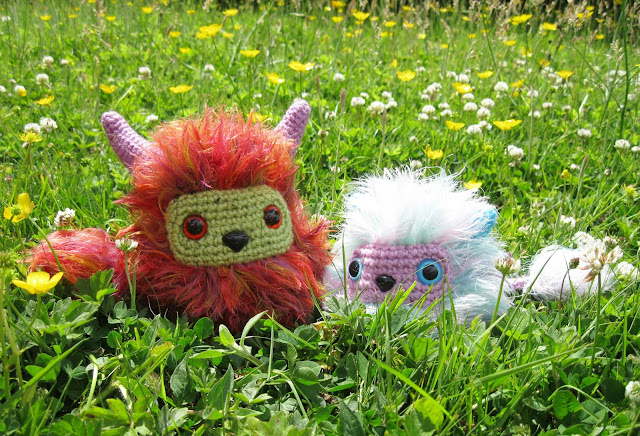
Whenever I go into a yarn store, I can't help but be tempted by those fuzzy fun fur-type yarns, they look so fluffy and tactile. The sort of yarns I'm talking about, sometimes called eyelash yarn, have a thread base with strands sticking out from this. Back when I had just started making amigurumi I bought quite a lot of them, in all sorts of different colours, and then I had to work out what to do with them. I ended up using them to make Fuzzy Trolls for my children, but until now I hadn't got round to turning this design into a pattern.

These trolls are friendly little creatures, who love nothing more than relaxing in a meadow filled with wildflowers. They are brightly coloured, with horns and long fuzzy-ended tails, and the pattern gives you all the details you need to make either a large (15cm/6" tall) or small (12cm/5" tall) fuzzy troll.


My new pattern is available on Etsy and Ravelry, and because using fuzzy yarn can be a bit challenging, I have created a series of videos to take you through the whole process of making a Fuzzy Troll, which you can find on this playlist on my YouTube channel. 
Here is the first video, which tells you how to choose the fuzzy yarn you need.

Along with the pattern, you can work your way through all the videos in order and they will guide you through everything you need to do, or you can just check out any elements that you are unsure of.

This is my first time making video crochet tutorials, so I hope you find them helpful. They show a lot of tips and tricks as to how to make various elements of amigurumi, so you might find it useful to watch them, even if you're not making a troll. In the future I'd like to make some more, perhaps showing how to make some of my small free patterns in detail, hopefully that will be helpful to anyone who's new to making amigurumi.

Wednesday, 10 June 2020

Ahsoka Tano Amigurumi Pattern


My latest pattern, to make Ahsoka Tano from The Clone Wars, is now available to buy in my Etsy and Ravelry shops. The Clone Wars series has been responsible for some great serialised story-telling in the Star Wars universe, and for creating a character in Ahsoka who has become a fan favourite. She's introduced as Anakin's young padawan and is enthusiastic and honest, with a good moral compass. She's not perfect, she makes mistakes, but she has great character development over the series, and goes on to appear in Star Wars Rebels as well.


Ahsoka is a Togruta, with orange skin and blue and white head parts, consisting of two pointed montrals at the top and three tails, or lekku, at the bottom. Creating this at a relatively small scale (she's only 11 cm/4.5” tall) was quite the challenge, and it took quite a few attempts to get it right. Because of the complicated structure of the head piece I've added lots of photos into the pattern to explain each stage clearly, so I hope it won't be too difficult for people to follow.


I based this pattern on her look at the start of The Clone Wars, but it would be easy to alter it slightly to look like the outfit she wears from series 3. To make her with the dress and leggings rather than top, skirt and leggings, just crochet the orange skin section in the middle in brown instead, and use two chains of russet brown/dark orange yarn to make her belt. You can also make her an extra lightsaber. Her later grey/blue costume would just need changes in colour for the different parts, and white lightsabers.


I've listed the yarn I used to make her at the end of this post: Star Wars Crochet - yarn used. I hope those of you who are fans of Ahsoka will enjoy making this mini version of her!


Friday, 27 March 2020

Fizzgig Amigurumi Pattern


After I saw The Dark Crystal for the first time as a child I totally fell in love with Kira's adorable and occasionally grumpy pet Fizzgig. Who wouldn't love that ball of fluff? And then, when the prequel series Age of Resistance was released last year, I fell in love with the whole world of Thra all over again, with its multiple Fizzgigs in different colours, including one with an eyepatch!. I've already posted about making a Fizzgig for myself (here) and the trip I took him on to see The Dark Crystal exhibition in London (here).


After that I decided to write up the pattern but I immediately encountered a problem. Fizzgig's fluffy fur is made by working the loop stitch, cutting the loops and them brushing with a wire pet brush to separate the strands. The yarn I used, which had a mix of light brown colours and a loose twist, was perfect for this, but was unfortunately not being made any more. I then had to experiment with other yarns and found that Hayfield Bonus DK and Robin DK brushed out the right way, and so I chose different shades of light brown, beige, honey and gold yarn, and used two colours alternately to give the right look. I found that Stylecraft Special DK does not brush out well, but I would recommend that anyone who wants to make a Fizzgig tests the yarn they've chosen. I've used 100% acrylic yarn, which works fine, and acrylic yarn mixed with wool or alpaca should work, as I think would 100% wool or alpaca. Cotton yarn would not brush out in the same way.


Fizzgig have four feet...

...which you can just see peeping out under their fur.

They also have long, fluffy tails.

Luckily mixing two yarns together worked, and gave a nice result. I tweaked my original pattern a bit and made it slightly taller, as well as giving Fizzgig the correct number of feet (four). I decided against trying to make a version with an open mouth, as this would probably have to be a puppet, and I was more keen to create a solid toy.

Large and small versions.

Brushing the yarn to make it fluffy takes a fair bit of work, you need to sit down with a fun TV show or podcast and just work at gradually brushing a few strands at a time. Because of that I designed a smaller version that would be quicker to make, and still be just as cute. The larger version is about 22cm/8.5" tall, the smaller one is about 16cm/6.5" tall, and the pattern includes details to make eyepatches for both sizes of Fizzgig. You can buy the pattern on Etsy or Ravelry.


Friday, 14 February 2020

Jon Snow and Ghost


While the final series of Game of Thrones was showing last year, I started working on these patterns, but various things conspired to mean that I hadn't got them finally finished and written up until now! I know series 8 got some mixed reviews, but I enjoyed it, and I thought the show as a whole was great. Jon Snow was always one of my favourite characters, and had a fascinating journey thoughout the show. I've designed him with a couple of different looks - the loose curly hair and mostly black clothes of the earlier seasons when he was in the Nightwatch, and the longer, pulled back hair and neck armour he wears in later seasons. The pattern also includes details to make a cloak with a fur collar for either version.


Of course, I had to make a pattern for his white direwolf companion Ghost. I thought it would also be nice to design two more versions with two-coloured coats so people can make a variety of different direwolves (or wolves - there's no difference apart from the scale with the Jon Snow figure). Wolves come in a variety of different colours - brown, black, reddish, grey or a mixture - so you can choose whatever yarn suits you best. If you can find a mottled one, that would probably give a really good effect.


Both patterns are available on Etsy (Jon Snow pattern here, Wolf and Direwolf pattern here) and you can buy them together at a reduced price here. You can also find them on my Ravelry page here.