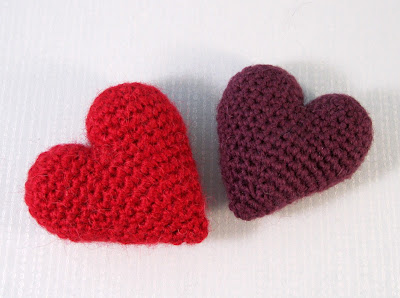
For Valentines Day I’ve made this cute little Love Monster, using my Adorable Monster pattern. I had some lovely pink fuzzy yarn that I’d saved for ages, and this seemed the perfect thing to make with it. I had to give him a heart to give to people he loves, so I’ve included the pattern to make that below.
Amigurumi Heart Pattern
This is a simple pattern to make a three-dimensional amigurumi heart that could be used for all sorts of things. Make it into a decoration, make several of them and display in a bowl or string together to hang on the wall. You could give one to someone you’ve fallen in love with, or stick pins in it if they break your heart!
Yarn required:
I used double knitting (DK) weight yarn, approximately 10g. You can use any colour you like, and any thickness of yarn, though you will need to adjust the amount and hook size.
You will also need:
Stuffing.
Tapestry needle.
4
mm hook (US G hook).
Finished size: approximately 6 cm/2.5" tall.
Abbreviations:
ch
= chain
st
= stitch or stitches
sc
= single crochet (US), double crochet (
tog
= together
sc2tog
= decrease by working two sc together
FO
= fasten off
Notes:
This
heart is made in rounds, starting with the two rounded parts at
the top which are then joined together by crocheting around and continuing to
the point. Do
not join rounds, use a stitch marker to mark the start of a round - a small
piece of different coloured yarn placed under the stitch at the start of the
round will do. To start a round, you can use the magic ring method, but I
prefer to ch 2, then work sc into 1st ch. If you work the
sc over the tail of yarn as well you can use that to pull the hole tight.
Whichever method you use, always make sure that there is no hole in the first
round before you continue.
Top of heart (make 2):
Round 1: ch 2, work 6 sc into 1st ch - 6 st.
Round 2: [2 sc in next st, sc in next st] 6 times - 12 st.
Round 3: [2 sc in next st, sc in next 2 st] 6 times - 18 st.
Round 4 - 6: (3 rounds) sc in each st around - 18
st.
-For first piece, FO leaving a length of yarn.
-For second piece, do not FO.
Rest of heart:
-Join the two pieces, leaving 3 st not joined between the
two pieces, using the following instructions:
Round 7: sc into 4th st of first piece, sc in
next 14 st, sc into 4th st of second piece, sc in next 14 st - 30 st.
Round 8: sc in next 6 st, sc2tog, sc in next 13
st, sc2tog, sc in next 7 st - 28 st.
Round 9: sc in next 6 st, sc2tog, sc in next 12
st, sc2tog, sc in next 6 st - 26 st.
Round 10: sc in next 6 st, sc2tog, sc in next 11
st, sc2tog, sc in next 5 st - 24 st.
Round 11: sc in next 6 st, sc2tog, sc in next 10
st, sc2tog, sc in next 4 st - 22 st.
-Sew up the hole between the two original pieces using the
length of yarn from the first piece.
-Start to stuff and continue as you go along.
Round 12: sc in next 5 st, sc2tog, sc in next 9
st, sc2tog, sc in next 4 st - 20 st.
Round 13: [sc2tog, sc in next 3 st] 4 times - 16
st.
Round 14: [sc2tog, sc in next 2 st] 4 times - 12
st.
Round 15: [sc2tog, sc in next st] 4 times - 8 st.
Round 16: sc in next st, sc2tog, sc in next 2 st,
sc2tog, sc in next st - 6 st.
-Finish stuffing and sew up hole at bottom.
This pattern is also available to download from Ravelry, and the Adorable Monster pattern can be bought on Etsy and Ravelry.


