Showing posts with label dog. Show all posts

Sunday, 26 February 2017

Free Animal Amigurumi

A few months ago I designed a set of six animal patterns for LoveCrochet. This is a site that started off selling yarn but now also sells patterns (you'll find most of mine on there), and has now started selling their own brands of yarn. One of those is Paintbox, which comes in a really good range of colours. I used the Simply DK for these animals, which is an acrylic yarn perfect for amigurumi, but they also have acrylic yarn in aran and chunky weights, and cotton DK yarn.

I designed the animals to be (hopefully) cute and cuddly, and fairly simple for anyone new to making amigurumi. They include Zachary the Frog, Alfie the Duckling, Amelie the Mouse, Jamie the Kitten, Sam the Puppy and Tilly the Piglet. They're all free for you to download at LoveCrochet, just click on the name to go straight to the pattern.


Wednesday, 5 October 2016

Mini Pets - Tiny Cat and Dog Amigurumi Patterns


I’ve never been able to resist tiny things – as a child I was always delighted with tiny toys and anything made in miniature. So, it's natural that I sometimes like to make really small amigurumi animals. It is possible to make a tiny version of any crochet toy by using thin crochet thread instead of yarn and a much smaller hook, but that can be very fiddly and hard on the eyes, especially if you have to sew incredibly small parts together.


However, I’ve designed these tiny cats and dogs to be made all-in-one, using normal sized yarn and hooks, with the legs, ears and tails worked as you go along. There is minimal sewing needed, just embroidering the features and sewing up the hole at the end, which makes them pretty quick and easy to complete. 


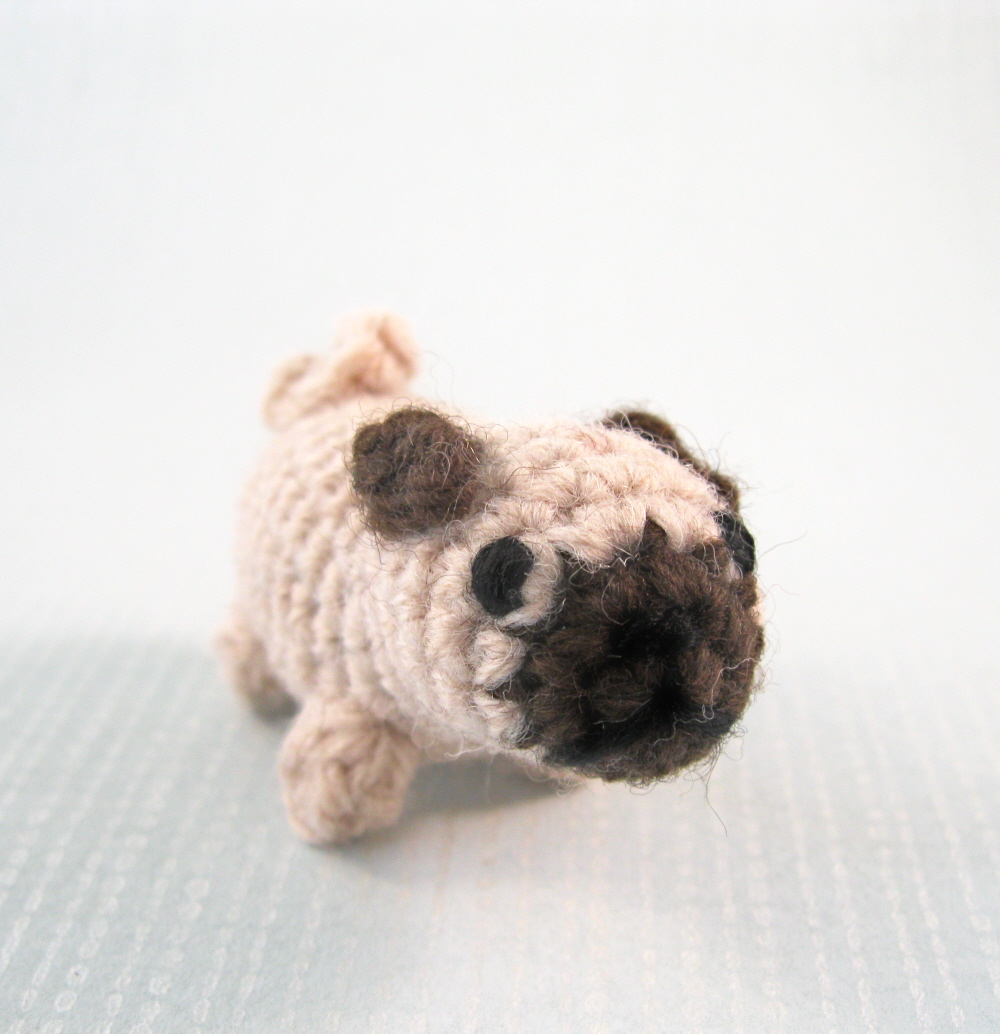
I first came up with a mini dachshund years ago, when I was making little toys for my sons' school bazaar. Using popcorn stitches for the legs was perfect for these dogs, so when I decided to try some different breeds of dog I went for others which have short legs, like Jack Russell terriers and corgis, or ones that are often a little tubby, like pugs and French bulldogs.


Having made these dogs, I then wondered if the same technique would work for cats. Since they're a bit smaller than the dogs I used increases and decreases in the right places to make their legs seem more proportional to their bodies.


So, my new pattern has all the details to make cats in various colours and fur patterns, and five different breeds of dog. It also tells you how to make most of the dogs with little sweaters.


These mini pets range in size from 2.25" - 3.5" long (6 - 9cm), and fit easily in your hand (even small ones!) which makes them perfect for little gifts. Make a pet for a doll, or turn one into a keychain. Or crochet all the different breeds and organise a pet show!


You can buy this pattern now from Etsy, Ravelry or LoveCrochet.

Thursday, 3 December 2015

Christmas Cracker Crown - free pattern


A few years ago I decided to make my own Christmas crackers (if you’re not familiar with these festive essentials check out the wiki page). I bought a kit with the cardboard tube and the snaps, and bought or made some little gifts to go inside. The kit did come with paper crowns, but I always find these slip off my head, and don’t fit the children in the family (or those with extra large heads), so I decided to make my own. I figured that the easiest way to make crowns that would fit everybody would be to make them very small and attach them with elastic under the chin or behind the head. You could also attach them with hair clips, like a fascinator. Here is the pattern to make your own mini crowns, about 8” in circumference, small enough to fit inside a cracker, or just to be worn for a special get-together or party, at Christmas or any other time. Or, they're just the right size for a dog, if they're patient enough to wear them!


Christmas Cracker Crown

For each crown you will need:
Approx 10g double knitting weight yarn in a bright colour.
Small amount of eyelash yarn in white or contrasting bright colour.
Approx 20” thin elastic.
4mm (F) hook.
Tapestry needle.

Abbreviations:
ch = chain
st = stitch or stitches
ss = slipstitch
sc = single crochet (US), double crochet (UK)
hdc = half double crochet (US), half treble crochet (UK)
dc = double crochet (US), treble crochet (UK)
FO = fasten off

Special stitch instructions:

4 dc bob: bobble stitch. YOH (yarn over hook), insert hook into next stitch, YOH and pull through loop, YOH, pull through 2 loops, *YOH, insert hook into same stitch, YOH and pull through loop, YOH, pull through 2 loops, repeat twice from*, YOH, pull through all 5 loops on hook.

Front post sc (Fpsc): work stitch (sc) by putting your hook from right to left around the back of the post of the next stitch on the previous round. This will create a ridge on the other side of your work.

The front post stitches help the crown keep its circular shape, but if you want it to be stiffer you can use a pipe cleaner. Work round 1 with single crochet over a pipe cleaner, preferably the same colour as the main yarn.


Pattern:
Using main yarn for crown, ch 41, sc into 2nd ch from hook, sc into next 39 ch. Making sure not to twist it, join to the first sc with a ss to make a circle.
Round 1: Ch 1, fpsc around same st, fpsc around next 39 st, ss to join to 1st st.
Round 2: Ch 2 (counts as 1 hdc), hdc in next 39 st, ss to join to 1st st.
Round 3: Ch 1, fpsc around same st, fpsc around next 39 st, ss to join to 1st st.
Round 4: Starting in next st of round after joining ss [sc, skip 2 st, 3 dc in next st, ch 2, 3 dc in same st, skip 2 st, sc, ss] 5 times.
Round 5: Ss in each st around, 4 dc bob into each ch 2 gap. FO.

Push the bobble stitches from the inside outwards. Turn crown inside out and join in eyelash yarn into back of original ch, sc around bottom into back of original ch and join to first sc with ss. FO

Sew together the point where you originally joined in a circle and weave in ends. Tie or sew a length of thin elastic on either side so it will stay on head.


Note: sorry about the quality of these photos. The light is awful at this time of year, and I had to bribe my son to use his head to model the crowns, but he refused to let me show his face. Boris, our dog, was also bribed with a treat, but you can see how thrilled he was to be modelling!


Sunday, 20 May 2012

Finn and Jake patterns ready!


My Finn and Jake amigurumi patterns are now available to buy in my Etsy shop.

You can buy both patterns together or buy them separately.


Now I just need to get on with my Jawa pattern!

Tuesday, 17 April 2012

Adventure Time with Finn and Jake

I recently started watching Adventure Time on Cartoon Network UK with my boys (I only just found out we could get it on our subscription). It's a great show, suitable for kids (maybe not very young ones) and adults - the humour's fun and weird but not mean. It's set in a colourful, fantastical post-apocalyptic world with Finn, a 12/13 year old boy (the only human we know of) and Jake the dog, who is capable of stretching or shrinking to almost any size or shape. They have all sorts of adventures - Finn is pretty handy with a sword - and sing cute little songs.

I joined in with an Adventure Time swap on Craftster and made Finn and Jake for my partner (I think I'll have to remake them for my boys!).


Part of the reason I like the show is the design of the characters, and they have great shapes to crochet. Here are the originals to compare:


Finn is about 13" tall and has a backpack that opens and closes with a small button.


Jake is about 8" tall, roughly in proportion to Finn in his normal shape and size, where he still has quite long arms.


Since they both have such thin legs, it's hard to make them stand up, so I took them outside to pose them a bit. Finn's off on an adventure and Jake's hanging around in a tree.


I hope you like them, and if you haven't watched Adventure Time, give it a go!