Tuesday, 13 February 2024

Love Monster, with Free Amigurumi Heart Pattern


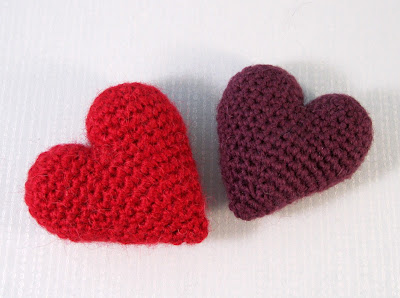
For Valentines Day I’ve made this cute little Love Monster, using my Adorable Monster pattern. I had some lovely pink fuzzy yarn that I’d saved for ages, and this seemed the perfect thing to make with it. I had to give him a heart to give to people he loves, so I’ve included the pattern to make that below.


Amigurumi Heart Pattern

This is a simple pattern to make a three-dimensional amigurumi heart that could be used for all sorts of things. Make it into a decoration, make several of them and display in a bowl or string together to hang on the wall. You could give one to someone you’ve fallen in love with, or stick pins in it if they break your heart!

Yarn required:

I used double knitting (DK) weight yarn, approximately 10g. You can use any colour you like, and any thickness of yarn, though you will need to adjust the amount and hook size. 

You will also need:

Stuffing.

Tapestry needle.

4 mm hook (US G hook).

Finished size: approximately 6 cm/2.5" tall.

Abbreviations:

ch = chain

st = stitch or stitches

sc = single crochet (US), double crochet (UK)

tog = together

sc2tog = decrease by working two sc together

FO = fasten off

Notes:

This heart is made in rounds, starting with the two rounded parts at the top which are then joined together by crocheting around and continuing to the point. Do not join rounds, use a stitch marker to mark the start of a round - a small piece of different coloured yarn placed under the stitch at the start of the round will do. To start a round, you can use the magic ring method, but I prefer to ch 2, then work sc into 1st ch. If you work the sc over the tail of yarn as well you can use that to pull the hole tight. Whichever method you use, always make sure that there is no hole in the first round before you continue.


Top of heart (make 2):

Round 1: ch 2, work 6 sc into 1st ch - 6 st.

Round 2: [2 sc in next st, sc in next st] 6 times - 12 st.

Round 3: [2 sc in next st, sc in next 2 st] 6 times - 18 st.

Round 4 - 6: (3 rounds) sc in each st around - 18 st.

-For first piece, FO leaving a length of yarn.

-For second piece, do not FO.

Rest of heart:

-Join the two pieces, leaving 3 st not joined between the two pieces, using the following instructions:

Round 7: sc into 4th st of first piece, sc in next 14 st, sc into 4th st of second piece, sc in next 14 st - 30 st.

Round 8: sc in next 6 st, sc2tog, sc in next 13 st, sc2tog, sc in next 7 st - 28 st.

Round 9: sc in next 6 st, sc2tog, sc in next 12 st, sc2tog, sc in next 6 st - 26 st.

Round 10: sc in next 6 st, sc2tog, sc in next 11 st, sc2tog, sc in next 5 st - 24 st.

Round 11: sc in next 6 st, sc2tog, sc in next 10 st, sc2tog, sc in next 4 st - 22 st.

-Sew up the hole between the two original pieces using the length of yarn from the first piece.

-Start to stuff and continue as you go along.

Round 12: sc in next 5 st, sc2tog, sc in next 9 st, sc2tog, sc in next 4 st - 20 st.

Round 13: [sc2tog, sc in next 3 st] 4 times - 16 st.

Round 14: [sc2tog, sc in next 2 st] 4 times - 12 st.

Round 15: [sc2tog, sc in next st] 4 times - 8 st.

Round 16: sc in next st, sc2tog, sc in next 2 st, sc2tog, sc in next st - 6 st.

-Finish stuffing and sew up hole at bottom.


This pattern is also available to download from Ravelry, and the Adorable Monster pattern can be bought on Etsy and Ravelry.


Pumpkinhead Witch and Scarecrow Amigurumi Pattern


As it was heading towards autumn a couple of years ago, and people had started talking about Halloween online, I had an urge to make a witch with a pumpkin head. I thought I'd work on the pattern and have it ready in time for the spooky season. Of course, it took me much longer to make than I thought, so I played with the idea a bit and created a pumpkin-headed scarecrow as well. Then I shelved it, as it seemed a bit pointless bringing out a pattern like that in springtime. As autumn swung round again last year I suddenly remembered this pattern and got it ready, but I completely forgot to post about it here on my blog. I hope you're enjoying this insight into my organisational skills!


I tried a couple of techniques to form the ridges in the pumpkin, and in the end was very happy with what I came up with. The ridges are subtle, but I think they work. You could easily change elements of this pattern to make the clothes different, she doesn't have to be a witch, she can be a girl in a bright-coloured dress, and you can make the scarecrow in any colour of clothes that you want.


This pattern is available in my Etsy and Ravelry shops.

B2EMO - Star Wars Andor Droid Pattern


I absolutely loved season 1 of Andor, the Star Wars show that came out in 2022, and prequel to Rogue One. Brilliantly made, it had a different feel to many other Star Wars films and shows, and I can't wait to see the conclusion, hopefully out later this year. One of my favourite characters was the salvage assist droid, B2EMO belonging to the Andor family. He is an old droid, a bit battered and with a vocal stutter, but he is incredibly loyal.


Making something that was a square shape was an interesting challenge, but I ended up working out the pattern quite quickly in the end (handy, since the first time I made it was as a last minute Christmas present!). I did a couple of small tweaks to that initial pattern, and it is now available to buy in my Etsy and Ravelry shops.


He isn't in scale with my other Star Wars amigurumi as he would have ended up way too small, but at about 8 cm/3.25" tall he's the perfect size to sit on your desk or shelf and keep you company. 


Saturday, 1 April 2023

Dice Bag - Free Pattern


Since the new Dungeons & Dragons film has just been released, I thought it would be fun to share this simple dice bag pattern with you D&D players out there. I’ve had a few goes at playing over the years, but never had a chance to get really into the swing of it (I tend to stick to tabletop games). However, my daughter has been playing for years, and has built up an impressive collection of dice, so I thought I’d make her a nice, sturdy bag for them.

It’s a fairly simple design, but to give a bit of visual interest, and hopefully some extra strength, I’ve used front post stitches to make vertical ridges – you can do them at different distances apart, as you choose.


Wider spaced ridges

Narrower spaced ridges


You can make your bag in any colour you like, or use more than one colour – self-striping or multicoloured yarn is the quick and easy way to get a fun effect.

This bag will come out about 15 cm/6” tall, 10 cm/4” in diameter.


Abbreviations:
ch = chain
st = stitch or stitches
ss = slip stitch
sc = single crochet (US), double crochet (UK)
dc = double crochet (US), treble crochet (UK)
fpsc = front post single crochet (US), front post double crochet (UK), see special stitch instructions below.
tog = together
sc2tog = decrease by working two sc together
YOH = yarn over hook
FO = fasten off

General instructions:
Work in rounds unless otherwise stated and do not join rounds unless told to. Use a stitch marker to mark the start of a round - a small piece of different coloured yarn placed under the stitch at the start of the round will do. To start a round, you can use the magic ring method, but I prefer (ch 2, work 6 sc into 1st ch). If you work the 6 sc over the tail of yarn as well you can use that to pull the hole tight.

Work through both loops of stitches unless otherwise indicated.

You will need:
Approximately 40g of any colour yarn, double knitting or worsted weight.
4mm (G/6) hook.
Tapestry needle.

Special stitch instructions:

Fpsc: work sc by putting your hook from right to left around the back of the post of the next stitch on the previous round.

Sc do not have much of a post (the body of a stitch, apart from the 'v' shape of the two loops that you normally put your hook under) so it can be quite hard to do this stitch. Push your hook under the two loops as normal (Fig. 1), then back under the two loops of the next stitch from back to front (Fig. 2 shows with the green mark where to insert your hook from the back, Fig. 3 shows what it looks like when you have done this). YOH, pull yarn through, YOH, pull through both loops on hook. When you work the next stitch remember to start by putting your hook under the second set of two loops that you used previously. It is very easy to mix up which stitch you're working into, so count your stitches frequently to check you haven't made a mistake.

   Fig. 1

   Fig. 2


   Fig. 3


Linked dc (optional): to make the top of the bag where the drawstring goes a bit stronger, you can work round 38 with linked dc. To do this, work the first dc of each pair. Then insert your hook under a strand of yarn that makes up the dc (Fig. 4 shows the strand outlined in black, Fig. 5 shows the hook under the strand) and then into the next st. YOH, pull through yarn, YOH, pull through 2 loops, YOH, pull through 2 loops.

   Fig. 4

   Fig. 5


Bag:
Round 1: ch 2, work 6 sc into 1st ch - 6 st.
Round 2: 2 sc in each st around - 12 st.
Round 3: [2 sc in next st, sc in next st] 6 times - 18 st
Round 4: [2 sc in next st, sc in next 2 st] 6 times - 24 st.
Round 5: [2 sc in next st, sc in next 3 st] 6 times - 30 st.
Round 6: [2 sc in next st, sc in next 4 st] 6 times - 36 st.
Round 7: [2 sc in next st, sc in next 5 st] 6 times - 42 st.
Round 8: [2 sc in next st, sc in next 6 st] 6 times - 48 st.
Round 9: [2 sc in next st, sc in next 7 st] 6 times - 54 st.
Round 10: [2 sc in next st, sc in next 8 st] 6 times - 60 st.
Round 11: [2 sc in next st, sc in next 9 st] 6 times - 66 st.
Round 12: [2 sc in next st, sc in next 10 st] 6 times - 72 st.
-For wider spaced ridges continue here:
Round 13 - 34: (22 rounds) [fpsc, sc in next 5 st] 12 times - 72 st.
Round 35: [fpsc, sc in next 3 st, sc2tog] 12 times - 60 st.
Round 36 - 37: (2 rounds) [fpsc, sc in next 4 st] 12 times - 60 st.
-For narrower spaced ridges continue here:
Round 13 - 34: (22 rounds) [fpsc, sc in next 2 st] 24 times - 72 st.
Round 35: [fpsc, sc2tog, fpsc, sc in next 2 st] 12 times - 60 st.
Round 36 - 37: (2 rounds) [fpsc, sc in next st, fpsc, sc in next 2 st] 12 times - 60 st.
-For all bags, continue here (see above on how to do linked dc if you choose):
Round 38: ss in next st, ch 1, dc in same st, dc in next st, ch 1, skip st, [dc in next 2 st, ch 1, skip st] 19 times - 60 st.
Round 39: starting in first dc, [sc in next 2 st, sc around ch] 20 times – 60 st.
Round 40: sc in each st around - 60 st.
-Ss in next st, FO.
-Weave in ends.

Drawstring:
Chain until you have a length of about 60 cm/24”, then ss in each ch, FO.
Thread through the ch 1 spaces at the top of the bag, then sew the ends together, weaving your yarn a little way along the drawstring to make the join secure.

Fill with dice – or use for anything else you want!


Friday, 10 March 2023

Human Figure Amigurumi Pattern


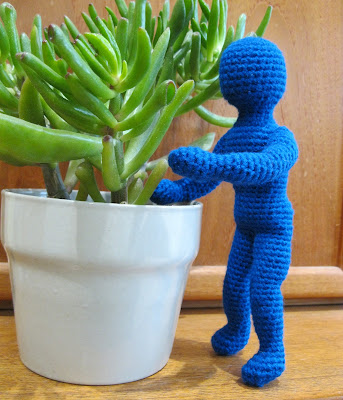
My latest pattern is a simple human figure, without features but fairly proportional and shaped more realistically than most amigurumi. It is non-gendered and designed to be made in one colour. You can use pipe cleaners or wire in the limbs to make it poseable, so it can be a little friend, hanging around on your shelves and looking after your plants. The pattern includes details to make a base for the figure, so you can pose it like an artist's manikin, or you can turn it into a statue, fixed in one position (a pattern for a sword is also included).


You can also use this pattern as a base and alter the figure as you please, add features, clothes, other accessories, and make it look however you wish. What would you do with it?


You can find the pattern in my Etsy and Ravelry shops.


Thursday, 24 March 2022

Tiny Woodland Animal Amigurumi Patterns


My latest project is a collection of crochet patterns for nine tiny woodland animals which includes: fox, badger, squirrel, rabbit, hedgehog, mole, otter, sitting and flying owls, as well as patterns for a playmat, tree stump and hollow log. Like some of my other patterns, such as the Tiny Cats and Dogs, these make cute little animals, ranging in size from 4 cm to 10 cm (1.5" to 4") long, which are mostly crocheted 'all-in-one', with the ears, legs and tails made as you go along, and minimal sewing.
 
As I live in the UK, these are woodland animals that I'm familiar with from Britain, and I've made them in a realistic style, at least as far as I can given their size. Although they're not totally in scale, I've tried to keep them mostly in proportion with each other. They don't use much yarn, so they're good for using up scraps - I made them using acrylic yarn with a bit of wool or alpaca mixed in, to give a nice, soft effect. 

This set is perfect for animal-loving children to play with (due to the size of the animals they wouldn't be suitable for any children under three years) but you could also make them for anyone who loves any of these animals - they're easy to turn into key-chains or decorations, and a group of flying owls would make a great mobile. 

I gave the owl a little hat, and made a scarf for the squirrel, to make them into Christmas decorations.

This collection of patterns is available now in my Lucyravenscar Etsy and Ravelry shops. 


Fox 
One of my favourite animals, known in folklore for their cleverness and cunning. It's not too hard to spot an urban fox at night, but I especially love it when I see one in the countryside during the day, when their red coats show up so beautifully. I was lucky enough recently to spot one in a field through a hedge, only a few metres away, hunting by pouncing into the grass and catching (and crunching!) a vole.


For such a small creature, there was a lot of work in getting this pattern right. The changes of colour to get the white patch under the chin in just the right place, and all the increases and decreases to get the shaping of the body took many tries! Like most of the animals, the fox is crocheted from nose to tail with the ears and legs made as you go along, so the only sewing you need to do is the features and the hole at the end of the tail. 


If you want to crochet a much bigger fox, try my Bracken the Fox pattern. 


Badger 
Whilst badgers in other parts of the world are often known for their aggression, that is not the case with British badgers. Made popular in children's literature with the kindly, paternal Badger in The Wind in the Willows, they are often thought of as determined and patient.


The distinct pattern of black and white stripes on the face weren't easy to get right, especially over such a small number of stitches, but I worked it out eventually. Since badger's eyes are on the black stripe I had to sew some brown with a black dot on top to make them show up. 

For a larger, cuddly badger pattern, why not give Blackberry the Badger a go? 


Squirrel
Red squirrels are native to Britain, but the introduction of North American grey squirrels in the nineteenth century has meant that they are mostly found in the rural North of England and Scotland, and are not so easy to spot. Grey squirrels, on the other hand, are common in woods, parks and gardens, and are probably the main wild mammal that most people see regularly. Either version is wonderful to see, leaping from branch to branch, using their wonderful fluffy tails for balance.


The tail was the main design challenge in this pattern. I tried to make it as part of the body, but that just wasn't possible. Once I decided to make it separately I wondered whether to make it fluffy, or as a solid shape, but I after a couple of experiments I came up with a way of making it that I'm really happy with. 


Rabbit 
Another relatively common animal that I sometimes spot on country walks, or nibbling on road verges when I'm driving along, I fell in love with rabbits when I read Watership Down as a child.


I already have a free pattern for a little rabbit available here on my blog, but I worked on it and tweaked it to make the shaping on the head better and more realistic. The tail is made separately, I tried to make it as part of the body but that didn't work as well. 


Hedgehog 
A very endearing creature which is very popular in Britain, although their population is sadly in decline due to habitat loss. Sometimes seen snuffling around gardens at night, it's a long time since I've seen one, although I do remember saving several baby hedgehogs that fell into a drain outside our house when I was little! 


Given how small this pattern is, it was hard to work out how to make the hedgehog's prickles. Any three-dimensional stitches would be too big, and so I ended up using spike stitches in a different colour to give the effect of spines. Hedgehogs do have ears, but they're quite small, and at this scale I couldn't include them without them being out of proportion. 


Mole
A small creature that is rarely seen, though the evidence of its existance, molehills, can be found all over the place! Another animal that appears in The Wind in the Willows, moles are seen as modest and introverted, with their tiny eyes and poor eyesight, and the fact that they spend most of their lives underground.


I made my mole with dark grey yarn, as although they have black fur, it has a bit of a shine to it, making it look more grey. In real life their eyes are barely visible, but I did sew little black eyes, even if they're hard to see in the photo. Luckily it is easy to see their cute pink snouts and big, spade-like front paws. 


Otter 
A beautiful creature that's known for its playful attitude, sadly it isn't easy to see in the UK. Found along waterways, their populations are only just starting to recover after years of pollution. Various species are found all over the world, from giant South American otters to sea otters, but they always spend most of their time in the water. 


This is quite a simple shape, the most complicated part of the deisgn was getting the pale colour on the neck in the right place. You could always change the colours to make other similar animals, such as weasels, stoats, pine martens or ferrets. 


Sitting and Flying Owls 
I love owls, they're beautiful and unique-looking birds that are found all over the world. They feature strongly in myths and literature, with their large eyes, round faces and silent flight making them seem mysterious and wise, although sometimes they just look very cute! 


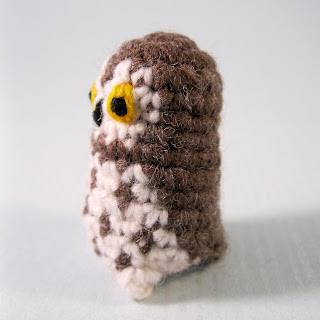
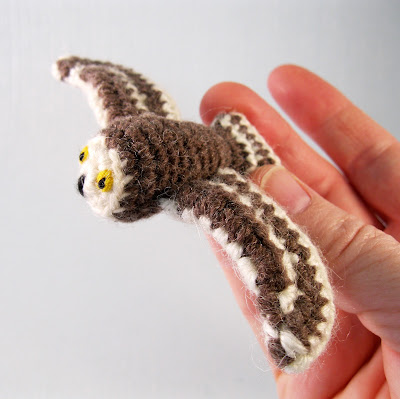
I mostly based these patterns on the short-eared owl, but many owls have similar colours, and you could always change the colours to match a particular species of owl. The sitting owl, made all-in-one, has a detailed speckled chest, a short tail at the back, and little feet. I tried a few different techniques to make the chest, but eventually I was happy with the way it looked. I was very keen to make a flying owl, they look so impressive in flight with their wings stretched out wide. The wings are made separately, and I rather like the way that crochet stitches automatically give the look of feathers.


I also have a pattern available for a larger owl in a sweater, the Flappy Owl


Playmat 
A simple circle of grass with a tree stump in the middle, it makes a great place to play with the animals. You can also make a hollow log for the creatures to hide in, and the mat has a drawstring around the edge so you can use it to carry the toys around. You could also just make the tree stump and use it as a little display for one of the animals.



Friday, 7 January 2022

All About The Mandalorian Crochet Kit


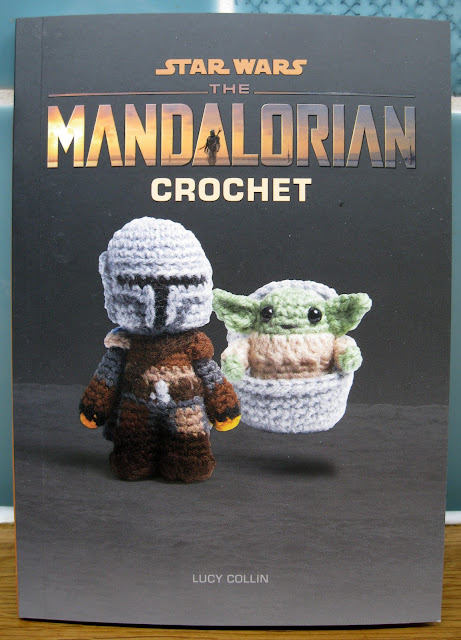
My latest book and kit is out now, with twelve characters from The Mandalorian for you to make. In the book you'll find the patterns for:

The Mandalorian himself, or Mando, with the outfit he wears at the start of series 1 (during the two series so far he gradually picks up new armour).


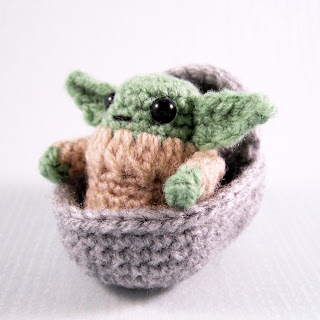
Grogu (Baby Yoda) in his floating pram - full disclosure, despite the photo on the front of the book, the crochet pram does not actually float!


Cara Dune.


Greef Karga
.


Moff Gideon, with the Darksaber.


Kuiil
.

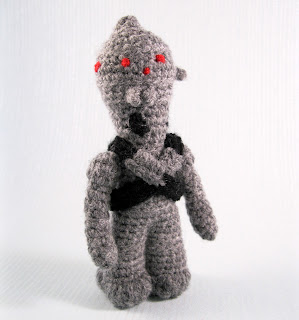
IG-11.


Grogu (Baby Yoda) at a larger scale. The first Grogu is tiny, and roughly in scale with the other characters. This version is larger, about 3" tall, compared to the humans who are generally about 4" tall.


Mudhorn, which is not in scale with the other figures but is still quite large at about 6" long.


Offworld Jawa, which as well as wearing a grey rather than brown robe, has a slightly different hood compared to the Jawa pattern you'll find in Star Wars Even More Crochet.


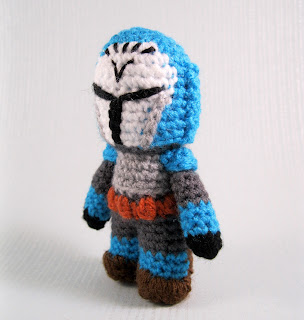
Bo-Katan Kryze, who comes with the option to make her with or without her helmet.

Ahsoka Tano, who is obviously the older version of the character than the one seen in The Clone Wars cartoons, with two white lightsabers.

There were some interesting challenges in coming up with these designs. It seemed like Mando would be just a variation on Boba Fett, but the fact that his helmet is all silver made it much harder to define the shape in a small crochet form. I had to try quite a few variations before I was satisfied, and it must be said that this is not an easy pattern for a beginner to amigurumi. It's included as one of the patterns in the kit, which makes sense given that he's the main character in the show, but there are a lot of colour changes and fiddly elements to the pattern. The other pattern in the kit, the smaller Grogu in his pram, is a bit easier, but it was also a challenge to make such a small character and still manage to include enough details to make it work.


I was very happy with Kuill, who was one of my favourite characters. He's a bit smaller than the human characters so I worried that I wouldn't be able to include all the details I needed to make him work, but he came out just how I wanted the first time I made him. I really wasn't sure if IG-11 would work in this format at all - it's a tall, thin, spindly robot, and these are cute, slightly chubby amigurumi versions of characters - but in the end I think this version is fun, recognisable but cute.


I started work on this in the early autumn of 2020, before series 2 of The Mandalorian had been released, so I wasn't told about all the characters I'd have to make until they'd appeared in the show. I was very happy when Ahsoka and Bo-Katan appeared, they're both colourful and interesting to look at, so they make great amigurumi. I thought I had a head start on Ahsoka since I'd already made the young version we first see at the beginning of The Clone Wars, but it was surprising how many details had to be altered, and since her head piece is so complicated it took a while to work out all the changes. With Bo-Katan I thought I knew how to make her helmet, since I'd already done Mando's, but the shape and all the details are quite different, so it took a while to get it just right. I thought it would be fun to see her without her helmet too, so I'm glad I asked to include that version too.


I hope that if you get hold of this book that you enjoy making the various characters. To help you find the right colours of yarn to make the characters, I've made a list below of all the yarns I used, and the amounts needed for each figure. I've also noted at the bottom of this post any errors in the book that I've noticed; if you come across any yourself, let me know. I work hard to make sure there aren't any errors, but some always manage to slip through!


Yarn List (approximate amounts):

I live in the UK, so that's where I get all my yarn from. I use double knitting (DK) weight yarn, equivalent to 3:light weight in the US, and 8 ply in Australia/NZ - there's a yarn thickness guide on Ravelry which is very helpful. (By the way, the yarn I used is not the same as the yarn in the kit. That isn't a particular brand, and was sourced by the publisher separately).

If you can't get hold of the yarns listed below, you can at least look at them in online stores such as Wool Warehouse or LoveCrafts, which might help you find equivalents closer to home.

I used mostly Hayfield Bonus DK (HBDK) and Robin DK (RDK). Hayfield is a great yarn for making amigurumi (toys worked in the round) as it's quite sturdy and doesn't get squashed by working tightly, which you have to do when you're crocheting like this. Unfortunately, Robin yarn is no longer available, so I have included some alternatives in Stylecraft Special DK (SSDK). Stylecraft has a great range of colours but is a little lighter in weight so you might find that parts come out a little smaller when you use it.
 
The Mandalorian:
5g light grey yarn - HBDK Light Grey Mix (814).
5g black yarn - HBDK Black (965).
10g dark grey yarn - HBDK Slate Grey (633).
5g mid brown yarn - HBDK Chocolate (947).
5g dark brown yarn - RDK Brown (051), alternative SSDK Dark Brown (1004).
Small amount of yellow yarn - HBDK Sunflower (978).
Small amount of beige yarn - HBDK Walnut (927).
Small amount of light beige yarn - HBDK Oatmeal (964).
Small amount of blue yarn - HBDK Denim (994).
 
Grogu in pram:
5g green yarn - HBDK Grass (825).
10g light beige yarn - HBDK Oatmeal (964).
10g light grey yarn - HBDK Light Grey Mix (814).
 
Cara Dune:
10g pale peach yarn - HBDK Biscuit (963).
10g teal yarn - HBDK Petrol (829), alternative Peacock (560).
5g dark teal yarn - HBDK Teal (691), alternative Royal Teal (558).
5g dark grey yarn - HBDK Slate Grey (633).
10g black yarn - HBDK Black (965).
10g dark brown yarn - RDK Brown (051), alternative SSDK Dark Brown (1004).
Small amount of light grey yarn - HBDK Light Grey Mix (814).
 
Greef Karga:
5g black yarn - HBDK Black (965).
10g light brown yarn - HBDK Walnut (927).
10g mid brown yarn - HBDK Chocolate (947).
10g dark brown yarn - RDK Brown (051), alternative SSDK Dark Brown (1004).
5g golden brown yarn - RDK Honey (129), alternative SSDK Camel (1420).
 
Moff Gideon:
20g black yarn - HBDK Black (965).
5g light brown yarn - HBDK Walnut (927).
5g red yarn - HBDK Soft Red (617).
Small amount of white yarn - HBDK White (961).
Small amount of dark grey yarn - HBDK Slate Grey (633).
 
Kuiil:
5g pale peach yarn - HBDK Biscuit (963).
5g mid brown yarn - HBDK Chocolate (947).
5g dark brown yarn - RDK Brown (051), alternative SSDK Dark Brown (1004).
5g khaki green yarn - HBDK Olive Green (634).
5g light brown yarn - HBDK Walnut (927) or Taupe (601).
Small amount of silver grey yarn - HBDK Light Grey Mix (814).
Small amount of black yarn - HBDK Black (965).
 
IG-11:
15g grey yarn - HBDK Dark Grey Mix (790).
5g black yarn - HBDK Black (965).
Small amount of red yarn - HBDK Signal Red (977).
 
Grogu (larger version):
10g green yarn - HBDK Grass (825).
15g light beige yarn - HBDK Oatmeal (964).
 
Mudhorn:
30g mid brown yarn - HBDK Chocolate (947).
10g dark beige yarn - HBDK Walnut (927).
 
Offworld Jawa:
5g black yarn - HBDK Black (965).
15g dark grey yarn - HBDK Slate Grey (633).
Small amount of dark brown yarn - HBDK Chocolate (947).
 
Bo-Katan Kryze:
10g pale peach yarn - HBDK Biscuit (963).
10g dark grey yarn - HBDK Slate Grey (633).
10g light grey yarn - HBDK Light Grey Mix (814).
10g russet yarn - HBDK Fox (779).
15g turquoise yarn - HBDK Turquoise (998).
5g black yarn - HBDK Black (965).
10g mid brown yarn - HBDK Chocolate (947).
5g white yarn - HBDK White (961).
 
Ahsoka Tano: 
10g russet yarn - HBDK Fox (779).
10g black yarn - HBDK Black (965).
5g mid brown yarn - HBDK Chocolate (947).
10g dark grey yarn - HBDK Slate Grey (633).
10g blue yarn - HBDK Denim (994).
10g white yarn - HBDK White (961).
5g light grey yarn - HBDK Light Grey Mix (814).
Small amount of maroon yarn - HBDK Claret (841).
 
*Errata:
On page 47 in the pattern for IG-11, round 3 should read:
Rnd 3: [2 sc in next st, sc in next 2 st] 2 times – 8 st.

On p19 of the pattern for the Mandalorian, the text after round 22 starting "In the following 3 rounds..." should go before round 22.

On p20 of the pattern for the Mandalorian, under the 'Left Shoulder Armor' and the 'Right Shoulder Armor', the second section in brackets on row 1 should be ignored.

On p53 in the pattern for Grogu, 'Cowl Neck of Robe', row 1 should read: 
Row 1: skip ch next to hook, sc in next 25 st, ch 1, turn.