Showing posts with label Christmas. Show all posts

Wednesday, 30 November 2016

Yarn party, and ideas for Christmas

A few weeks ago I was lucky enough to be invited along to LoveKnitting/LoveCrochet's Flock launch party, a get together for various craft bloggers. You can find more information about it here, but basically it was a great chance to meet the lovely people at LoveKnitting and other designers and bloggers - a real treat for someone who works at home, getting to chat to people who love crochet and knitting. Oh, and there was lots of prosecco!


That's me, checking out all the lovely yarn samples, chatting about crochet, and drinking prosecco!

I've been impressed with LoveKnitting as a company - they sell yarn and all the accessories you need to knit or crochet, but they also sell patterns, (you can find all of mine on there, just search for 'Lucy Collin') and now they've produced their own range of yarn, Paintbox.

Paintbox comes in acrylic DK, aran and chunky, and cotton DK, and all of them in a really good range of colours that makes them perfect for making amigurumi. If you want to try out the acrylic DK they are currently selling an advent calendar with a 10g ball of yarn behind each window (get it here in the sale that ends tonight). They had jars full of these tiny balls at the party, and I think everyone who saw them immediately squealed with happiness at seeing them, they look so cute! They very kindly let me have some to try out, and I really like the feel of the yarn for making amigurumi, soft and smooth.


The cute little mini balls with a 100g ball for comparison

You might be wondering what on earth you can make with such tiny balls of yarn, but apart from the free patterns you get with the advent calendar, I've got loads of free patterns here that would be perfect. There's a full list of my free patterns on the right, but here are a few that you will be able to make with one of those tiny 10g balls, with some of them you'd only use half of one, or even less. Of course, you could just use any scraps of yarn that you have.

Since the point of an advent calendar is to lead up to Christmas, any of my Christmas amigurumi patterns would be perfect to make as decorations, including my Little Christmas MouseTiny Crochet PenguinMini SnowmanTiny Christmas Robin and Mini Father Christmas.


Other cute little things to make, maybe as stocking fillers, would be my mini TeddiesFrogsMonkeysOctopusesElephants and Turtles.


Hopefully these little things will be quick and easy to make in the 24 days before Christmas. Have fun!

Saturday, 12 December 2015

Mini Father Christmas - free crochet pattern

Here we come to the last in my collection of free Christmas crochet patterns, a miniature Father Christmas that you can make into a tree decoration, or add to a little festive scene. He’ll look sweet together with the penguin and snowman patterns I posted previously, though I think the mouse and the robin would look a bit giant next to him!

I hope you’ve been enjoying all the Christmas patterns, and found a few little things that you can make at the last minute if necessary. If you ever want to find them again, you’ll see a list of all my free patterns to the right of this page, just click on any that you’re interested in.

 
Abbreviations:
ch = chain
st = stitch or stitches
sc = single crochet (US), double crochet (UK)
dc = double crochet (US), treble crochet (UK)
tog = together
sc2tog = decrease by working two sc together
bob = bobble (see special stitch instructions)
BLO = work in back loop only
FO = fasten off

Approximate size: 6cm/2.5" tall.

General instructions:
Work in rounds unless otherwise stated and do not join rounds unless told to. Use a stitch marker to mark the start of a round - a small piece of different coloured yarn placed under the stitch at the start of the round will do. To start a round, you can use the magic ring method, but I prefer to ch 2, and work the appropriate number of sc into 1st ch. If you work the sc over the tail of yarn as well you can use that to pull the hole tight.

When changing from one colour of yarn to another work the stitch before the change until there are two loops left on the hook. Then use the new colour for the final yarn over hook and pull through. When you use two different colours on the same round, as you do for the face, carry the colour you are not using behind the one you are working with.

Work through both loops of stitches unless otherwise indicated.

Special stitch instructions:
2dc bob: bobble stitch for beard. YOH, insert hook into next stitch, YOH and pull through stitch, YOH, pull through 2 loops, YOH, insert hook into same stitch, YOH and pull through stitch, YOH, pull through 2 loops, YOH, pull through all 3 loops on hook.

You will need:
Small amounts of double knitting or worsted weight yarn in red, white, black and skin colour.
A length of cotton yarn to hang as a decoration.
Small amount of stuffing.
3.5mm (E) hook.
Tapestry needle.


Pattern:
Start with red yarn.
Round 1: Ch 2, work 5 sc into 1st ch - 5 st.
Round 2: 2 sc in next st, sc in next 4 st - 6 st.
Round 3: [2 sc in next st, sc in next st] 3 times - 9 st.

Round 4: Sc in each st around – 9 st.
Round 5: [2 sc in next st, sc in next 2 st] 3 times - 12 st.
Round 6: Sc in each st around – 12 st.
Change to white yarn.
Round 7: Sc in each st around – 12 st.
Change to skin colour yarn.
Round 8: BLO Sc in next 6 st, change to white yarn, sc in next 6 st – 12 st.
Round 9: Sc in next 6 st, change to white yarn, sc in next 6 st – 12 st.
Round 10: Sc in next st, 2dc bob in each of next 4 st, sc in next st, change to red yarn, sc in next 6 st – 12 st.
Round 11: Sc in each st around – 12 st.
Round 12: 2 sc in next 6 st, sc in next 6 st - 18 st.
Round 13: Sc in each st around – 18 st.
Change to black yarn.
Round 14: Sc in each st around – 18 st.
Change to red yarn.
Round 15 - 17: (3 rounds) Sc in each st around – 18 st.
Round 18: [Sc2tog, sc in next st] 6 times – 12 st.
Round 19: Sc2tog 6 times – 6 st.

FO, leaving a length of yarn, and stuff. With the cotton yarn, sew a loop at the top of the head if you want to hang as a decoration. Using black yarn sew eyes and a little mouth on top of the beard. Finish stuffing and sew up bottom neatly.


Friday, 11 December 2015

Tiny Christmas Robin - free crochet pattern


Apparently, robins are associated with Christmas, at least in Britain, because of Victorian postmen, who wore bright red jackets and were nicknamed ‘Robins’. As they were a welcome sight, delivering the newly invented Christmas cards, their feathered namesakes soon became popular in the designs of the cards. Of course, robins are also delightful birds, easily visible and seemingly friendly (especially if you’re doing some gardening, when they swoop in and devour any bugs you’ve unearthed), who look particularly striking against a snowy backdrop with their bright red breasts.

With this crochet pattern you can make yourself a tiny little robin, only about 3 cm/1.5" tall. Simple and quick to make, with minimal sewing, he’s perfect to hang on your tree, or decorate anywhere else you like.

 
Abbreviations:
ch = chain
st = stitch or stitches
ss = slipstitch
sc = single crochet (US), double crochet (UK)
dc = double crochet (US), treble crochet (UK)
tog = together
sc2tog = decrease by working two sc together
FO = fasten off

General instructions:
Work in rounds unless otherwise stated and do not join rounds unless told to. Use a stitch marker to mark the start of a round - a small piece of different coloured yarn placed under the stitch at the start of the round will do. To start a round, you can use the magic ring method, but I prefer to ch 2, and work the appropriate number of sc into 1st ch. If you work the sc over the tail of yarn as well you can use that to pull the hole tight.

When changing from one colour of yarn to another work the stitch before the change until there are two loops left on the hook. Then use the new colour for the final yarn over hook and pull through.

Work through both loops of stitches unless otherwise indicated.

Special stitch instructions:
3 dc bob: bobble stitch. YOH (yarn over hook), insert hook into next stitch, YOH and pull through loop, YOH, pull through 2 loops, *YOH, insert hook into same stitch, YOH and pull through loop, YOH, pull through 2 loops, repeat once from*, YOH, pull through all 4 loops on hook.

You will need:
Small amounts of red, brown and white yarn, double knitting or worsted weight.
Small amount of black yarn for the eyes and beak.
A length of cotton yarn to hang as a decoration.
Small amount of stuffing.
3.5mm (E) hook.
Tapestry needle.


Pattern:
Start with red yarn.
Round 1: Ch 2, work 6 sc into 1st ch - 6 st.
Round 2: 2 sc in each st around - 12 st.
Round 3: [2 sc in next st, sc in next st] 6 times – 18 st.

Round 4: Sc in next 8 st, change to white yarn, sc in next 10 st – 18 st.
Change to brown yarn
Round 5: Sc in each st around - 18 st.
Round 6: Sc in next st, [wing: ss in next st, ch 4, miss ch next to hook, sc in next ch, dc in next ch, sc in next ch, ss back into original st], sc in next st, [3dc bob] 3 times, sc in next st, [wing: as before], sc in next 10 st – 18 st.
Push bobbles from the inside out, they will form the head.
Round 7: Sc in each st around - 18 st.
Round 8: [Sc2tog, sc in next st] 4 times, sc2tog, [tail: ss in next st, ch 4, miss ch next to hook, sc in next 3 ch, ss back into original st], sc2tog, sc in next st – 12 st.
Round 9: Sc2tog 6 times – 6 st.
FO, leaving a length of yarn.

Embroider the eyes using three short lines of black yarn for each eye. Make the beak by sewing a French knot with the black yarn. To do this, take the yarn out between the eyes and, with the needle held close to this point, wrap the yarn three times around the needle. Sew back into the head very close to the point where the yarn came out.

Using cotton yarn, sew a loop at the top of the head if you want to hang your robin as a decoration. Finish stuffing and neatly sew up the hole at the back. Don’t cut the brown yarn but use it to keep the wings in place. Sew one or two stitches in the middle of each wing to attach it to the back.

Thursday, 10 December 2015

Mini Snowman - free crochet pattern


Here's another, pretty simple Christmas crochet pattern, for a wee snowman in a woolly hat and scarf. Hang him on your tree, or use him as part of a Christmas display. As you can see, he looks great with the tiny penguin from yesterday.


Abbreviations:
ch = chain
st = stitch or stitches
sc = single crochet (US), double crochet (UK)
tog = together
sc2tog = decrease by working two sc together
BLO = work in back loop only
FO = fasten off

Approximate size: 5cm/2" tall.

General instructions:
Work in rounds unless otherwise stated and do not join rounds unless told to. Use a stitch marker to mark the start of a round - a small piece of different coloured yarn placed under the stitch at the start of the round will do. To start a round, you can use the magic ring method, but I prefer to ch 2, and work the appropriate number of sc into 1st ch. If you work the sc over the tail of yarn as well you can use that to pull the hole tight.

When changing from one colour of yarn to another work the stitch before the change until there are two loops left on the hook. Then use the new colour for the final yarn over hook and pull through.

Work through both loops of stitches unless otherwise indicated.

You will need:
Small amounts of white yarn, and two colours of bright yarn for the hat and scarf, double knitting or worsted weight.
Small amount of black yarn to embroider details.
A length of cotton yarn to hang as a decoration.
Small amount of stuffing.
3.5mm (E) hook.
Tapestry needle.

Pattern:
Start with main hat colour yarn.
Round 1: Ch 2, work 6 sc into 1st ch - 6 st.
Round 2: [2 sc in next st, sc in next st] 3 times - 9 st.

Round 3: [2 sc in next st, sc in next 2 st] 3 times - 12 st.
Change to contrast hat colour yarn.
Round 4: Sc in each st around – 12 st.
Change to white yarn.
Round 5: BLO Sc in each st around – 12 st.
Round 6 - 7: (2 rounds) Sc in each st around – 12 st.
Round 8: [Sc2tog, sc in next 2 st] 3 times – 9 st.
Round 9: 2 sc in each st around - 18 st.
Round 10 - 13: (4 rounds) Sc in each st around – 18 st.
Round 14: [Sc2tog, sc in next st] 6 times – 12 st.
Round 15: Sc2tog 6 times – 6 st.
FO, leaving a length of yarn, and stuff. With the cotton yarn, sew a loop at the top of the head if you want to hang your snowman as a decoration. Using black yarn sew eyes, mouth and three buttons down the front. Finish stuffing and sew up bottom of snowman neatly.

Scarf:
Using one of the colours you used for the hat, ch 22 and FO. Tie tightly around snowman’s neck with a double knot.


Wednesday, 9 December 2015

Tiny Crochet Penguin - free pattern


Here's my next free Christmas pattern, to make a tiny crochet penguin, only about 3 cm/1.5" tall. This little fellow is perfect as a tree decoration, or you could use him in a Christmas scene or wreath, or add him to the wrapping on a present to make it extra special. He's made all in one go, with the wings crocheted as you go, so he's very quick and easy to create.
 
 
Abbreviations:
ch = chain
st = stitch or stitches
ss = slipstitch
sc = single crochet (US), double crochet (UK)
dc = double crochet (US), treble crochet (UK)
tog = together
sc2tog = decrease by working two sc together
FO = fasten off

General instructions:
Work in rounds unless otherwise stated and do not join rounds unless told to. Use a stitch marker to mark the start of a round - a small piece of different coloured yarn placed under the stitch at the start of the round will do. To start a round, you can use the magic ring method, but I prefer to ch 2, and work the appropriate number of sc into 1st ch. If you work the sc over the tail of yarn as well you can use that to pull the hole tight.

Work through both loops of stitches unless otherwise indicated.

Special stitch instructions:
3 dc bob: bobble stitch. YOH (yarn over hook), insert hook into next stitch, YOH and pull through loop, YOH, pull through 2 loops, *YOH, insert hook into same stitch, YOH and pull through loop, YOH, pull through 2 loops, repeat once from*, YOH, pull through all 4 loops on hook.

You will need:
Small amounts of black and white yarn, double knitting or worsted weight.
Small amount of orange yarn for the beak.
A length of cotton yarn.
Small amount of stuffing.
3.5mm (E) hook.
Tapestry needle.


Pattern:
Start with white yarn.
Round 1: Ch 2, work 6 sc into 1st ch - 6 st.
Round 2: 2 sc in each st around - 12 st.
Round 3: [2 sc in next st, sc in next st] 6 times – 18 st.

Change to black yarn
Round 4: Sc in each st around - 18 st.
Round 5: Sc in next 6 st, [wing: ss in next st, ch 4, miss ch next to hook, sc in next 3 ch, ss back into original st], sc in next st, [3dc bob] 2 times, sc in next st, [wing: as before], sc in next 6 st – 18 st.
Push bobbles from the inside out, they will form the head.
Round 6: Sc in each st around - 18 st.
Round 7: [Sc2tog, sc in next st] 6 times – 12 st.
Round 8: Sc2tog 6 times – 6 st.
FO, leaving a length of yarn.

Embroider the eyes using three short lines of white yarn for each eye, then one or two even shorter lines of black in the centre. Make the beak by sewing a French knot with the orange yarn. To do this, take the yarn out between the eyes and, with the needle held close to this point, wrap the yarn three times around the needle. Sew back into the head very close to the point where the yarn came out. If you find this difficult, just sew two or three short lines in the orange yarn.

Using cotton yarn, sew a loop at the top of the head if you want to hang your penguin as a decoration. Finish stuffing and neatly sew up the hole at the back.
 
 
Here's Penguin just chilling with his friend Snowman, pattern coming soon!


Tuesday, 8 December 2015

Little Christmas Mouse - free pattern


My next free pattern for Christmas is a slight variation on my Little Kissing Mice pattern, so you can make a cute little mouse with a Christmassy red and green stripy sweater. You can add a loop so you can hang it on your Christmas tree, give it as a sweet little stocking filler, or fill it with catnip as a present for your cat.
 

Abbreviations:
ch = chain
st = stitch or stitches
ss = slipstitch
sc = single crochet (US), double crochet (UK)
dc = double crochet (US), treble crochet (UK)
tog = together
sc2tog = decrease by working two sc together
FLO = work in front loop only
FO = fasten off

Approximate size: 5cm/2" long without tail.

General instructions:
Work in rounds unless otherwise stated and do not join rounds unless told to. Use a stitch marker to mark the start of a round - a small piece of different coloured yarn placed under the stitch at the start of the round will do. To start a round, you can use the magic ring method, but I prefer to ch 2, and work the appropriate number of sc into 1st ch. If you work the sc over the tail of yarn as well you can use that to pull the hole tight.

When changing from one colour of yarn to another work the stitch before the change until there are two loops left on the hook. Then use the new colour for the final yarn over hook and pull through.

Work through both loops of stitches unless otherwise indicated.

You will need:
Small amounts of double knitting or worsted weight yarn:
A natural fur colour for the head and tail.
Two colours of yarn, such as red and green, for the body.
Small amount of black yarn to embroider eyes.
Small length of cotton yarn.
Small amount of stuffing.
3.5mm (E) hook.
Tapestry needle.


Pattern:
 
Start with natural fur colour yarn.
Round 1: Ch 2, work 4 sc into 1st ch - 4 st.
Round 2: [2 sc in next st, sc in next st] 2 times - 6 st.

Round 3: [2 sc in next st, sc in next 2 st] 2 times - 8 st.
Round 4: [2 sc in next st, sc in next 3 st] 2 times - 10 st.
Round 5: Sc in each st around – 10 st.
Round 6: [2 sc in next st, sc in next 4 st] 2 times - 12 st.
Round 7: Sc in next 6 st, [ear, in FLO of next st: ss, ch 2, 5 dc, ch 2, ss], sc in next 3 st, [ear as before], sc in next st – 12 st (counting each ear as one st).
Round 8: Sc in each st around, working into the back loop behind each ear – 12 st.
Stuff head and use black yarn to sew eyes.
Change to first yarn colour for body.
Round 9: [2 sc in next st, sc in next st] 3 times, sc in next 6 st – 15 st.
Round 10: [2 sc in next st, sc in next 4 st] 3 times – 18 st.
Change to second yarn colour for body.
Round 11: Sc in each st around – 18 st.
Change to first yarn colour for body.
Round 12: [Sc in next 2 st, 2 sc in next st, sc in next 3 st] 3 times – 21 st.
Change to second yarn colour for body.
Round 13: Sc in each st around – 21 st.
Change to first yarn colour for body.
Round 14 - 15: (2 rounds) Sc in each st around – 21 st.
Change to natural fur colour yarn.
Round 16: [Sc2tog, sc in next 5 st] 2 times, sc2tog, sc in next 2 st, [tail: ss in next st, ch 20, miss ch next to hook, ss 19, ss back into original st], sc in next 2 st – 18 st.
Round 17: Sc2tog 2 times, sc in next 6 st, sc2tog 4 times – 12 st.
Round 18: Sc2tog 6 times – 6 st.
FO, leaving a length of yarn. Using cotton yarn, sew a loop behind the head if you want to hang your mouse as a decoration. Finish stuffing and sew up bottom of mouse neatly - if you stuff the body well it will sit up nicely.

Another simple idea for a little tree decoration is to make one of my Little Teddies using white yarn and give it a red scarf.


For more Christmas crochet ideas, I also have a Chubby Gnome pattern in my Etsy shop which includes instructions to make these Christmas characters - a cute little Santa and Elf.


If you especially love mice and would like to make some slightly larger ones, try my Wee Mousie pattern.


Keep an eye out here and on my Facebook page as I'll be posting four totally new mini Christmas patterns.

Saturday, 5 December 2015

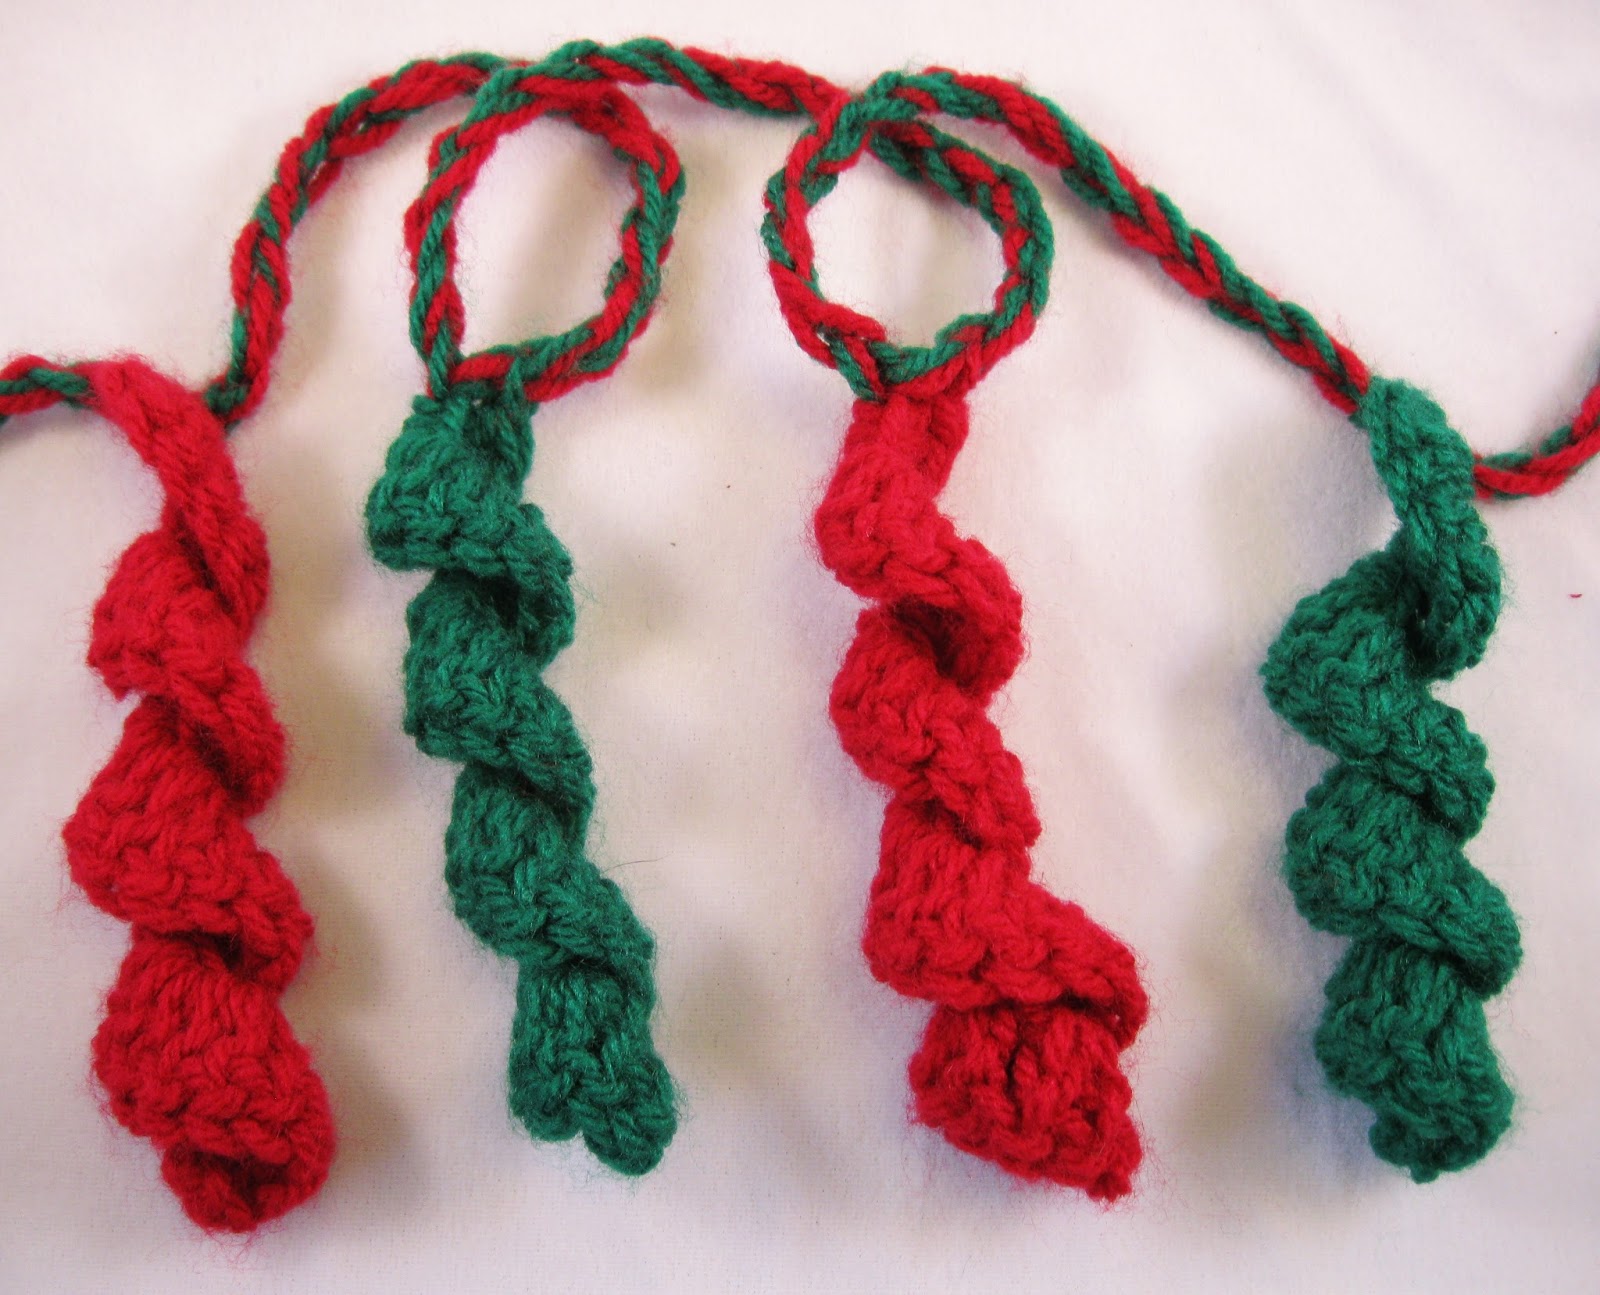
Crochet streamer bunting - free pattern


When my children were young and I was decorating the house for Christmas, I was happy with the Christmas tree, but I felt that I needed something up high, to really fill the room. I tried paper streamers, but they always broke and didn't last from year to year. I think I looked for crochet bunting patterns, but they were too complex for the time I had to get something done, involving making lots of small items and then joining them together. So, I came up with this very simple, very quick bunting with streamers hanging from it, in red and green, nice festive colours. You can make it any length you like, change the length of the streamers, and use whatever colours fit in with your Christmas colour scheme. Pale blue and white would give a nice frosty look, especially if you used yarn with a sparkle in it. It's easy to store and it will look great when you bring it out each year.


Crochet Streamer Bunting
 
You will need:
Double knitting weight yarn (cheap acrylic is fine) in two colours. How much you'll need will depend on how long you make it, but 100g ball of each should get you quite a long way.
6mm hook (US J/10)
 
Abbreviations:
ch = chain
dc = double crochet (US), treble crochet (UK)
 
Method:
Work 2 strands together to start.
Ch 48
* Using only 1 strand ch 13, turn.
2 dc in 4th ch from hook, 4 dc in next 9 ch.
Join back into the double strand by working a slipstitch with both strands.
Ch 15 using both strands*
Work from * to *, alternating which colour you use to form the spiral, as many times as necessary to fit your room.
Ch 48, Fasten off.
 
The lengths of chain at the beginning and end are long enough to make loops to go round the end of curtain poles (which is how I secure them), or tie around whatever is handy.


I also made some with shorter streamers (see above), to do that just substitute the instructions below into the main pattern.
* Using only 1 strand ch 10, turn.
2 dc in 4th ch from hook, 4 dc in next 6 ch.

The bunting with the longer streamers is about 17' long, and the one with the shorter streamers is about 31" long. It's a while since I made them, but I think I used about one 100g ball of each colour for each length of bunting.

For another slight variation of this pattern check this post from 2009 when I made a multicoloured version for birthdays: http://lucyravenscar.blogspot.co.uk/2009/06/party-time.html