Showing posts with label free pattern. Show all posts

Sunday, 28 March 2021

Chubby Bunnies - free patterns


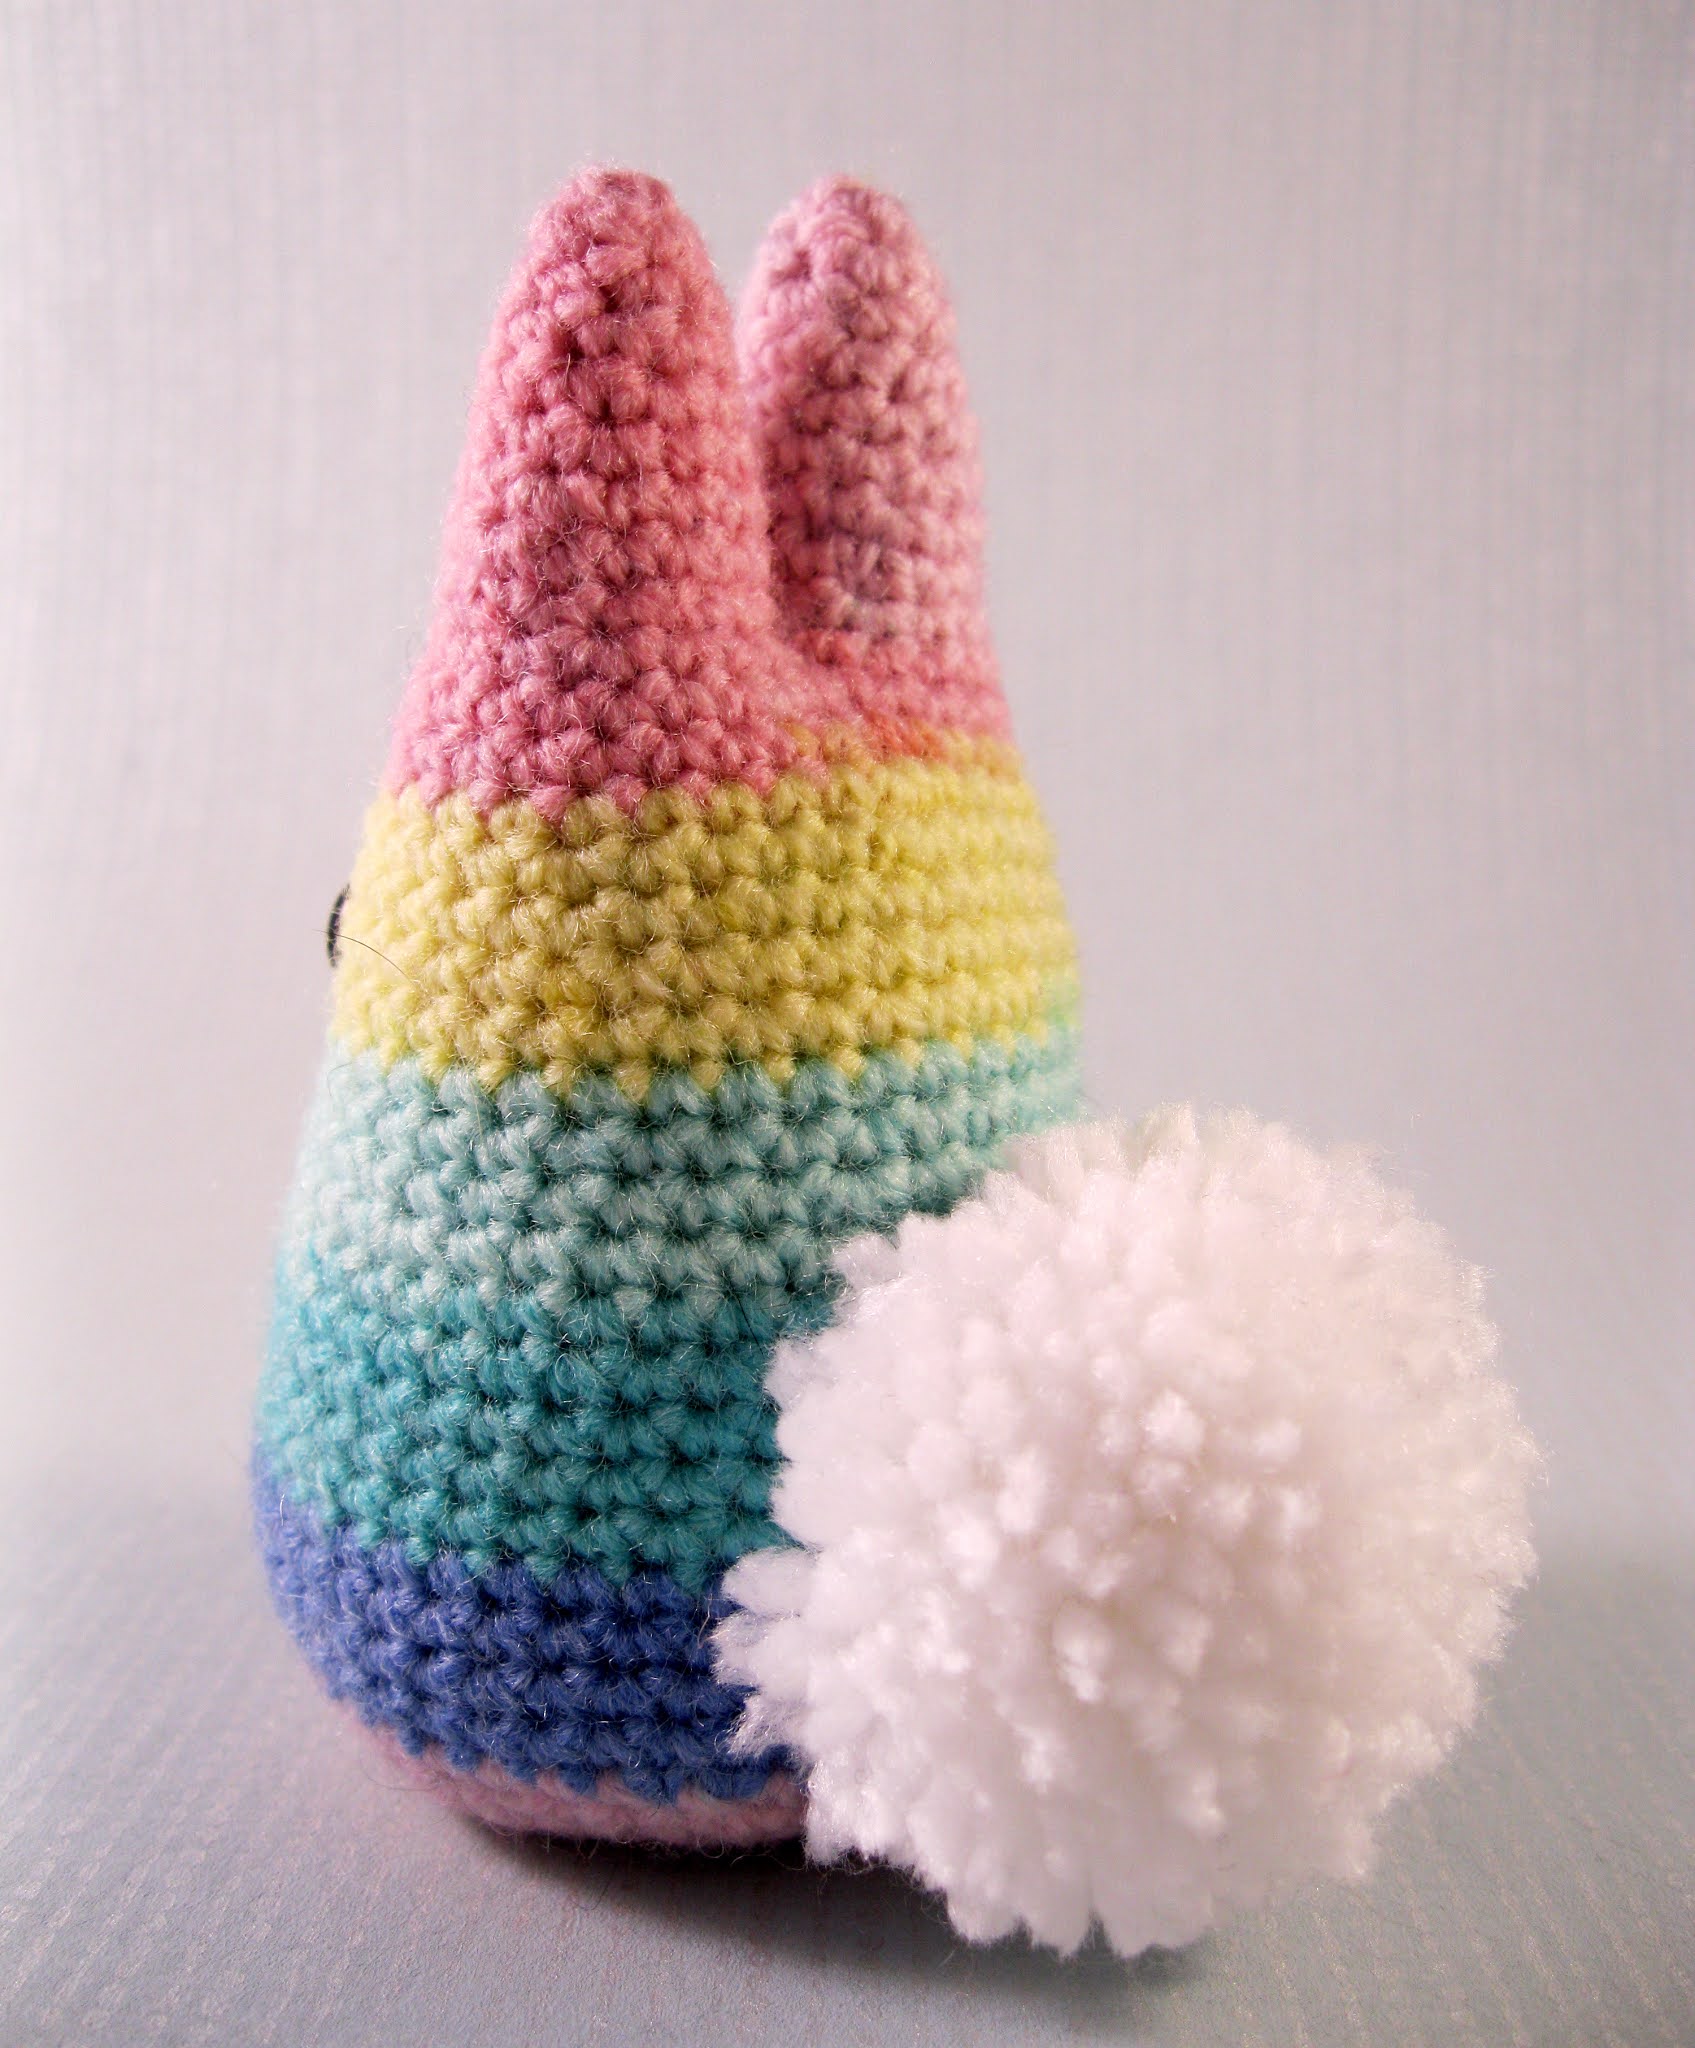
It's a week to go until Easter, and I've been working on some cute Chubby Bunnies and Baby Chubby Bunnies. You can find the free patterns on my Ravelry page and I've made a few different types to show you some options.


You can make them in natural rabbit colours, or use colourful or striped yarn for a fun look. Crochet the tails, or make a great big pom-pom instead. The Baby Chubby Bunnies are so quick and easy to make, you could crochet lots of them and use them in an Easter Egg hunt as an alternative to chocolate.


I hope you have fun with the patterns, let me know if you make any!


Friday, 30 October 2020

Super Quick Snake - Free Crochet Pattern


These little snakes are quick and easy to crochet, they don't need stuffing and there's hardly any sewing to finish them off. They naturally curl around your fingers and are great for anyone who loves snakes. They would also make cool and creepy decorations for Halloween.


You will need:

Small amounts of 2 different colours of DK weight yarn to work together - green and black, or green and yellow make nice snake colours mixed together (thinner or thicker yarn is fine, just use a thinner or thicker hook).

Small amount of red yarn for the mouth and eyes.

Tapestry needle.

4.5mm crochet hook.

Finished size: approximately 18 cm/7” long.


Abbreviations:

ch = chain

st = stitch or stitches

ss = slipstitch

dc = double crochet (US), treble crochet (UK)

hdc = half double crochet (US), half treble crochet (UK)

tog = together

dc2tog = decrease by working two dc together (see special stitch instructions)

FO = fasten off


General instructions:

This pattern is written using US crochet terms. For the UK equivalents, see abbreviations list.

The head is worked in rounds and is not joined. To start a round, you can use the magic ring method, but I prefer to work into the  1st chain stitch, working over the tail of yarn and using that to pull the hole tight.

Special stitch instructions:

Dc2tog: YOH (yarn over hook), insert hook into next stitch, YOH and pull through loop, YOH, pull through 2 loops, YOH, insert hook into next stitch, YOH and pull through loop, YOH, pull through 2 loops, YOH, pull through all 3 loops on hook.


Starting at the head, holding both strands of yarn together:

Round 1: ch 3, work 8 dc into 1st ch - 8 st.

Round 2: dc2tog 4 times - 4 st.

Ch 21, sc into 2nd ch from hook, sc into next ch, 2 hdc into next 18 ch.

Ss into next st on head, FO leaving some yarn.

Using the red yarn sew one eye with three short lines. Take the yarn out of the small hole where you started the head and make a tiny stitch to secure it. Make a loop for the tongue and secure it with another tiny stitch, then sew the other eye and secure the end of the yarn. Cut the loop of yarn to look like a forked tongue (if it frays put a tiny bit of glue on the strands). Use the ends of yarn from the snake’s body to sew up the back of its head and weave in any ends.


Wednesday, 30 October 2019

Little Monster Finger Puppets - free crochet pattern


Here's a little treat for Halloween that's quick and simple to crochet.


You will need:
Small amount of yarn for the body, any colour you like (I think green or purple looks good).
Small amount of red yarn for the mouth and eyes.
Small amount of black yarn for eyes.
Tapestry needle.
3.5mm crochet hook (US E hook).

Finished size: approximately 4 cm/1.5” tall.

Abbreviations:
ch = chain
st = stitch or stitches
ss = slipstitch
sc = single crochet (US), double crochet (UK)
dc = double crochet (US), treble crochet (UK)
hdc = half double crochet (US), half treble crochet (UK)
BLO = back loop only
FLO = front loop only
tog = together
sc2tog = decrease by working two sc together
bob = bobble (see special stitch instructions)
FO = fasten off

General instructions:
This pattern is written using US crochet terms. For the UK equivalents, see abbreviations list.

Work in rounds unless otherwise stated and do not join rounds unless told to. Use a stitch marker to mark the start of a round - a small piece of different coloured yarn placed under the stitch at the start of the round will do. To start a round, you can use the magic ring method, but I prefer (ch2, work 6 sc into 1st ch). If you work the 6 sc over the tail of yarn as well you can use that to pull the hole tight. You can find a detailed tutorial on how to do this here on my blog.

Work through both loops of stitches unless otherwise indicated.

Special stitch instructions:
3 dc bob: bobble stitch for nose. YOH (yarn over hook), insert hook into next stitch, YOH and pull through loop, YOH, pull through 2 loops, *YOH, insert hook into same stitch, YOH and pull through loop, YOH, pull through 2 loops, repeat once from*, YOH, pull through all 4 loops on hook.


Start with yarn for body.
Round 1: ch 2, work 6 sc into 1st ch - 6 st.
Round 2: 2 sc in each st around - 12 st.
Round 3: [2 sc in next st, sc in next 3 st] 3 times – 15 st.
Round 4: sc in each st around - 15 st.
Round 5: sc in next 6 st, 3 dc bob in next st, sc in next 8 st – 15 st.
Round 6: sc in next 4 st, [FLO: sc in next st, 2 hdc in next st, hdc in next 2 st, 2 hdc in next st, sc in next st], sc in next 5 st – 17 st.
Round 7: sc in next 4 st, change to red yarn, [work in back loops remaining from working in front loops in previous round: hdc in next 6 st], change to body yarn, sc in next 5 st – 15 st.
Cut red yarn, leaving a length to sew the eyes. Sew 4-5 lines vertically over rounds 3 and 4 on either side of the nose. Use black yarn to sew a dot in the centre of each eye. Secure ends of yarn.
Round 8: sc in next 5 st, [FLO: sc in next st, 2 hdc in next st, hdc in next st, 2 hdc in next st, sc in next st], sc in next 5 st – 17 st.
Round 9: sc in next 5 st, [work in back loops remaining from working in front loops in previous round: hdc in next 5 st], sc in next 5 st – 15 st.
Round 10: sc in next 3 st, [arm: ss into next st, ch 7, turn, ss into next 2 ch, (ch 3, turn, ss in next 2 ch) 2 times, ss into next 4 ch, ss back into original st on round], sc in next 7 st, [arm], sc in next 3 st - 15 st.
Round 11: sc in each st around (work into the first ss used to make each arm, not the final ss) - 15 st.
Round 12: sc in each st around - 15 st.
Ss in next st, FO and weave in end of yarn.

Stick it on your finger and have some monstrous fun!


Tuesday, 17 October 2017

Making the wings for the Fierce Little Dragon

My Fierce Little Dragon pattern is one of my most popular patterns - since I made it available on Ravelry in 2011 it has been downloaded over 90000 times! However, it's not necessarily a pattern for total beginners, as there are some more complicated elements, in particular the wings.


I'm happy with the basic design, which is different from the normal bat-wing look of dragon wings, and was somewhat inspired by Wayne Anderson's illustrations for The Flight of Dragons.


I used front post stitches in the wings to make ridges that give them stiffness, but as the pattern stands the two wings aren't totally symmetrical. This doesn't show very obviously when they are sewn on, but I had a bit of a play with the design and came up with something that makes the wings a bit more symmetrical. I have updated the pattern with the new details (so go and download it again to get them) and I decided to make a little tutorial to show the more fiddly parts of making them. Whenever you want to make the dragon, read through the pattern for the wings, and follow this tutorial to help.

So, here are the new, improved wings. Upper side:


And lower side:


For many of the stitches (sc, hdc and dc, in US terms) you will be working around the 'posts' of the stitches, which is the main body of the stitch, rather than through the two loops at the top. With front post stitches (fpsc, fphdc and fpdc) you insert your hook from right to left around the back of the post, and that makes a ridge at the back of your work.

Working around a double crochet (dc) stitch, it's quite easy to see where to put your hook. Here are the dc stitches from the previous row:


Here's an arrow to show where your hook should go:


And here's the hook being inserted (after doing a yarn over hook):


You work around the hdc and the sc stitches in the same way. It can be a bit harder to see where to put your hook with the sc stitches, but once you have done it with the larger stitches you'll start to get the hang of it. Here's a photo showing how you do an fpsc around the last sc on the row:


At the end of the row, you then work an sc into the top of the last sc you worked around. This stops the edge of the wing ending up sloping to the right. This is what it looks like when you work into the last sc:


You then ch 1 and turn, here's what the wing looks like when turned (I undid the ch 1 as it's hard to count the stitches in a photo otherwise):


For the next row, you miss the first sc and instead work around the second sc. This is part of what stops the edge forming a slope. Here's where your hook should go:


And here's a photo showing the hook inserted:


I hope this helps, just ask if you have any other questions about the pattern, and have fun making your dragons!


Sunday, 26 February 2017

Free Animal Amigurumi

A few months ago I designed a set of six animal patterns for LoveCrochet. This is a site that started off selling yarn but now also sells patterns (you'll find most of mine on there), and has now started selling their own brands of yarn. One of those is Paintbox, which comes in a really good range of colours. I used the Simply DK for these animals, which is an acrylic yarn perfect for amigurumi, but they also have acrylic yarn in aran and chunky weights, and cotton DK yarn.

I designed the animals to be (hopefully) cute and cuddly, and fairly simple for anyone new to making amigurumi. They include Zachary the Frog, Alfie the Duckling, Amelie the Mouse, Jamie the Kitten, Sam the Puppy and Tilly the Piglet. They're all free for you to download at LoveCrochet, just click on the name to go straight to the pattern.


Friday, 7 October 2016

Little Pumpkin Mice - free amigurumi pattern


I made Little Kissing Mice for Valentine's Day and a Little Christmas Mouse for (you've guessed it!) Christmas, so now that autumn is here I thought it would be fun to make some Pumpkin Mice.


I’m not sure if these mice have eaten their way through tiny pumpkins or if they’re wearing little costumes but either way they’re cute, and they make perfect decorations for autumn and Halloween.

Abbreviations:
ch = chain
st = stitch or stitches
ss = slipstitch
sc = single crochet (US), double crochet (UK)
dc = double crochet (US), treble crochet (UK)
tog = together
sc2tog = decrease by working two sc together
FLO = work in front loop only
FO = fasten off

Approximate size: 5cm/2" long without tail.

General instructions:
Work in rounds unless otherwise stated and do not join rounds unless told to. Use a stitch marker to mark the start of a round - a small piece of different coloured yarn placed under the stitch at the start of the round will do. To start a round, you can use the magic ring method, but I prefer to ch 2, and work the appropriate number of sc into 1st ch. If you work the sc over the tail of yarn as well you can use that to pull the hole tight.

When changing from one colour of yarn to another work the stitch before the change until there are two loops left on the hook. Then use the new colour for the final yarn over hook and pull through.

Stuff as you go along.

Work through both loops of stitches unless otherwise indicated.

You will need:
Small amounts of yarn in a natural colour for the head and tail, and orange for the pumpkin, double knitting or worsted weight.
Small amounts of black yarn to embroider eyes.
Small amount of stuffing.
3.5mm (E) hook.
Tapestry needle.

Start with natural colour yarn.
Round 1: Ch 2, work 4 sc into 1st ch - 4 st.
Round 2: [2 sc in next st, sc in next st] 2 times - 6 st.
Round 3: [2 sc in next st, sc in next 2 st] 2 times - 8 st.
Round 4: [2 sc in next st, sc in next 3 st] 2 times - 10 st.
Round 5: Sc in each st around – 10 st.
Round 6: [2 sc in next st, sc in next 4 st] 2 times - 12 st.
Round 7: Sc in next 6 st, [ear, in FLO of next st: ss, ch 2, 5 dc, ch 2, ss], sc in next 3 st, [ear as before], sc in next st – 12 st (counting each ear as one st).
Round 8: Sc in next 2 st, 2 sc in next st, sc in next 3 st, sc in back loop behind ear, sc in next st, sc2tog, sc in back loop behind ear, sc in next st – 12 st.
Change to orange yarn.
Round 9: [2 sc in next st] 6 times, sc in next 6 st – 18 st.
Round 10: [2 sc in next st, sc in next 5 st] 3 times – 21 st.
Round 11 - 16: (6 rounds) Sc in each st around – 21 st.
Round 17: [Sc2tog, sc in next 5 st] 2 times, sc2tog, sc in next 3 st, change to natural colour yarn, [tail: ss in next st, ch 20, miss ch next to hook, ss 19, ss back into original st and change back to orange yarn], sc in next st – 18 st.
Round 18: Sc2tog 2 times, sc in next 6 st, sc2tog 4 times – 12 st.
Round 19: Sc2tog 6 times – 6 st.

FO, leaving a length of yarn about 15”/40 cm long. Finish stuffing and use black yarn to sew eyes. Using the length of yarn, sew up the bottom of the mouse neatly. Then sew six lines evenly spaced around the pumpkin, from the neck down to the bottom (the bottom point shouldn’t be the hole you sewed up, just a little in front of that will be better and will make the mouse sit up properly). Pull each line through tightly so your mouse has a flat base.


Wednesday, 21 September 2016

Itty Bitty Bat - German translation

I'm sure some of you are starting to think about Halloween already, so if you want to crochet something cute for the occasion, why not check out my Itty Bitty Bat pattern (see the list of free patterns on the right for the link), which now includes a version in German, courtesy of Annet Tafelski.


Saturday, 19 March 2016

Spring and Easter Patterns


We’ve had a lovely week here in the south of England, still quite chill but with lots of blue skies and sunshine, so it’s started to feel like spring – some of the muddy paths on my regular dog walks have even started to dry up! However, I still can’t believe it’s only a week until Easter. I thought I’d put together a list of my patterns that might be good to make for Easter, maybe as a substitute for one more chocolate egg, or as little extras in an Easter basket. I’ve also picked a few that make me think of spring, and getting outside to enjoy nature. Just click on the name to go to the patterns.

This is a pattern that allows you to make a cute lamb or rabbit, with the choice to have them wearing a dress/skirt or a sweater (jumper in the UK, hence the name). They’re about 6.5” tall (not including the rabbit’s ears) and would make a great Easter gift.


I originally designed these at Easter, the idea is that they’re egg-shaped, but also that I associate gnomes with gardening, and spring is when all the flowers start to appear. I think they’d be great to make as a gift with some packets of seeds and some plant pots or garden tools.


This pattern to make a set of crocheted mini creatures also reminds of spring, and children getting outside and exploring. Make it so you don’t end up with the real creatures in your house!


This is a very simple free pattern to make a cute little egg friend for Easter. I made a set of six for each of my boys and put them in old egg boxes, and they went on all sorts of adventures together!


Here’s a free pattern to make a little Easter bunny – you can make it in natural colours, or go for spring pastels, or even make it look like a chocolate bunny.


Tiny Chick
Very quick and easy to make, imagine lots of these on the breakfast table on Easter Sunday.


I haven’t seen any lambs in the fields yet, but here’s a free pattern to make a tiny little sheep, perfect for all us yarn lovers.


If you’d like a more realistic looking rabbit, here’s a tiny one you can make.