Showing posts with label easter. Show all posts

Sunday, 28 March 2021

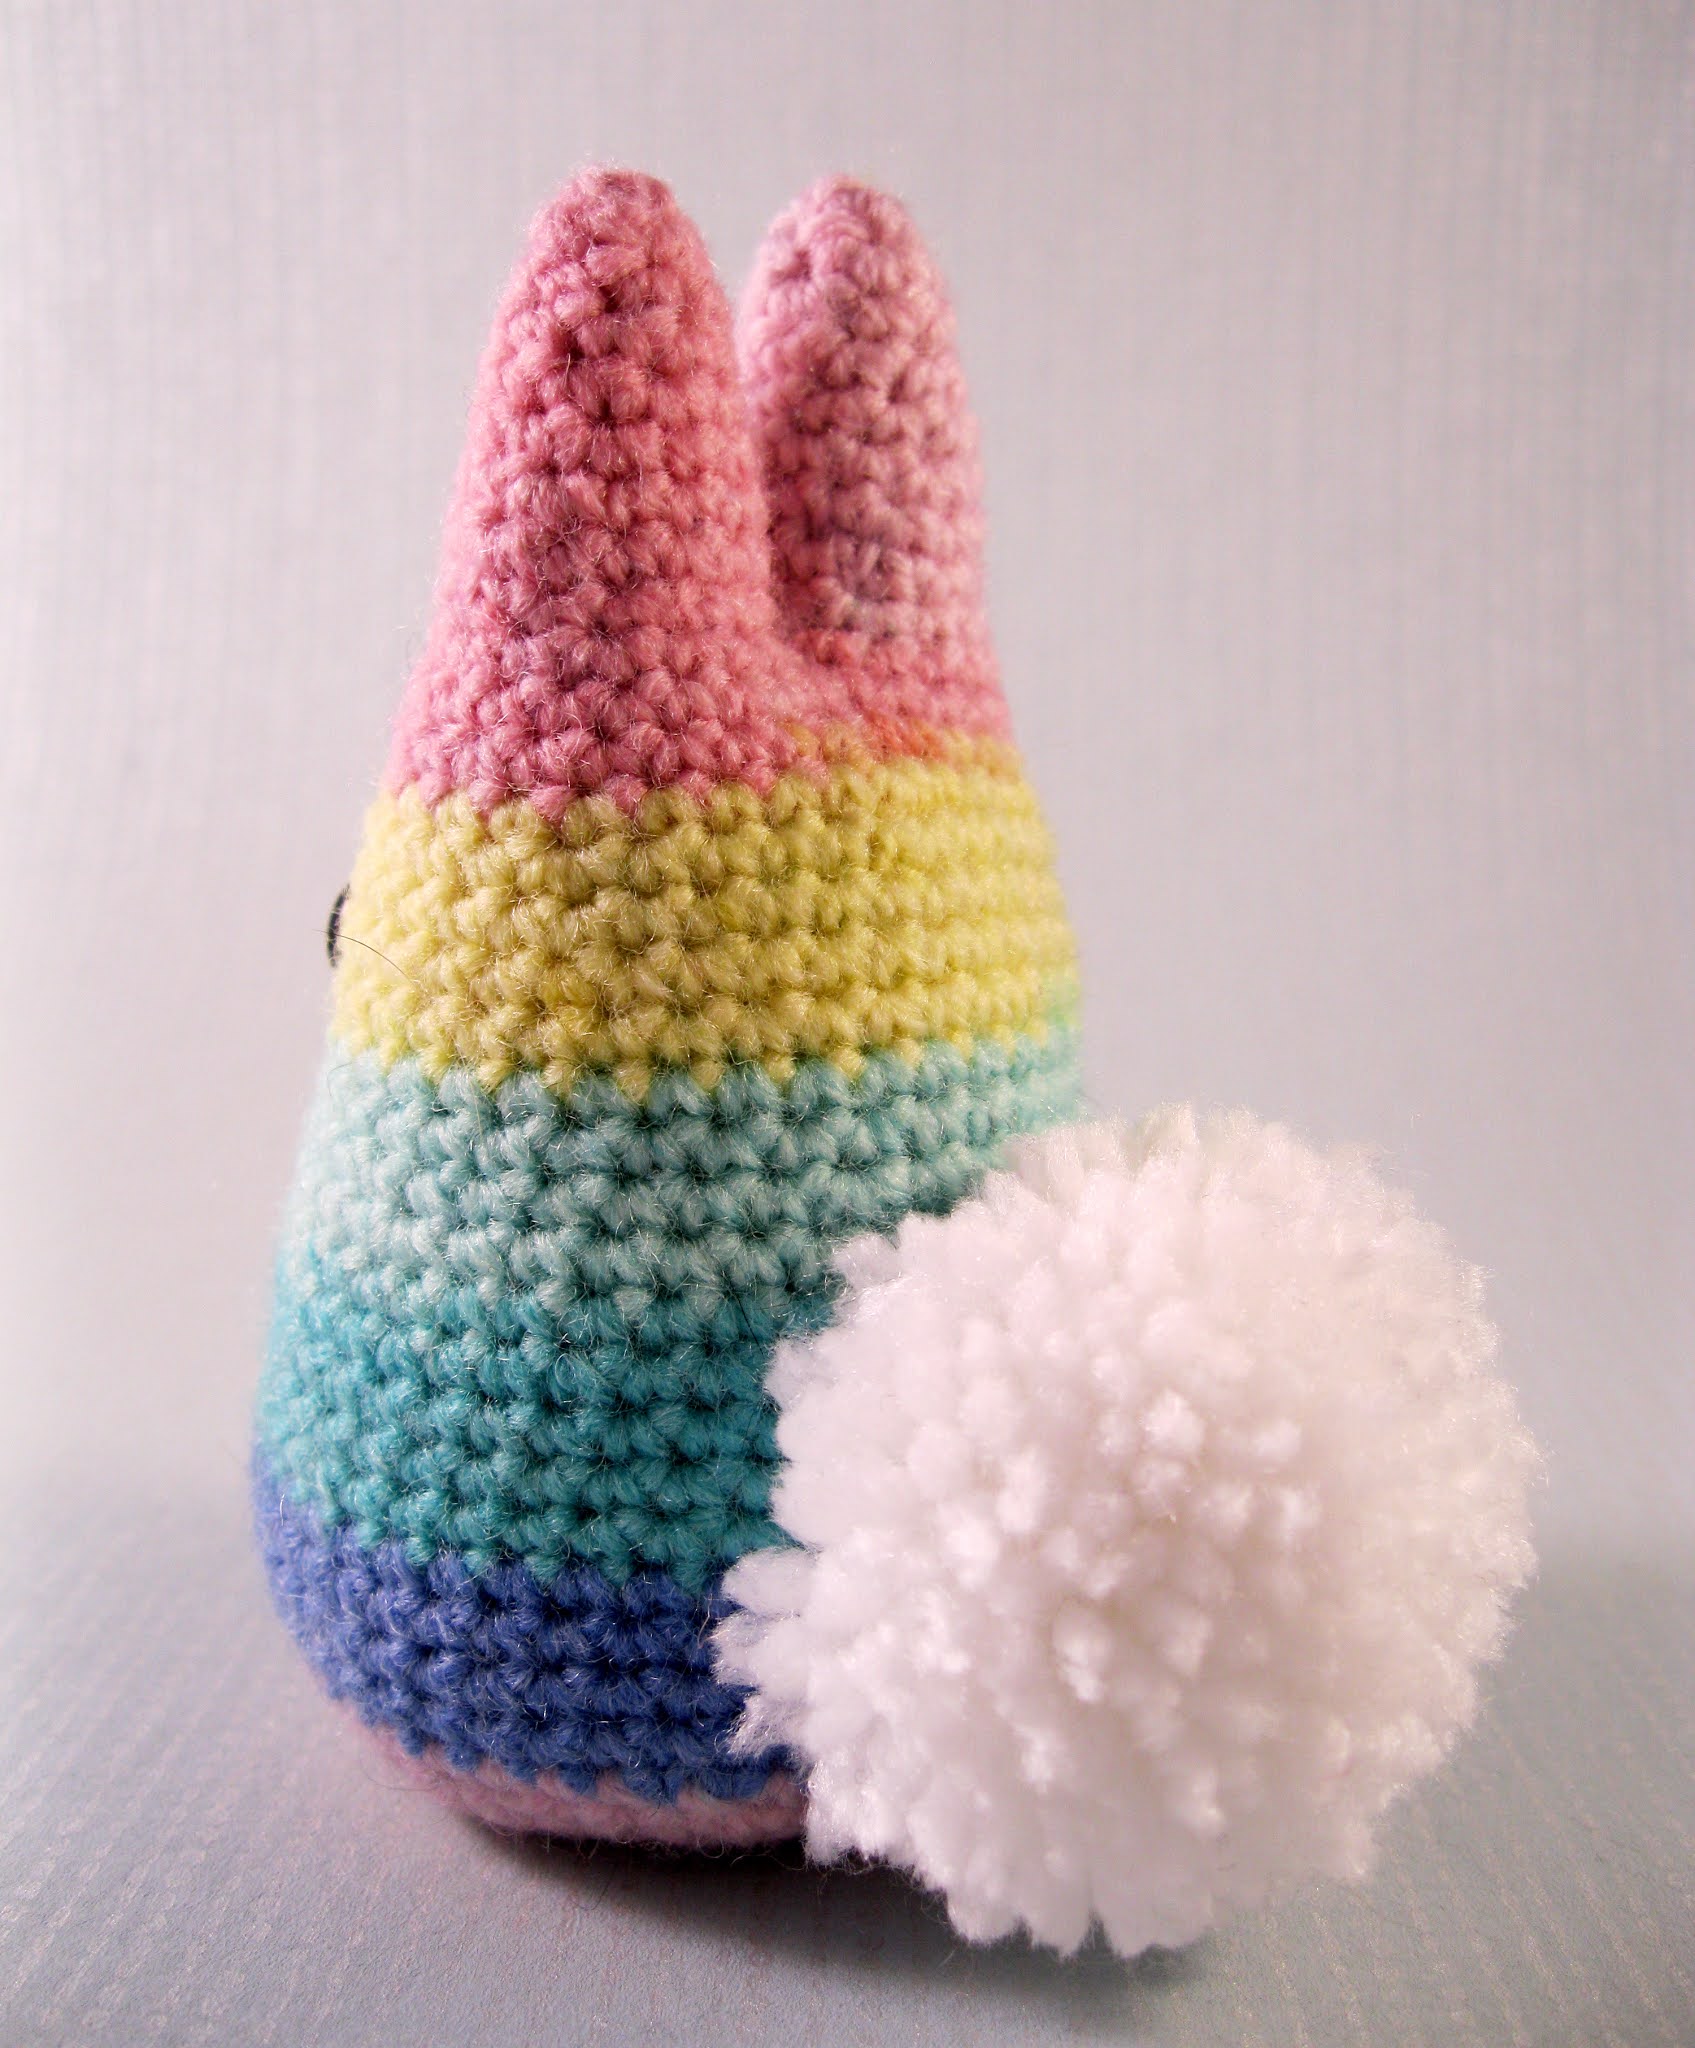
Chubby Bunnies - free patterns


It's a week to go until Easter, and I've been working on some cute Chubby Bunnies and Baby Chubby Bunnies. You can find the free patterns on my Ravelry page and I've made a few different types to show you some options.


You can make them in natural rabbit colours, or use colourful or striped yarn for a fun look. Crochet the tails, or make a great big pom-pom instead. The Baby Chubby Bunnies are so quick and easy to make, you could crochet lots of them and use them in an Easter Egg hunt as an alternative to chocolate.


I hope you have fun with the patterns, let me know if you make any!


Saturday, 19 March 2016

Spring and Easter Patterns


We’ve had a lovely week here in the south of England, still quite chill but with lots of blue skies and sunshine, so it’s started to feel like spring – some of the muddy paths on my regular dog walks have even started to dry up! However, I still can’t believe it’s only a week until Easter. I thought I’d put together a list of my patterns that might be good to make for Easter, maybe as a substitute for one more chocolate egg, or as little extras in an Easter basket. I’ve also picked a few that make me think of spring, and getting outside to enjoy nature. Just click on the name to go to the patterns.

This is a pattern that allows you to make a cute lamb or rabbit, with the choice to have them wearing a dress/skirt or a sweater (jumper in the UK, hence the name). They’re about 6.5” tall (not including the rabbit’s ears) and would make a great Easter gift.


I originally designed these at Easter, the idea is that they’re egg-shaped, but also that I associate gnomes with gardening, and spring is when all the flowers start to appear. I think they’d be great to make as a gift with some packets of seeds and some plant pots or garden tools.


This pattern to make a set of crocheted mini creatures also reminds of spring, and children getting outside and exploring. Make it so you don’t end up with the real creatures in your house!


This is a very simple free pattern to make a cute little egg friend for Easter. I made a set of six for each of my boys and put them in old egg boxes, and they went on all sorts of adventures together!


Here’s a free pattern to make a little Easter bunny – you can make it in natural colours, or go for spring pastels, or even make it look like a chocolate bunny.


Tiny Chick
Very quick and easy to make, imagine lots of these on the breakfast table on Easter Sunday.


I haven’t seen any lambs in the fields yet, but here’s a free pattern to make a tiny little sheep, perfect for all us yarn lovers.


If you’d like a more realistic looking rabbit, here’s a tiny one you can make.


Wednesday, 9 April 2014

Quick and Easy Easter Bunny - free pattern!


Whilst I was making the Little Teddies from the previous post, I realised it wouldn't take much turn them into little bunnies. They don't take very long to make, and you only need scraps of yarn, so they're perfect little extras to make for an Easter basket. I made a couple using pastel self-striping yarn, which seemed nice and spring-like, then I made one in brown yarn to be a little chocolate bunny.


Easter Bunny

 
This little bunny will end up about 4.5 cm/1.75" tall, not including ears, depending on the yarn you use.
 
Abbreviations:
ch = chain
st = stitch or stitches
ss = slip stitch
sc = single crochet (US), double crochet (UK)
dc = double crochet (US), treble crochet (UK)
tog = together
sc2tog = decrease by working two sc together
pop = popcorn (see special stitch instructions)
FO = fasten off

General instructions:
Work in rounds unless otherwise stated and do not join rounds unless told to. Use a stitch marker to mark the start of a round - a small piece of different coloured yarn placed under the stitch at the start of the round will do. To start a round, you can use the magic ring method, but I prefer (ch 2, work 6 sc into 1st ch). The first ch is a slip knot so it will expand and if you work the 6 sc over the tail of yarn as well you can use that to pull the hole tight.

Work through both loops of stitches unless otherwise indicated.
 
Special stitch instructions:

3 dc pop: popcorn stitch for tail. Work 3 dc into 1 st, take hook out leaving loop, put hook through 1st dc & pull loop through.
(When changing colour for the tail work the sc before the change until there are two loops left on the hook. Then use the new colour for the final yarn over hook and pull through. When changing back to the main colour after doing a 3dc pop work the last dc of the popcorn until there are two loops left on the hook. Then use the main colour for the final yarn over hook and pull through. Finish making the popcorn st and you will have the main colour on your hook for the next stitch.)

4 dc pop: popcorn stitch for arms and legs. Work 4 dc into 1 st, take hook out leaving loop, put hook through 1st dc & pull loop through.

You will need:
Small amount of yarn, any colour you like, in double knitting or worsted weight.
Small amount of white or cream yarn for tail.
Small amount of black yarn (or cream and pink for chocolate bunny) for eyes and mouth.
Small amount of stuffing.
3.5mm (E) hook.
 

Round 1: Ch 2, work 6 sc into 1st ch - 6 st.
Round 2: [2 sc in next st, (sc and ss into next st, (ear) ch 6, sc into 2nd ch from hook, dc into next 3 ch, sc into next ch, ss back into original st), 2 sc in next st] 2 times - 12 st (the ss used to start the ear counts as a st, and you will work into it on the next round).
Round 3: [2 sc in next st, sc in next st] 6 times – 18 st.

Round 4 - 6: (3 rounds) Sc in each st around - 18 st.
Round 7: [Sc2tog, sc in next st] 6 times – 12 st.
Round 8: [Sc2tog, sc in next 2 st] 3 times – 9 st.
Round 9: [2 sc in next st, sc in next 2 st] 3 times – 12 st.
Round 10: Sc in next 5 st, 4dc pop, sc in next 4 st, 4dc pop, sc in next st - 12 st.
Round 11 - 12: Sc in each st around - 12 st.
Round 13: [2 sc in next st, sc in next 3 st] 3 times – 15 st.
Round 14: Sc in next 4 st, change to tail colour yarn, 3dc pop, change back to main yarn, sc in next 4 st, 4dc pop, sc in next 3 st, 4dc pop, sc in next st - 15 st.
Round 15: [Sc2tog, sc in next 3 st] 3 times – 12 st.
Round 16: [Sc2tog] 6 times – 6 sc. FO, leaving a length of yarn.
 
Stuff head and body and embroider features. Use length of yarn to sew up hole at bottom, pulling yarn upwards through body to make sure the bottom is flat. You can also use this yarn to sew a stitch or two at the bottom of each ear to make sure they're pointing forwards.


Saturday, 5 April 2014

Easter Patterns

Just a quick post to highlight some of my patterns that might make good presents for Easter. In my Etsy shop you can find my Woolly Jumpers pattern, which gives you instructions to make a cute little rabbit or lamb, either a boy in a sweater or a girl in a little skirt.


 I also think my Chubby Gnomes pattern is quite fun for Easter - the gnomes are actually egg-shaped, and I associate gnomes with gardens and all the new spring growth.


Here on my blog I have some free patterns that are perfect for small extra Easter gifts (and good if you're worried about too much chocolate!). They're quick and easy to make, and need hardly any sewing to finish them off. Just click on the names below the pictures to see the patterns.


I've got a few more free patterns that I'm going to post in the next few days, some of which will also make good little extras for Easter, so keep an eye out for those.

Sunday, 8 April 2012

Mini Crochet Creatures - Wee Sheepie


Happy Easter! I've just written up a few patterns to make some tiny little crochet animals - a little sheep, a tiny turtle, and two versions of a baby octopus. Below are a list of abbreviations and some general instructions that will help with all the patterns, and then the pattern to make a Wee Sheepie. I'll put the patterns for the other animals in the following posts.

Abbreviations:
ch = chain
st = stitch or stitches
sc = single crochet (US), double crochet (UK)
dc = double crochet (US), treble crochet (UK)
hdc = half double crochet (US), half treble crochet (UK)
BLO = back loop only
FLO = front loop only
tog = together
sc2tog = decrease by working two sc together
FO = fasten off

General instructions:
Work in rounds unless otherwise stated and do not join rounds unless told to. Use a stitch marker to mark the start of a round - a small piece of different coloured yarn placed under the stitch at the start of the round will do. To start a round, you can use the magic ring method, but I prefer (ch2, work 6 sc into 1st ch). If you work the 6 sc over the tail of yarn as well you can use that to pull the hole tight.

Work through both loops of stitches unless otherwise indicated.

 
Wee Sheepie

You will need:
Small amount of cream yarn.
Small amount of black yarn.
Small amount of stuffing.
3.5mm (E) hook.
Special stitch instructions:
4 dc pop: popcorn stitch for ears and legs. Work 4 dc into 1 st, take hook out leaving loop, put hook through 1st dc & pull loop through.
Start using black yarn.
Round 1: Ch 2, work 6 sc into 1st ch - 6 st.
Round 2: [2 sc in next st, sc in next st] 3 times – 9 st.
Round 3: [2 sc in next st, sc in next 2 st] 3 times – 12 st.
Round 4: Sc in each st around - 12 st.
Round 5: Sc in next 4 st, 4 dc pop in next st, sc in next 3 st, 4 dc pop in next st, sc in next 3 st – 12 st.
Round 6: [Sc2tog, sc in next 2 st] 3 times – 9 st.
Change to cream yarn.
Round 7: 2 sc in each st around - 18 st.
Round 8: Sc in each st around - 18 st.
Change to black yarn.
Round 9: 4 dc pop in next st, (change to cream yarn) sc in next 2 st, (black) 4 dc pop in next st, (cream) sc in next 14 st – 18 st.
Round 10 - 11: (2 rounds) Sc in each st around - 18 st.
Round 12: Sc in next st, (black) 4 dc pop in next st, (cream) sc in next 2 st, (black) 4 dc pop in next st, (cream) sc in next 13 st – 18 st.
Round 13: Sc in each st around - 18 st.
Round 14: [Sc2tog, sc in next st] 6 times – 12 st.
Round 15: [Sc2tog] 6 times – 6 st.
FO, leaving lengths of black and cream yarn.
Embroider the eyes making patches using cream yarn with a dot of black yarn on top. Stuff and use length of cream yarn to sew up hole at bottom.


Wednesday, 13 April 2011

Little Eggie Amigurumi Pattern


Perfect for Easter - make a cute little Eggie friend. He's about the same size as a hen's egg - use light brown or white yarn if you want him to look like one, or bright yarn if you want him to look like a decorated Easter egg.


Materials:
Small amount of yarn, any colour you like. Thickness is not too important - I used double knitting (dk) but a bit thicker would be fine too.
Black yarn to embroider the mouth.
One pair 6mm safety eyes.
3.5mm hook (US E hook).
Stuffing.
Tapestry needle.

Abbreviations:
ch = chain
st = stitch or stitches
sc = single crochet (US), double crochet (UK)
dc = double crochet (US), treble crochet (UK)
ss = slip stitch
tog = together
sc2tog = decrease by working two sc together
FO = fasten off

Special stitch instructions:
3 dc bob: bobble stitch for hands and feet. YOH (yarn over hook), insert hook into second ch from hook, YOH and pull through loop, YOH, pull through 2 loops, *YOH, insert hook into same stitch, YOH and pull through loop, YOH, pull through 2 loops, repeat once from*, YOH, pull through all 4 loops on hook.

Little Eggie is made in rounds. Do not join rounds, use a stitch marker to mark the start of a round - a small piece of different coloured yarn placed under the stitch at the start of the round will do.

Round 1: Ch 2, work 6 sc into 1st ch - 6 st.
Round 2: 2 sc in each st around - 12 st.
Round 3: [2sc in next st, sc in next 3 st] 3 times – 15 st.
Round 4: [2sc in next st, sc in next 2 st] 5 times – 20 st.
Round 5 – 6: (2 rounds) Sc in each st around – 20 st.
Round 7: [2sc in next st, sc in next 3 st] 5 times – 25 st.
Round 8 – 10: (3 rounds) Sc in each st around – 25 st.
Round 11: Sc in next 6 st, [make arm: ss into next st, ch 7, 3 dc bob into 2nd ch from hook, ss into next 5 ch, ss back into original st], sc in next 11 st, [make arm as before], sc in next 6 st - 25 st.
Round 12: Sc in each st around – 25 st (you sc into the first ss used to make each arm).

Fit eyes between rounds 9 and 10.

Round 13 – 15: (3 rounds) Sc in each st around – 25 st.
Round 16: [Sc2tog, sc in next 3 st] 5 times – 20 st.
Round 17: Sc2tog, sc in next 2 st, sc2tog, [make leg using the same method as the arm], sc in next st, sc2tog, sc in next 2 st, sc2tog, [make leg], sc in next st, sc2tog, sc in next 2 st – 15 st.

Stuff Eggie and embroider mouth.

Round 18: [Sc2tog, sc in next st] 5 times – 10 st.
Round 19: [Sc2tog] 5 times – 5 sc. FO.

Complete stuffing and sew up hole neatly.

Tiny Chick - Free Amigurumi Pattern


This miniature chick is only 1.5" tall, so he'd make a cute little extra for Easter.


Materials:
Small amount of pale yellow yarn, double knitting (dk) weight.
Black yarn to embroider the eyes.
Dark yellow or orange yarn to embroider the beak.
3.5mm hook (US E hook).
Stuffing.
Tapestry needle.


Abbreviations:
ch = chain
st = stitch or stitches
sc = single crochet (US), double crochet (UK)
hdc = half double crochet (US), half treble crochet (UK)
ss = slip stitch
tog = together
sc2tog = decrease by working two sc together
FO = fasten off


This chick is made in rounds. Do not join rounds, use a stitch marker to mark the start of a round - a small piece of different coloured yarn placed under the stitch at the start of the round will do.


Round 1: Ch 2, work 6 sc into 1st ch - 6 st.
Round 2: 2 sc in each st around - 12 st.
Round 3: [2 sc in next st, sc in next st] 6 times – 18 st.
Round 4 – 7: (4 rounds) Sc in each st around – 18 st.
Round 8: Sc in next 4 st, [make wing: ss into next st, ch 4, hdc into 2nd ch from hook, hdc in next 2 ch, ss back into original st], sc in next 8 st, [make wing as before], sc in next 4 st - 18 st.
Round 9: Sc in each st around – 18 st (you sc into the first ss used to make each wing).
Round 10: [2 sc in next st, sc in next 5 st] 3 times – 21 st.
Round 11: [2 sc in next st, sc in next 6 st] 3 times – 24 st.
Round 12 – 13: (2 rounds) Sc in each st around – 24 st.


Start to stuff. Embroider eyes and beak with French knots - wind the yarn round the needle twice for the eyes, and four or five times for the beak.


Round 14: [Sc2tog] 6 times – 12 st.
Round 15: [Sc2tog] 6 times – 6 sc. FO.
Complete stuffing and sew up hole neatly.

Sunday, 20 March 2011

Woolly Jumpers! Rabbit and Lamb amigurumis


I was asked to make some toys for our school's Easter raffle and so I picked two of the animals I most associate with spring - rabbits and lambs. I've been wanting to come up with a pattern for animal toys wearing clothes, so this was a good opportunity to give it a try. I started with a boy rabbit wearing a jumper (or sweater), then made the boy lamb with a really stripy jumper (I love stripes!).


Since I have boys I don't usually make girly toys, but I thought I'd give it a go this time and made a girl rabbit and lamb wearing little dresses, which made a nice change for me.


When I started making them the weather was still quite wintery, but but by the time I got round to photographing them it was getting much more spring-like, and I was pleased to be able to use some daffodils and primula as a backdrop.


The pattern, which gives instructions on how to make all the variations, is available in my Etsy shop.