Showing posts with label toy. Show all posts

Friday, 19 December 2014

Mini Pets - Snails, Bugs and Frogs amigurumi patterns

My latest pattern, or rather set of patterns, to make tiny amigurumi snails, beetles, spiders and frogs, is now available in my Etsy shop and Ravelry. The creatures, which are quick to make with minimal sewing, also come with the details to make a toadstool play mat and hollow log.


As a child I loved and was fascinated by all types of animals, and was keen to have all sorts of pets, that weren't always practical. I did keep snails for a short while, and repeated the experience with my children. They make great temporary pets, you just find some in your garden and put them in a plastic pet box with some soil and greenery keep them damp and fed, and then return them to the garden after a few weeks.


However, not everyone wants various creepy crawlies in their house, and so for a more cuddly alternative I designed these creatures, so that the little animal lover in your house can play with them any time they want. You can make snails, two different shapes of beetle, including a ladybird (ladybug), spiders with various patterns on their backs, and tiny baby frogs. Their sizes range from 1.5" to 2.5" long.


You can keep them in a jar or matchbox, but you can also make them a grassy mat for them to play on, with a toadstool in the middle, and a hollow log to climb in. It has a drawstring around the edge so you can turn it into a bag and keep everything safe.


Of course, you can do all sorts of things with these creatures. It's easy to turn them into key chains, or put small magnets inside as you crochet them to make them into fridge magnets. The beetles would make unusual brooches, the spiders are great for Halloween accessories, and you could make the frogs in sets of different colours and use them as game pieces. You can make them as party favours, or stocking fillers, or make lots for a school or church fair. Whatever you do, I hope you'll have fun with them!

Wednesday, 9 April 2014

Quick and Easy Easter Bunny - free pattern!


Whilst I was making the Little Teddies from the previous post, I realised it wouldn't take much turn them into little bunnies. They don't take very long to make, and you only need scraps of yarn, so they're perfect little extras to make for an Easter basket. I made a couple using pastel self-striping yarn, which seemed nice and spring-like, then I made one in brown yarn to be a little chocolate bunny.


Easter Bunny

 
This little bunny will end up about 4.5 cm/1.75" tall, not including ears, depending on the yarn you use.
 
Abbreviations:
ch = chain
st = stitch or stitches
ss = slip stitch
sc = single crochet (US), double crochet (UK)
dc = double crochet (US), treble crochet (UK)
tog = together
sc2tog = decrease by working two sc together
pop = popcorn (see special stitch instructions)
FO = fasten off

General instructions:
Work in rounds unless otherwise stated and do not join rounds unless told to. Use a stitch marker to mark the start of a round - a small piece of different coloured yarn placed under the stitch at the start of the round will do. To start a round, you can use the magic ring method, but I prefer (ch 2, work 6 sc into 1st ch). The first ch is a slip knot so it will expand and if you work the 6 sc over the tail of yarn as well you can use that to pull the hole tight.

Work through both loops of stitches unless otherwise indicated.
 
Special stitch instructions:

3 dc pop: popcorn stitch for tail. Work 3 dc into 1 st, take hook out leaving loop, put hook through 1st dc & pull loop through.
(When changing colour for the tail work the sc before the change until there are two loops left on the hook. Then use the new colour for the final yarn over hook and pull through. When changing back to the main colour after doing a 3dc pop work the last dc of the popcorn until there are two loops left on the hook. Then use the main colour for the final yarn over hook and pull through. Finish making the popcorn st and you will have the main colour on your hook for the next stitch.)

4 dc pop: popcorn stitch for arms and legs. Work 4 dc into 1 st, take hook out leaving loop, put hook through 1st dc & pull loop through.

You will need:
Small amount of yarn, any colour you like, in double knitting or worsted weight.
Small amount of white or cream yarn for tail.
Small amount of black yarn (or cream and pink for chocolate bunny) for eyes and mouth.
Small amount of stuffing.
3.5mm (E) hook.
 

Round 1: Ch 2, work 6 sc into 1st ch - 6 st.
Round 2: [2 sc in next st, (sc and ss into next st, (ear) ch 6, sc into 2nd ch from hook, dc into next 3 ch, sc into next ch, ss back into original st), 2 sc in next st] 2 times - 12 st (the ss used to start the ear counts as a st, and you will work into it on the next round).
Round 3: [2 sc in next st, sc in next st] 6 times – 18 st.

Round 4 - 6: (3 rounds) Sc in each st around - 18 st.
Round 7: [Sc2tog, sc in next st] 6 times – 12 st.
Round 8: [Sc2tog, sc in next 2 st] 3 times – 9 st.
Round 9: [2 sc in next st, sc in next 2 st] 3 times – 12 st.
Round 10: Sc in next 5 st, 4dc pop, sc in next 4 st, 4dc pop, sc in next st - 12 st.
Round 11 - 12: Sc in each st around - 12 st.
Round 13: [2 sc in next st, sc in next 3 st] 3 times – 15 st.
Round 14: Sc in next 4 st, change to tail colour yarn, 3dc pop, change back to main yarn, sc in next 4 st, 4dc pop, sc in next 3 st, 4dc pop, sc in next st - 15 st.
Round 15: [Sc2tog, sc in next 3 st] 3 times – 12 st.
Round 16: [Sc2tog] 6 times – 6 sc. FO, leaving a length of yarn.
 
Stuff head and body and embroider features. Use length of yarn to sew up hole at bottom, pulling yarn upwards through body to make sure the bottom is flat. You can also use this yarn to sew a stitch or two at the bottom of each ear to make sure they're pointing forwards.


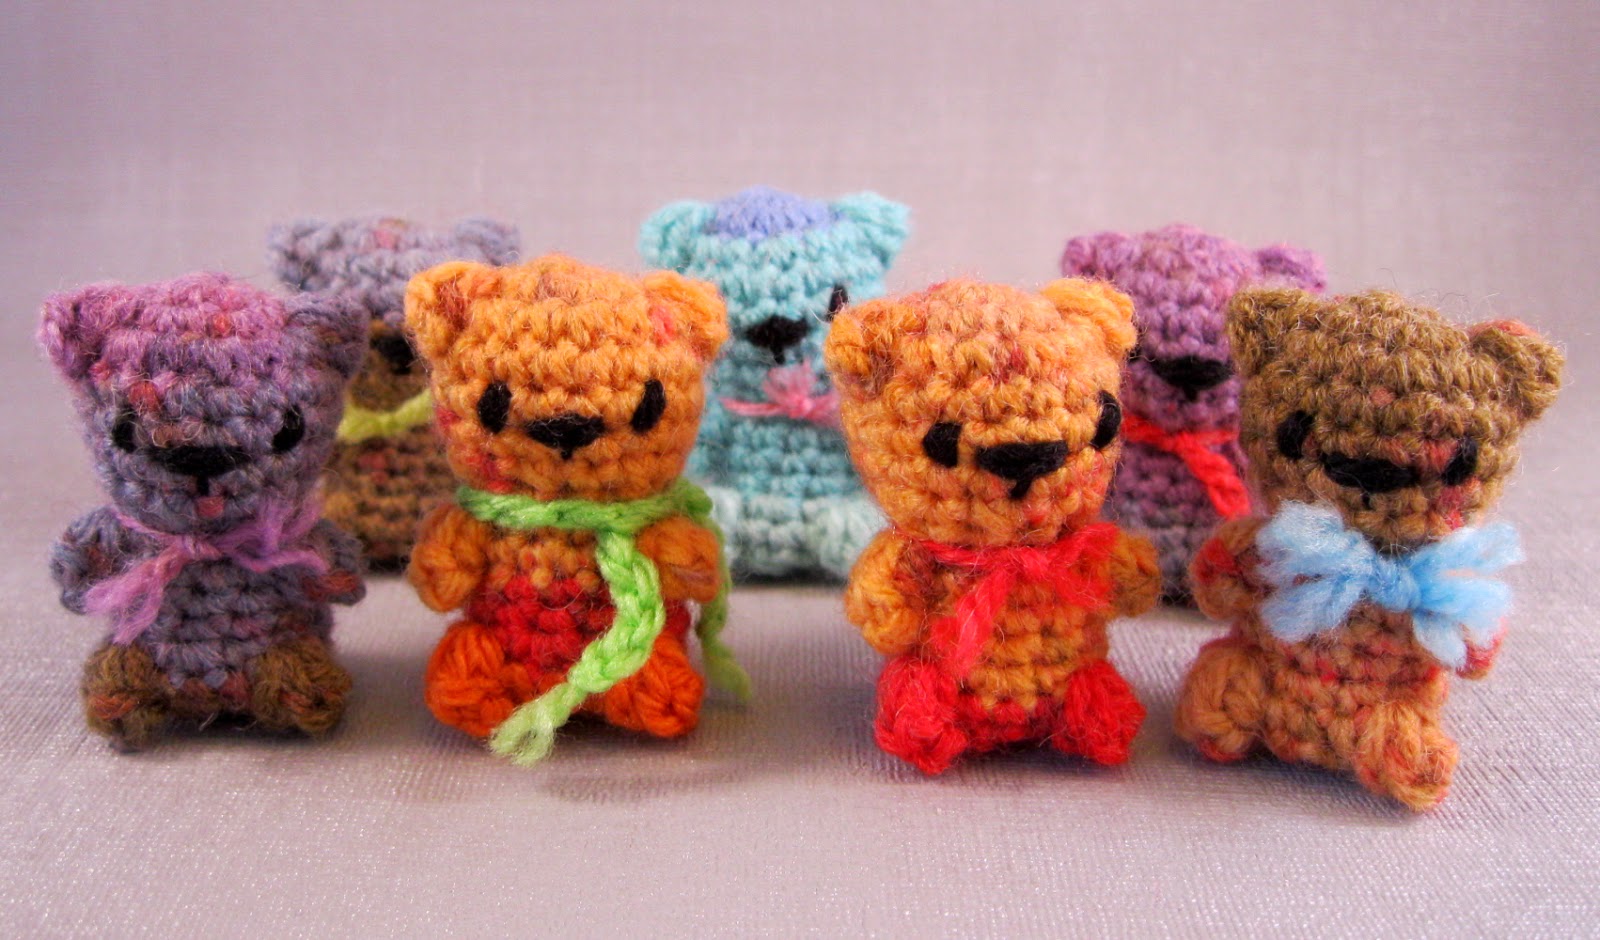
Mini Teddies - free amigurumi patterns!

If you've read previous entries in this blog, you'll know that over the last few years I've made lots of small amigurumi toys for the Christmas Bazaar at my sons' school, and I've tried to share the various patterns. Originally I posted the patterns on Craftster, including one for tiny teddies -http://www.craftster.org/forum/index.php?topic=289504.msg3296032#msg3296032  
Another member, Wayuki, liked the pattern and changed it a bit -
http://www.craftster.org/forum/index.php?topic=298179.msg3398743#msg3398743
I liked the way she made the heads of the teddies bigger, so I tried her version and tweaked it a bit myself, and I've used my second version to make lots of teddies for the Bazaar.
 
 
I know people have used my original Tiny Teddy pattern and had fun with it, so I thought I'd post that (with a few little alterations) and the larger Little Teddy pattern, so you can make either or both of them as you like. I've made a pair of the two different sizes using candy-coloured self striping yarn, then I've used natural coloured yarns to make two Tiny Teddies and one Little Teddy, so you can compare them.
 
 
Abbreviations:
ch = chain
st = stitch or stitches
sc = single crochet (US), double crochet (UK)
dc = double crochet (US), treble crochet (UK)
tog = together
sc2tog = decrease by working two sc together
bob = bobble (see special stitch instructions)
pop = popcorn (see special stitch instructions)
FO = fasten off
 
General instructions: Work in rounds unless otherwise stated and do not join rounds unless told to. Use a stitch marker to mark the start of a round - a small piece of different coloured yarn placed under the stitch at the start of the round will do. To start a round, you can use the magic ring method, but I prefer (ch 2, work 6 sc into 1st ch). The first ch is a slip knot so it will expand and if you work the 6 sc over the tail of yarn as well you can use that to pull the hole tight.
 
Work through both loops of stitches unless otherwise indicated.
 
Special stitch instructions:
3 dc bob: bobble stitch for Tiny Teddy ears. YOH (yarn over hook), insert hook into next stitch, YOH and pull through loop, YOH, pull through 2 loops, *YOH, insert hook into same stitch, YOH and pull through loop, YOH, pull through 2 loops, repeat once from*, YOH, pull through all 4 loops on hook.
3 dc pop: popcorn stitch for Little Teddy ears. Work 3 dc into 1 st, take hook out leaving loop, put hook through 1st dc & pull loop through.
4 dc pop: popcorn stitch for arms and legs. Work 4 dc into 1 st, take hook out leaving loop, put hook through 1st dc & pull loop through.
 
 
You will need:
Small amount of yarn, any colour you like, in double knitting or worsted weight.
Small amount of black yarn for eyes and mouth.
Small amount of stuffing.
3.5mm (E) hook.


Little Teddy in middle, Tiny Teddies on left and right


Tiny Teddy
 
These teddies really are tiny - depending on the yarn you use they'll be about 3.5 cm/1.5" tall.
 
Round 1: Ch 2, work 6 sc into 1st ch - 6 st.
Round 2: [2 sc in next st, (3dc bob and sc in next st), 2 sc in next st] 2 times - 12 st.
Round 3 - 4: (2 rounds) Sc in each st around - 12 st.
Round 5: [Sc2tog, sc in next st] 4 times – 8 st.
Round 6: [2 sc in next st, sc in next 3 st] 2 times – 10 st.
Round 7: Sc in next 4 st, 4dc pop, sc in next 3 st, 4dc pop, sc in next st - 10 st.
Round 8: Sc in each st around - 10 st.
Round 9: 2 sc in next st, sc in next 2 st, 2 sc in next st, sc in next 6 st – 12 st.
Round 10: Sc in each st around - 12 st.
Round 11: Sc in next 7 st, 4dc pop, sc in next 3 st, 4dc pop - 12 st.
Round 12: [Sc2tog] 6 times – 6 sc. FO, leaving a length of yarn.
 
Stuff head and body. Push the bobbles on the head outwards and embroider features using black yarn. Use length of yarn to sew up hole at bottom, pulling yarn upwards through body to make sure the bottom is flat.
 
    
Little Teddy
 
These cute little teddies will end up about 4.5 cm/1.75" tall, depending on the yarn you use.
 
Round 1: Ch 2, work 6 sc into 1st ch - 6 st.
Round 2: 2 sc in each st around - 12 st.
Round 3: [2 sc in next st, sc in next st, 2 sc in next st, 3dc pop in next st, 2 sc in next st, sc in next st] 2 times - 18 st.
Round 4 - 6: (3 rounds) Sc in each st around - 18 st.
Round 7: [Sc2tog, sc in next st] 6 times – 12 st.
Round 8: [Sc2tog, sc in next 2 st] 3 times – 9 st.
Round 9: [2 sc in next st, sc in next 2 st] 3 times – 12 st.
Round 10: Sc in next 5 st, 4dc pop, sc in next 4 st, 4dc pop, sc in next st - 12 st.
Round 11 - 12: (2 rounds) Sc in each st around - 12 st.
Round 13: [2 sc in next st, sc in next 3 st] 3 times – 15 st.
Round 14: Sc in next 9 st, 4dc pop, sc in next 3 st, 4dc pop, sc in next st - 15 st.
Round 15: [Sc2tog, sc in next 3 st] 3 times – 12 st.
Round 16: [Sc2tog] 6 times – 6 sc. FO, leaving a length of yarn.
 
Stuff head and body and embroider features using black yarn. Use length of yarn to sew up hole at bottom, pulling yarn upwards through body to make sure the bottom is flat.


Tiny Teddy on left, Little Teddy on right


Saturday, 5 April 2014

Easter Patterns

Just a quick post to highlight some of my patterns that might make good presents for Easter. In my Etsy shop you can find my Woolly Jumpers pattern, which gives you instructions to make a cute little rabbit or lamb, either a boy in a sweater or a girl in a little skirt.


 I also think my Chubby Gnomes pattern is quite fun for Easter - the gnomes are actually egg-shaped, and I associate gnomes with gardens and all the new spring growth.


Here on my blog I have some free patterns that are perfect for small extra Easter gifts (and good if you're worried about too much chocolate!). They're quick and easy to make, and need hardly any sewing to finish them off. Just click on the names below the pictures to see the patterns.


I've got a few more free patterns that I'm going to post in the next few days, some of which will also make good little extras for Easter, so keep an eye out for those.

Monday, 10 February 2014

Leesub Sirln

Last year I was contacted by a lady asking if I would make a custom Star Wars amigurumi for a friend. Well, I don't normally make the toys, only the patterns, but when she said her friend had actually appeared in the original Star Wars, I couldn't refuse. Her friend is Pam Rose, and she played an alien in the background of the Cantina scene, called Leesub Sirln. I must have seen the character lots of time creating part of the atmosphere of the Cantina, but I wasn't quite sure what she looked liked so I went to her website to check - a beautiful leggy alien with a large head.


I made the amigurumi to the same scale as my other Star Wars characters - getting the head just the right shape and working out the unusual hairstyle was an interesting challenge, and it wasn't easy to get the detail into her minimal costume, but I think I did it.


Mini Leesub was given to Pam for Christmas, and apparently she was very pleased with it. She very kindly sent me a signed photo, and I'm very happy to have made a figure for the person who actually portrayed the character!


Saturday, 11 January 2014

Jabba's Palace

I have just completed my latest Star Wars characters in crochet form; Jabba the Hutt, Salacious Crumb and Slave Leia; and the patterns are now available in my Etsy shop.


I've been meaning to design more Star Wars crochet patterns for a while now, although I always have a very long list of different patterns I want to create. However, last autumn I decided to start working on some new Star Wars characters. I had quite a few requests for Jabba the Hutt, so he seemed the obvious place to begin. He presented a different challenge to most of the other characters - generally I'm trying to simplify a fairly detailed character so that they're cute but still recognisable. Jabba is already quite a simple shape without much detail, and it's hard to consider him cute in any way! I also had to think about what size he should be; the other figures are not in an exact scale with one another, but Yoda is smaller than the human characters and Chewbacca is larger than all of them. I didn't want to make him too big, but he had to be bigger than the others.


In the end I was very happy with the way he came out - he's a simple shape, but the colour change in his face gives a bit of detail, and giving him a proper expression with the eyelids and facial features keep his character. That said, I definitely find him oddly cute in this miniaturised form!


As I was making Jabba it seemed obvious to consider what other characters from Jabba's Palace it would be fun to make patterns for. I decided that Jabba needed his annoying little pet, Salacious Crumb. However, he's pretty small, and I wasn't sure I would be able to give him enough detail. As he's a sort of lizard/monkey I used similar techniques to those I used to make my Mini Monkeys and that approach seemed to work. He seemed too simple a pattern to sell on his own, so I included him with Jabba.


Leia in the slave bikini costume seemed another obvious choice from the Jabba's Palace sequence - I know my husband kept asking when I was going to make her! The original Princess Leia figure I made was quite small, shorter than all the other human characters, and I found it hard to fit in the details of the bikini costume, so I made her a bit taller (the same as Luke). I also decided to change the way I made her hair, and make it as a separate piece of crochet rather than as part of the head.

 
I spent a while deciding how to make her bikini. Looking at the original, the top consists of a metal framework with grey/green leather underneath. I couldn't get the detail in the small amount of stitches I had to work with, so I just tried to show the metal part. The metal is described as brass, but it looks more like bronze to me - I tried to use a yarn that was brass-coloured, but it seemed too pale against the skin, so I settled on a darker bronze-coloured yarn, which I think works.


I was unsure as to whether the skimpy look of Slave Leia would work in a cute mini version, but I think she's turned out looking quite sassy, and ready to strangle Jabba if he causes any trouble!

The changes I made to the Slave Leia figure made me go back to the original Princess Leia figure in her white dress and tweak that pattern so that it was the same height and had hair made in the same way. If you bought the original Princess Leia pattern and you would like the updated version of that as shown here (Slave Leia is a different, separate pattern), just contact me on Etsy and let me know.


I'm now working on a Lando Calrissian pattern, then I 've got to decide which other characters I'd like to do; let me know any suggestions in the comments!


***Latest news July 2014***

The Jabba and original Princess Leia patterns are no longer available for sale, as they are going to be included in a new Star Wars crochet book, due to be published Spring 2015. Keep an eye out in the future as I may release Salacious Crumb as a free pattern.

Tuesday, 16 April 2013

Mini Frog - Free Amigurumi Pattern


Here's another one of the patterns I've made in the past for my children's school Christmas bazaar. However, a bright green frog seems more of a spring thing to me, so now is the perfect time to make one. This friendly little frog is easy to make with no parts to sew on, and is just 1.5"/4 cm tall. 


Abbreviations:
ch = chain
st = stitch or stitches
sc = single crochet (US), double crochet (UK)
dc = double crochet (US), treble crochet (UK)
hdc = half double crochet (US), half treble crochet (UK)
BLO = back loop only
FLO = front loop only
tog = together
sc2tog = decrease by working two sc together
bob = bobble (see special stitch instructions)
pop = popcorn (see special stitch instructions)
FO = fasten off

General instructions:
Work in rounds unless otherwise stated and do not join rounds unless told to. Use a stitch marker to mark the start of a round - a small piece of different coloured yarn placed under the stitch at the start of the round will do. To start a round, you can use the magic ring method, but I prefer (ch2, work 6 sc into 1st ch). If you work the 6 sc over the tail of yarn as well you can use that to pull the hole tight.

Work through both loops of stitches unless otherwise indicated.

Special stitch instructions:
4 dc pop: popcorn stitch for eyes and feet. Work 4 dc into 1 st, take hook out leaving loop, put hook through 1st dc & pull loop through.

3 dc bob: bobble stitch for hands. YOH (yarn over hook), insert hook into next stitch, YOH and pull through loop, YOH, pull through 2 loops, *YOH, insert hook into same stitch, YOH and pull through loop, YOH, pull through 2 loops, repeat once from*, YOH, pull through all 4 loops on hook.

You will need:
Small amount of green yarn, double knitting or worsted weight.
Small amount of red yarn for the mouth.
Small of black yarn for the eyes.
Small amount of stuffing.
3.5mm (E) hook.
 
Round 1: Ch 2, work 6 sc into 1st ch - 6 st.
Round 2: 2 sc in each st around - 12 st.
Round 3: [2 sc in next st, sc in next st, 2 sc in next st, 4dc pop in next st, 2 sc in next st, sc in next st] 2 times – 18 st.
Round 4 - 6: (3 rounds) Sc in each st around - 18 st.
Round 7: [Sc2tog, sc in next st] 6 times – 12 st.
Round 8: Sc in next 4 st, [arm: ss into next st, ch 6, 3dc bob into 3rd ch from hook, ss into next 3 ch, ss back into original st], sc in next 5 st, [arm], sc in next st - 12 st.
Round 9 - 10: (2 rounds) Sc in each st around - 12 st.
Round 11: [2 sc in next st, sc in next 3 st] 3 times – 15 st.
Round 12: Sc in each st around - 15 st.
Round 13: Sc in next 8 st, 4dc pop, sc in next 4 st, 4dc pop, sc in next st - 15 st.
Round 14: [Sc2tog, sc in next 3 st] 3 times – 12 st.
Round 15: [Sc2tog] 6 times – 6 sc. FO, leaving a length of yarn.

Stuff head and body. Embroider black eyes on the popcorn stitches on the head and use the red yarn to sew a wide mouth. Use length of yarn to sew up hole at bottom.

Monday, 15 April 2013

Mini Monkeys - Free Amigurumi Pattern


If you've been following my blog you'll know that every year I make lots of little amigurumi for our school's Christmas Bazaar. I've been gradually putting the patterns on here, but I've still got quite a few to go.
 
 
I've made mini monkeys over several years, and tried all sorts of variations of the pattern, but this is the one I'm happiest with. You can make these little monkeys in two ways: either follow the main pattern to give them long legs or use the alternative instructions to have them sitting down with their little feet sticking out. Either way they're about 2"/5.5mm tall, not including legs. Make them in natural browns like mine or use any colour you like.

Abbreviations:
ch = chain
st = stitch or stitches
sc = single crochet (US), double crochet (UK)
dc = double crochet (US), treble crochet (UK)
hdc = half double crochet (US), half treble crochet (UK)
BLO = back loop only
FLO = front loop only
tog = together
sc2tog = decrease by working two sc together
bob = bobble (see special stitch instructions)
pop = popcorn (see special stitch instructions)
FO = fasten off

General instructions:
Work in rounds unless otherwise stated and do not join rounds unless told to. Use a stitch marker to mark the start of a round - a small piece of different coloured yarn placed under the stitch at the start of the round will do. To start a round, you can use the magic ring method, but I prefer (ch2, work 6 sc into 1st ch). If you work the 6 sc over the tail of yarn as well you can use that to pull the hole tight.

Work through both loops of stitches unless otherwise indicated.

The faces for these monkeys are made by changing the yarn colour as you crochet. Carry the body colour yarn under the face colour by crocheting over it every couple of stitches. Don't carry the face yarn under the body yarn, just leave it hanging and pick it up when you need it in the next round.

Special stitch instructions:
4 dc pop: popcorn stitch for ears and alternative feet. Work 4 dc into 1 st, take hook out leaving loop, put hook through 1st dc & pull loop through.

3 dc bob: bobble stitch for face, hands and feet. YOH (yarn over hook), insert hook into next stitch, YOH and pull through loop, YOH, pull through 2 loops, *YOH, insert hook into same stitch, YOH and pull through loop, YOH, pull through 2 loops, repeat once from*, YOH, pull through all 4 loops on hook.

You will need:
Small amount of double knitting or worsted weight yarn for the body of your monkey, any colour you like.
Small amount of double knitting or worsted weight yarn for the face of your monkey, pale brown or any colour you like.
Small of black yarn for eyes and mouth.
Small amount of stuffing.
3.5mm (E) hook.


Start with yarn for body.
Round 1: Ch 2, work 6 sc into 1st ch - 6 st.
Round 2: 2 sc in each st around - 12 st.
Round 3: [2 sc in next st, sc in next st] 6 times – 18 st.

Round 4: Sc in each st around - 18 st.
Round 5: Sc in next 6 st, change to face yarn, sc in next 5 st, change to body yarn, sc in next 7 st – 18 st.
Round 6: Sc in next 4 st, 4dc pop in next st, sc in next st, change to face yarn, sc in next 5 st, change to body yarn, sc in next 2 st, 4dc pop in next st, sc in next 4 st – 18 st.
Round 7: Sc in next 7 st, change to face yarn, 3dc bob in next 4 st, change to body yarn, sc in next 7 st – 18 st.
Round 8: [Sc2tog, sc in next st] 6 times – 12 st.
Round 9: [Sc2tog, sc in next 2 st] 3 times – 9 st.
Round 10: [2 sc in next st, sc in next 2 st] 3 times – 12 st.
Round 11: Sc in next 4 st, [arm: ss into next st, ch 7, 3dc bob into 3rd ch from hook, ss into next 4 ch, ss back into original st], sc in next 4 st, [arm], sc in next 2 st - 12 st.
Round 12 - 15: (4 rounds) Sc in each st around - 12 st.
Round 16: Sc in next 5 st ,[leg: make as arm], sc in next 4 st, [leg], sc in next st - 12 st.
Round 17: Sc in next 2 st, [tail: ss into next st, ch 13, miss ch next to hook, ss into next 12 ch, ss back into original st], sc in next 9 st - 12 st.
Round 18: [Sc2tog] 6 times – 6 sc. FO, leaving a length of yarn.

Stuff head and body. Push the bobbles on the face outwards and embroider eyes and mouth using black yarn. Use length of yarn to sew up hole at bottom.


Alternative sitting monkey
Make as above up to round 14.
Round 15: [2 sc in next st, sc in next 3 st] 3 times – 15 st.
Round 16: Sc in next 8 st, 4dc pop, sc in next 3 st, 4dc pop, sc in next 2 st - 15 st.
Round 17: Sc in next 3 st, [tail: ss into next st, ch 13, miss ch next to hook, ss into next 12 ch, ss back into original st], sc in next 11 st - 15 st.
Round 18: [Sc2tog, sc in next 3 st] 3 times – 12 st.
Round 19: [Sc2tog] 6 times – 6 sc. FO, leaving a length of yarn.

Finish off as above.
 
Keep watching this space, I'll put up a pattern for a mini frog tomorrow.