Showing posts with label handmade. Show all posts

Tuesday, 16 April 2013

Mini Frog - Free Amigurumi Pattern


Here's another one of the patterns I've made in the past for my children's school Christmas bazaar. However, a bright green frog seems more of a spring thing to me, so now is the perfect time to make one. This friendly little frog is easy to make with no parts to sew on, and is just 1.5"/4 cm tall. 


Abbreviations:
ch = chain
st = stitch or stitches
sc = single crochet (US), double crochet (UK)
dc = double crochet (US), treble crochet (UK)
hdc = half double crochet (US), half treble crochet (UK)
BLO = back loop only
FLO = front loop only
tog = together
sc2tog = decrease by working two sc together
bob = bobble (see special stitch instructions)
pop = popcorn (see special stitch instructions)
FO = fasten off

General instructions:
Work in rounds unless otherwise stated and do not join rounds unless told to. Use a stitch marker to mark the start of a round - a small piece of different coloured yarn placed under the stitch at the start of the round will do. To start a round, you can use the magic ring method, but I prefer (ch2, work 6 sc into 1st ch). If you work the 6 sc over the tail of yarn as well you can use that to pull the hole tight.

Work through both loops of stitches unless otherwise indicated.

Special stitch instructions:
4 dc pop: popcorn stitch for eyes and feet. Work 4 dc into 1 st, take hook out leaving loop, put hook through 1st dc & pull loop through.

3 dc bob: bobble stitch for hands. YOH (yarn over hook), insert hook into next stitch, YOH and pull through loop, YOH, pull through 2 loops, *YOH, insert hook into same stitch, YOH and pull through loop, YOH, pull through 2 loops, repeat once from*, YOH, pull through all 4 loops on hook.

You will need:
Small amount of green yarn, double knitting or worsted weight.
Small amount of red yarn for the mouth.
Small of black yarn for the eyes.
Small amount of stuffing.
3.5mm (E) hook.
 
Round 1: Ch 2, work 6 sc into 1st ch - 6 st.
Round 2: 2 sc in each st around - 12 st.
Round 3: [2 sc in next st, sc in next st, 2 sc in next st, 4dc pop in next st, 2 sc in next st, sc in next st] 2 times – 18 st.
Round 4 - 6: (3 rounds) Sc in each st around - 18 st.
Round 7: [Sc2tog, sc in next st] 6 times – 12 st.
Round 8: Sc in next 4 st, [arm: ss into next st, ch 6, 3dc bob into 3rd ch from hook, ss into next 3 ch, ss back into original st], sc in next 5 st, [arm], sc in next st - 12 st.
Round 9 - 10: (2 rounds) Sc in each st around - 12 st.
Round 11: [2 sc in next st, sc in next 3 st] 3 times – 15 st.
Round 12: Sc in each st around - 15 st.
Round 13: Sc in next 8 st, 4dc pop, sc in next 4 st, 4dc pop, sc in next st - 15 st.
Round 14: [Sc2tog, sc in next 3 st] 3 times – 12 st.
Round 15: [Sc2tog] 6 times – 6 sc. FO, leaving a length of yarn.

Stuff head and body. Embroider black eyes on the popcorn stitches on the head and use the red yarn to sew a wide mouth. Use length of yarn to sew up hole at bottom.

Monday, 15 April 2013

Mini Monkeys - Free Amigurumi Pattern


If you've been following my blog you'll know that every year I make lots of little amigurumi for our school's Christmas Bazaar. I've been gradually putting the patterns on here, but I've still got quite a few to go.
 
 
I've made mini monkeys over several years, and tried all sorts of variations of the pattern, but this is the one I'm happiest with. You can make these little monkeys in two ways: either follow the main pattern to give them long legs or use the alternative instructions to have them sitting down with their little feet sticking out. Either way they're about 2"/5.5mm tall, not including legs. Make them in natural browns like mine or use any colour you like.

Abbreviations:
ch = chain
st = stitch or stitches
sc = single crochet (US), double crochet (UK)
dc = double crochet (US), treble crochet (UK)
hdc = half double crochet (US), half treble crochet (UK)
BLO = back loop only
FLO = front loop only
tog = together
sc2tog = decrease by working two sc together
bob = bobble (see special stitch instructions)
pop = popcorn (see special stitch instructions)
FO = fasten off

General instructions:
Work in rounds unless otherwise stated and do not join rounds unless told to. Use a stitch marker to mark the start of a round - a small piece of different coloured yarn placed under the stitch at the start of the round will do. To start a round, you can use the magic ring method, but I prefer (ch2, work 6 sc into 1st ch). If you work the 6 sc over the tail of yarn as well you can use that to pull the hole tight.

Work through both loops of stitches unless otherwise indicated.

The faces for these monkeys are made by changing the yarn colour as you crochet. Carry the body colour yarn under the face colour by crocheting over it every couple of stitches. Don't carry the face yarn under the body yarn, just leave it hanging and pick it up when you need it in the next round.

Special stitch instructions:
4 dc pop: popcorn stitch for ears and alternative feet. Work 4 dc into 1 st, take hook out leaving loop, put hook through 1st dc & pull loop through.

3 dc bob: bobble stitch for face, hands and feet. YOH (yarn over hook), insert hook into next stitch, YOH and pull through loop, YOH, pull through 2 loops, *YOH, insert hook into same stitch, YOH and pull through loop, YOH, pull through 2 loops, repeat once from*, YOH, pull through all 4 loops on hook.

You will need:
Small amount of double knitting or worsted weight yarn for the body of your monkey, any colour you like.
Small amount of double knitting or worsted weight yarn for the face of your monkey, pale brown or any colour you like.
Small of black yarn for eyes and mouth.
Small amount of stuffing.
3.5mm (E) hook.


Start with yarn for body.
Round 1: Ch 2, work 6 sc into 1st ch - 6 st.
Round 2: 2 sc in each st around - 12 st.
Round 3: [2 sc in next st, sc in next st] 6 times – 18 st.

Round 4: Sc in each st around - 18 st.
Round 5: Sc in next 6 st, change to face yarn, sc in next 5 st, change to body yarn, sc in next 7 st – 18 st.
Round 6: Sc in next 4 st, 4dc pop in next st, sc in next st, change to face yarn, sc in next 5 st, change to body yarn, sc in next 2 st, 4dc pop in next st, sc in next 4 st – 18 st.
Round 7: Sc in next 7 st, change to face yarn, 3dc bob in next 4 st, change to body yarn, sc in next 7 st – 18 st.
Round 8: [Sc2tog, sc in next st] 6 times – 12 st.
Round 9: [Sc2tog, sc in next 2 st] 3 times – 9 st.
Round 10: [2 sc in next st, sc in next 2 st] 3 times – 12 st.
Round 11: Sc in next 4 st, [arm: ss into next st, ch 7, 3dc bob into 3rd ch from hook, ss into next 4 ch, ss back into original st], sc in next 4 st, [arm], sc in next 2 st - 12 st.
Round 12 - 15: (4 rounds) Sc in each st around - 12 st.
Round 16: Sc in next 5 st ,[leg: make as arm], sc in next 4 st, [leg], sc in next st - 12 st.
Round 17: Sc in next 2 st, [tail: ss into next st, ch 13, miss ch next to hook, ss into next 12 ch, ss back into original st], sc in next 9 st - 12 st.
Round 18: [Sc2tog] 6 times – 6 sc. FO, leaving a length of yarn.

Stuff head and body. Push the bobbles on the face outwards and embroider eyes and mouth using black yarn. Use length of yarn to sew up hole at bottom.


Alternative sitting monkey
Make as above up to round 14.
Round 15: [2 sc in next st, sc in next 3 st] 3 times – 15 st.
Round 16: Sc in next 8 st, 4dc pop, sc in next 3 st, 4dc pop, sc in next 2 st - 15 st.
Round 17: Sc in next 3 st, [tail: ss into next st, ch 13, miss ch next to hook, ss into next 12 ch, ss back into original st], sc in next 11 st - 15 st.
Round 18: [Sc2tog, sc in next 3 st] 3 times – 12 st.
Round 19: [Sc2tog] 6 times – 6 sc. FO, leaving a length of yarn.

Finish off as above.
 
Keep watching this space, I'll put up a pattern for a mini frog tomorrow.


Saturday, 27 October 2012

Wee Mousies in Inside Crochet!

The latest copy of Inside Crochet has just come out (issue 35) and my pattern to make a pair of cute little mice is in it!

These Wee Mousies are only 9cm tall so they're perfect to make for little presents or stocking fillers. They'll fit perfectly in a pocket and it would be sweet to make them a little bed out of a box, and crochet a tiny blanket for them. Their clothes are crocheted as part of their bodies, but you could easily make them little accessories - my prototype has no clothes but he does have a scarf.


If you like to crochet you should check out Inside Crochet, it's always full of gorgeous patterns; clothes that I'm dying to make but will probably never get the time - there's a Ruby Sweater this month that has an amazing texture - and smaller projects that I really want to try. The Milly, Molly, Mandy scarf on the front cover looks delicious and there are some beautful, understated scatter cushions that I fancy giving a go. There are also some great inspirational articles and a 'how to' section that's useful if you're new to crochet.

Tuesday, 18 September 2012

Dalek Amigurumi Pattern


I'm a long time fan of Doctor Who - I started watching Jon Pertwee in the 1970s when I was very little, and I've loved it ever since, old series and new. The Daleks are a brilliant creation, scary and iconic, and I just had to crochet them. I made three a few years back, two for swaps and one for a present, but I never made any for myself. With the new season of Doctor Who just starting (and with the first episode featuring a selection of different types of Daleks) I knew I had to make them again.


I tweaked my original pattern a bit and came up with a design I'm really happy with. It's quite fiddly to make, but it has most of the essential details. I've made a classic grey and black Dalek from the 1970s and a bronze and gold one from the new series. However fearsome the real Daleks are, when they're reduced to 7 inches tall and made of yarn, they're suddenly much more cute and cuddly, and fun to play with. One of mine found a wig I'd made for something else and decided he'd look good in it. I can't decide if he looks like Boris Johnson or if it's one of Captain Kirk's!


You can download the PDF of the pattern from Etsy or Ravelry

Sunday, 20 May 2012

Finn and Jake patterns ready!


My Finn and Jake amigurumi patterns are now available to buy in my Etsy shop.

You can buy both patterns together or buy them separately.


Now I just need to get on with my Jawa pattern!

Tuesday, 17 April 2012

Adventure Time with Finn and Jake

I recently started watching Adventure Time on Cartoon Network UK with my boys (I only just found out we could get it on our subscription). It's a great show, suitable for kids (maybe not very young ones) and adults - the humour's fun and weird but not mean. It's set in a colourful, fantastical post-apocalyptic world with Finn, a 12/13 year old boy (the only human we know of) and Jake the dog, who is capable of stretching or shrinking to almost any size or shape. They have all sorts of adventures - Finn is pretty handy with a sword - and sing cute little songs.

I joined in with an Adventure Time swap on Craftster and made Finn and Jake for my partner (I think I'll have to remake them for my boys!).


Part of the reason I like the show is the design of the characters, and they have great shapes to crochet. Here are the originals to compare:


Finn is about 13" tall and has a backpack that opens and closes with a small button.


Jake is about 8" tall, roughly in proportion to Finn in his normal shape and size, where he still has quite long arms.


Since they both have such thin legs, it's hard to make them stand up, so I took them outside to pose them a bit. Finn's off on an adventure and Jake's hanging around in a tree.


I hope you like them, and if you haven't watched Adventure Time, give it a go!

Saturday, 14 April 2012

All the Totoros!

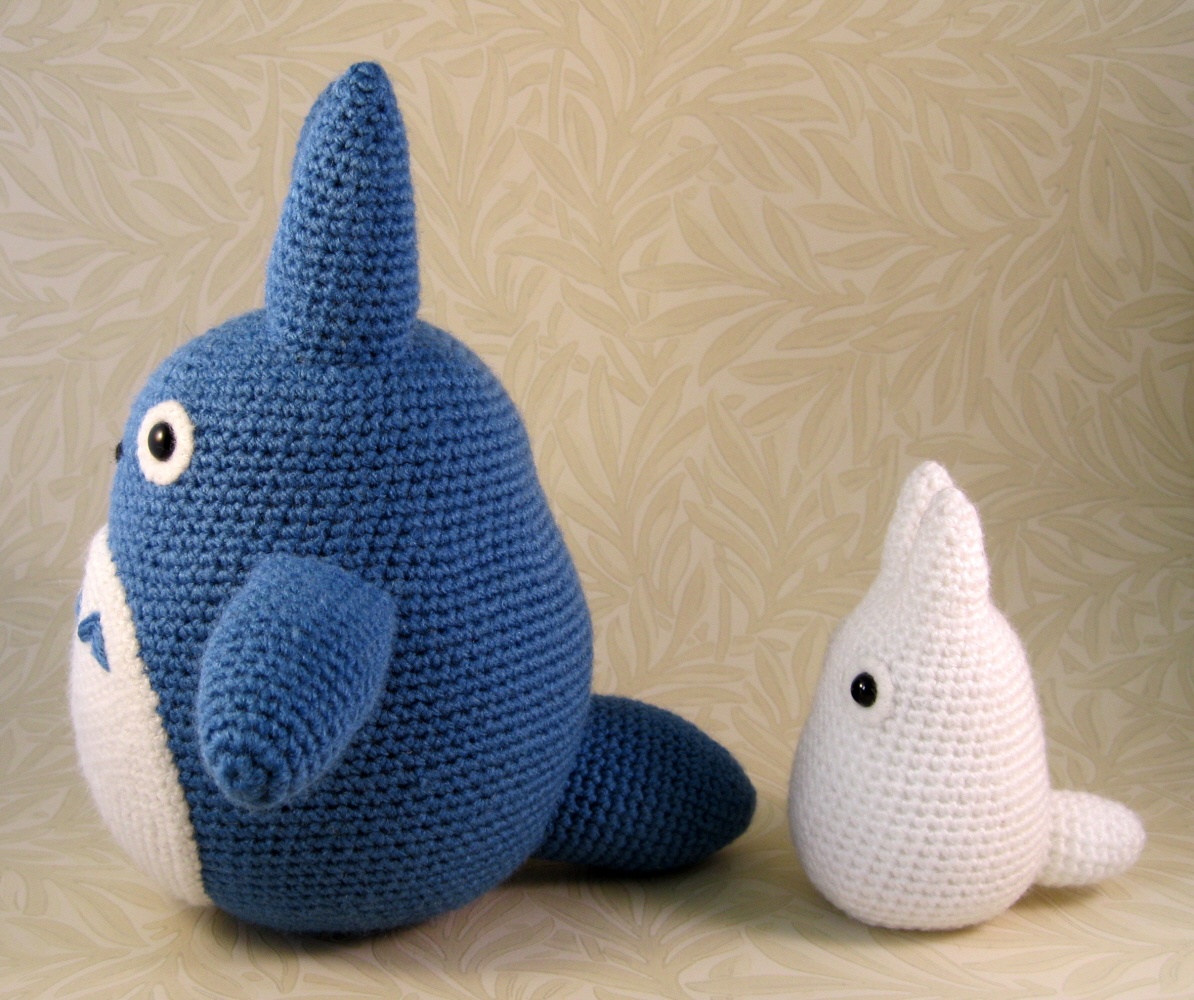
I love the Miyazaki/Studio Ghibli film My Neighbour Totoro, and the Totoros themselves, adorable monsters with features reminiscent of rabbits and cats, that come in three different sizes and colours. A giant grey one about twice the height of a person, a blue one about the size of a cat and a small white one about half that size. If you haven't seen the film, I urge you to give it a try, it's totally delightful.

A few years back I made a blue and a white Totoro, and wrote up the patterns on my livejournal (White Totoro , Blue Totoro ). Since then I've been wanting to make a grey one, and to perfect the original two patterns. In the end I did that, and also adapted the pattern for the white Totoro to make a small blue one to go with the grey one, and a tiny white one to complete the set.

This might be easier to explain in photos!

Here's the large grey Totoro, which is about 9" tall, with the small blue Totoro (4.25" tall) and the tiny white one (1.75"). To be honest, the two smaller ones aren't quite to scale with the grey one, but it would have been too difficult to make a white one small enough without changing the type of yarn, which I didn't want to do.


These are the updated blue and white Totoros. The blue one is about 8" tall and the white one is 4.25" tall. When I started remaking them I changed them quite a bit - I obviously crochet a lot tighter now that I did when I made them originally. The grey Totoro and this blue one have a similar pattern, the grey one is a bit taller but the ears are shorter.
The white Totoro and the small blue one are the same pattern, just with extra elements (tummy, arms) for the blue one.


Here you can see the two different sizes of blue and white Totoros, I'm happy that I got the scale pretty much right for both sets.


I also made a little leaf for the grey Totoro, to help keep off the rain.


You can download the patterns free from Ravelry:


Tiny White Totoro (the leaf pattern can be found with the Grey Totoro)


**Edit 2021 - unfortunately, these patterns are no longer available to download from Ravelry. 

Sunday, 8 April 2012

Mini Crochet Creatures - Tiny Two-tone Turtle


These tiny turtles are great to use up scraps of yarn, and can easily be made as keychains. Using two colours and spike stitch makes a really pretty design on the shell. Why not make lots of them! For general instructions and abbreviations, please check this earlier post

Tiny Two-tone Turtle


You will need:
Small amounts of yarn: two colours for the shell (C1 and C2) and light brown for the body.
Black yarn for eyes and mouth.
Small amount of stuffing.
Small split ring approx 1" (2cm) diameter.
3.5mm (E) hook.

Special stitch instructions:
3 dc pop: popcorn stitch for legs. Work 3 dc into 1 st, take hook out leaving loop, put hook through 1st dc & pull loop through.

Spike stitch (spike st): instead of working the sc into the top of the stitch in the previous round, work it right over that stitch and into the stitch from the round before.

Start using C1.
Round 1: Ch 2, work 6 sc into 1st ch - 6 st.
Round 2: 2 sc in each st around - 12 st.

Change to C2.
Round 3: [2 sc in next st, spike st over next st] 6 times – 18 st.

Round 4: [2 sc in next st, sc in next 5 st] 3 times – 21 st.
Change to C1.
Round 5: [Sc in next 2 st, spike st over next st] 7 times - 21 st.
Change to light brown yarn.
Round 6: Work in BLO for whole round: Sc in next 2 st, (*tail: ss in next st, ch 2, ss in 2nd ch from hook, ss back into original st), sc in next 2 st, 3 dc pop in next st, sc in next 3 st, 3 dc pop in next st, sc in next 2 st, [head: 3 dc in each of next 2 st, take hook out leaving loop, put hook through 1st dc & pull loop through], sc in next 2 st, 3 dc pop in next st, sc in next 3 st, 3 dc pop in next st - 20 st.
Round 7: Sc in each st around - 20 st.
Round 8: [Sc2tog] 10 times – 10 st.
Round 9: [Sc2tog] 5 times – 5 st. FO, leaving a length of yarn.

(*To make tail with split ring attached: ss in next st, ch 3, put split ring onto hook, ss over split ring in 2nd ch from hook and pull split ring over the end of the hook. Ss into next ch, ss back into original st.) Continue with round 6.

Use black yarn to sew eyes and a tiny mouth on the turtle's head, stuff and use length of brown yarn to sew up hole at bottom.

Mini Crochet Creatures - Baby Octopuses

Using any colour of yarn you like, make these cute baby octopuses. Choose between one with long wiggly legs, or one with short stubby little legs. For general instructions and abbreviations, please check the previous post.


Baby Octopuses

You will need:
Small amount of yarn, any colour you like.
Small safety eyes, buttons, or yarn for eyes.
Small amount of stuffing.
3.5mm (E) hook.

Special stitch instructions:
6 dc pop: popcorn stitch for short legs. Work 6 dc into 1 st, take hook out leaving loop, put hook through 1st dc & pull loop through.

Round 1: Ch 2, work 6 sc into 1st ch - 6 st.
Round 2: 2 sc in each st around - 12 st.
Round 3: [2 sc in next st, sc in next st] 6 times – 18 st.

Round 4: [2 sc in next st, sc in next 2 st] 6 times – 24 st.
Round 5 - 8: (4 rounds) Sc in each st around - 24 st.
Round 9: [Sc2tog, sc in next st] 8 times – 16 st.

To make an octopus with long legs, follow the rest of the instructions for rounds 10 to 13 here:

Round 10: Work in FLO for whole round [Ss into next st, ch 9, miss ch next to hook, sc into next 8 ch, ss back into original st, sc into next st] 8 times - 16 st.

Fit eyes now if using safety eyes, and start to stuff.

Round 11: Sc in each of the back loops left from the previous round - 16 st.
Round 12: [Sc2tog, sc in next 2 sc] 4 times – 12 sc.
Round 13: [Sc2tog] 6 times – 6 sc. FO, leaving a length of yarn.

To make an octopus with short legs, follow the rest of the instructions for rounds 10 to 12 here:

Round 10: [6 dc pop in next st, sc in next st] 8 times - 16 st.

Fit eyes now if using safety eyes, and start to stuff.

Round 11: [Sc2tog, sc in next 2 st] 4 times – 12 st.
Round 12: [Sc2tog] 6 times – 6 st. FO, leaving a length of yarn.

Both variations: Finish stuffing. If you aren't using safety eyes, sew on or embroider eyes now. Use length of yarn to sew up hole at bottom.

Thursday, 8 September 2011

A Tower of Tooterphants!


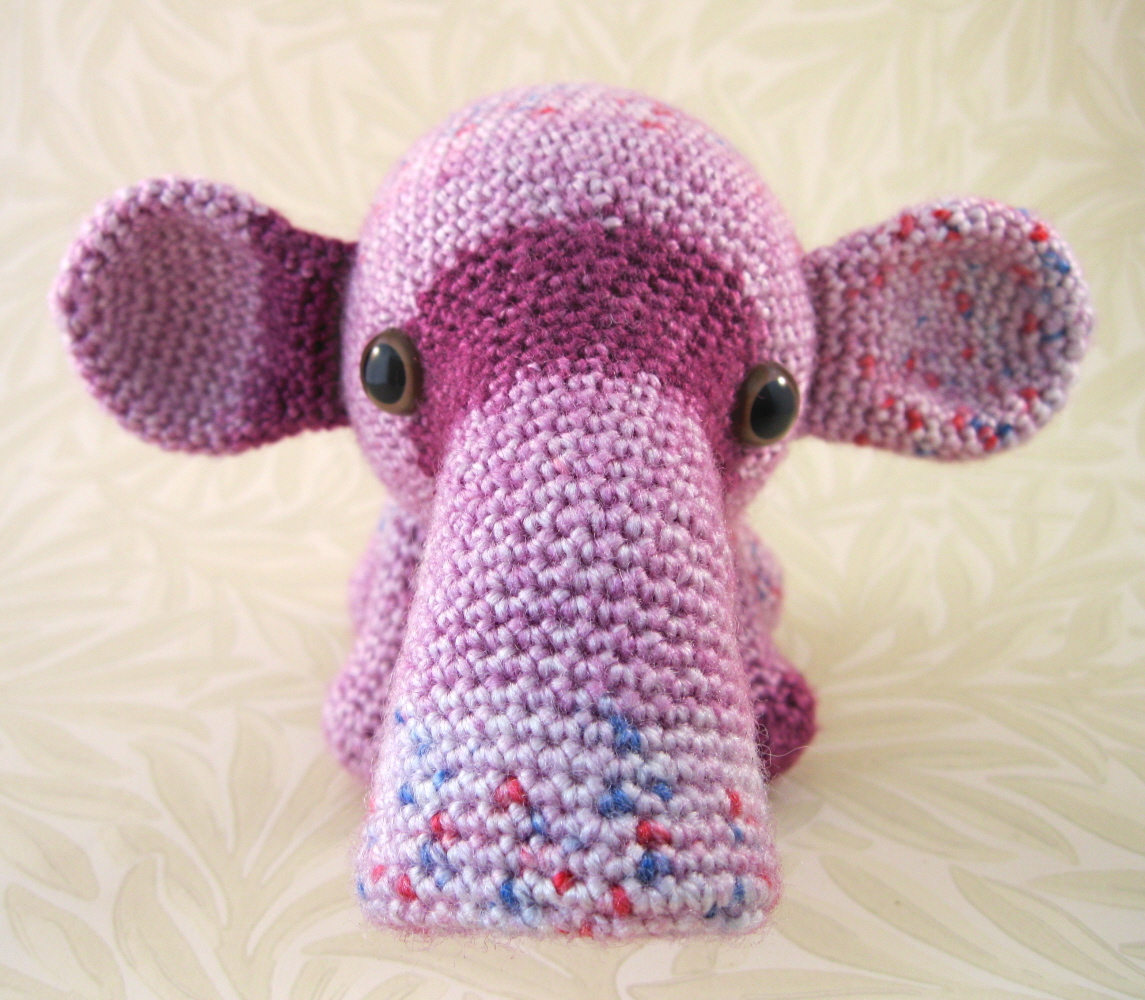
Tooterphants are friendly little creatures, similar in shape to elephants, if not in size. However, they have wide trumpet-shaped trunks that they use to make tooting noises to communicate with one another. They also use their trunks, or tooters, to suck up their food - should you want to attract one, leave a trail of interesting treats such as raisins and they may follow it. They live in groups, and enjoy acrobatic games where they climb on top of each other to form a tower of Tooterphants - luckily their rounded shape makes them bouncy, so they don't mind when they fall down.


These cute creatures are based on patterns I'd made in the past - several years ago I made an Eater of Socks for a swap, based on the description of a creature that appears briefly in Terry Pratchett's Hogfather. Given that it eats odd socks, I gave it a wide trunk/snout to suck them up, and made its legs striped like socks to act as camouflage. Then, a few years later, I made a Sky Elephant, using the previous pattern as a base, but making it bigger. The Sky Elephant was made from blue and white variegated yarn and had fluffly cloud-like ears.


So, I went back and revisited these patterns. I had some nice self-striping yarn that I wanted to try out (King Cole Splash DK), and I thought these would be the perfect patterns to use to show off all the colours nicely. I made a few minor changes, but I liked the patterns pretty much as they were. They have a nice compact shape and sweet faces, and I think they would make good toys for young children because they have a lot of bits to grab hold of. The pattern, which has all the details to make both sizes, is now available in my Etsy shop.

Wednesday, 13 April 2011

Little Eggie Amigurumi Pattern


Perfect for Easter - make a cute little Eggie friend. He's about the same size as a hen's egg - use light brown or white yarn if you want him to look like one, or bright yarn if you want him to look like a decorated Easter egg.


Materials:
Small amount of yarn, any colour you like. Thickness is not too important - I used double knitting (dk) but a bit thicker would be fine too.
Black yarn to embroider the mouth.
One pair 6mm safety eyes.
3.5mm hook (US E hook).
Stuffing.
Tapestry needle.

Abbreviations:
ch = chain
st = stitch or stitches
sc = single crochet (US), double crochet (UK)
dc = double crochet (US), treble crochet (UK)
ss = slip stitch
tog = together
sc2tog = decrease by working two sc together
FO = fasten off

Special stitch instructions:
3 dc bob: bobble stitch for hands and feet. YOH (yarn over hook), insert hook into second ch from hook, YOH and pull through loop, YOH, pull through 2 loops, *YOH, insert hook into same stitch, YOH and pull through loop, YOH, pull through 2 loops, repeat once from*, YOH, pull through all 4 loops on hook.

Little Eggie is made in rounds. Do not join rounds, use a stitch marker to mark the start of a round - a small piece of different coloured yarn placed under the stitch at the start of the round will do.

Round 1: Ch 2, work 6 sc into 1st ch - 6 st.
Round 2: 2 sc in each st around - 12 st.
Round 3: [2sc in next st, sc in next 3 st] 3 times – 15 st.
Round 4: [2sc in next st, sc in next 2 st] 5 times – 20 st.
Round 5 – 6: (2 rounds) Sc in each st around – 20 st.
Round 7: [2sc in next st, sc in next 3 st] 5 times – 25 st.
Round 8 – 10: (3 rounds) Sc in each st around – 25 st.
Round 11: Sc in next 6 st, [make arm: ss into next st, ch 7, 3 dc bob into 2nd ch from hook, ss into next 5 ch, ss back into original st], sc in next 11 st, [make arm as before], sc in next 6 st - 25 st.
Round 12: Sc in each st around – 25 st (you sc into the first ss used to make each arm).

Fit eyes between rounds 9 and 10.

Round 13 – 15: (3 rounds) Sc in each st around – 25 st.
Round 16: [Sc2tog, sc in next 3 st] 5 times – 20 st.
Round 17: Sc2tog, sc in next 2 st, sc2tog, [make leg using the same method as the arm], sc in next st, sc2tog, sc in next 2 st, sc2tog, [make leg], sc in next st, sc2tog, sc in next 2 st – 15 st.

Stuff Eggie and embroider mouth.

Round 18: [Sc2tog, sc in next st] 5 times – 10 st.
Round 19: [Sc2tog] 5 times – 5 sc. FO.

Complete stuffing and sew up hole neatly.